FIOS Quantum
 FIOS Quantum: a reader asks…
I just got new boxes from Verizon FIOS, I was talked into upgrading my TV service to their Quantum after asking if they had smaller cable boxes. So I got the boxes and want to know how I should go about doing the upgrade, they delivered the boxes and said it’s “self-install”. My main TV (Samsung) has the cable box connected and also my Onkyo home theater receiver which handles the audio from the TV. Any advice?
Sure! Likely you received in the boxes a FIOS Quantum Media gateway box that has the media server (your DVR). And you may have received one or more smaller media boxes for the other TVs in your house. Each one came with a remote that can control both the cable box and your TV. Let’s start with the main TV. One caveat, the remote that the media server came with only controls the FIOS service and your Samsung TV. It will not control the volume on your Onkyo receiver (since it’s a 3rd device and the remote is a 2-device remote). So you’ll still need your Onkyo remote to change the volume.
Unpack the new Quantum media server and you’ll have the media server, its power cord (2-piece, a power adapter with cable that goes to the back of the media server and the other cable that connects your electrical outlet to the power adapter) and the remote. You should also see a paper placard with instructions for how to hook things up, but I can give you the short version:
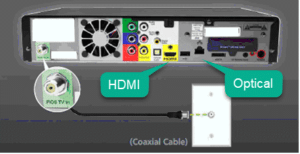
 Unplug the existing FIOS box, noting that you have a coax cable, an HDMI cable, and a power cable. You might also have an optical cable (that goes to the Onkyo receiver). You’ll be using all the same cables except for the power cable.
- Pull out the old cable box and put the new Quantum media server in its place, plugging the HDMI cable in, and screwing in the coax cable to the IN port (it may have both an IN and an OUT).
- Turn on your TV, then plug the new electrical power adapter into the wall outlet and the back of the Quantum Media server.
At this point, it’s mostly just waiting while the new media server connects to FIOS and programs itself. You will be prompted to name the server (choose any of the offered descriptive names) and you may also be asked if you want to copy over the settings from the old box (which are stored in the FIOS cloud), which you can say YES to or not, your choice. Those settings include any favorite channels you’d set on the old box and any Parental Control PIN you might have set. Other than those two choices the installation and setup is pretty automatic. At the end you may see some widget and other offerings, you can keep pressing the Exit button on your remote until you are watching live TV and then you’re done with the initial setup.
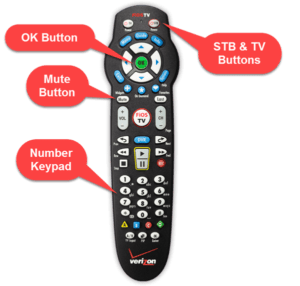
 Next you’ll want to program the new remote control so it can turn your TV on and off. Insert the batteries and then refer to the printed fold-out manual to find the three-digit code for your Samsung TV. Now you can program the remote, either following the instructions on the manual, or my short version:
- Press the OK and the number zero (0) button at the same time and then release. The red light at the top should blink and then stay on.
- Press in the 3 digit code for Samsung
- Press the channel up button once every 2 seconds until the TV turns off. Verify that the TV button at the top of the remote will turn the TV back on and then press the OK button to complete the programming
If in step 3, the TV button doesn’t turn the TV back on again, turn on the TV manually and repeat step 3 till the TV turns off (and the remote TV button turns it back on), then press OK. Just FYI, the STB button at the top is for your FIOS Gateway box.
If you don’t want the hassle of using multiple remotes (Onkyo for volume and FIOS for everything else), then you can purchase a different remote to control everything. You can buy and use the pricey Logitech Harmony Elite (or the cheaper Harmony 650) remote, or buy a multi-device remote from Verizon. The advantage of the latter is that you’ll have the dedicated buttons for managing all the FIOS functions.
You’re going to repeat the above two processes with each of the other FIOS boxes for your other TVs. If they use the internal TV speakers for sound, then make sure that when you program the remote, the volume up/down buttons work as well as the TV power button.
That takes care of the Quantum service installation, now you can enjoy the improved service from Verizon. Some of the new benefits:
 Any of the TVs can record programs, setup series recordings, and play back content from the media center DVR.
- You can also play back DVR recordings on your tablet or smartphone (with the Verizon Watch Fios TV Everywhere app), and you can also set recordings and series recordings right from your mobile device.
- Recording a TV show is so easy, from the on-screen guide navigate to a channel and time that has the show or movie you want to record, and then press the red REC button. I know this is just like it was before, but now you can do it from any TV in the house
- The new DVR has a lot more capability than the old one, you can record up to 12 different channels at the same time and the DVR capacity is much larger (200 hours of HD content)
- Watching live TV is better, you can pause, back up and move forward (up to the live moment). This is great for replaying the last few seconds or minutes if you missed something.
- If you want to play around with voice-command, a cheap ($50) Amazon Echo Dot can be easily setup to control your FIOS Gateway service using your voice. Change channels, pause, rewind, fast-forward, and even search for shows.
- If you have a Netflix account, you can find it right on the FIOS on-screen guide. Login the first time and the FIOS Quantum system will remember that so you can quickly watch Netflix shows and movies without needing another device.
- If you have FIOS phone service as well, you’ll notice that the TVs (when turned on) will briefly show you caller ID information when the phone rings. If you use the FIOS app on your smartphone you will also get a notification of incoming calls.
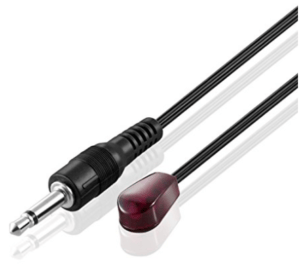
 One last note, if you want to hide the cable box behind the TV or in a cabinet, you’ll need an IR extender such as this one from Amazon for $7. There’s a plug in the back of the FIOS Quantum box that the IR extender will plug into, and you can stick the IR extender’s sensor anywhere you want – I suggest the bottom bezel of the TV in the middle as that’s where most people point their remote when using it. The only thing you lose is being able to see the face of the FIOS gateway, which shows the current time, as well as the channel when you’re changing channels. But you can get that easily by using the on-screen guide, which shows the current time as well as the channel and program you’re watching. I use the on-screen guide to change channels.
This website runs on a patronage model. If you find my answers of value, please consider supporting me by sending any dollar amount via:
or by mailing a check/cash to PosiTek.net LLC 1934 Old Gallows Road, Suite 350, Tysons Corner VA 22182. I am not a non-profit, but your support helps me to continue delivering advice and consumer technology support to the public. Thanks!
 Unplug the existing FIOS box, noting that you have a coax cable, an HDMI cable, and a power cable. You might also have an optical cable (that goes to the Onkyo receiver). You’ll be using all the same cables except for the power cable.


