Laptop Battery Sippy Cup
 Laptop Battery Sippy Cup: a reader asks…
Hello Coach, can you give me some tips on how to make my laptop’s new battery last longer? I have a 2-year old Dell laptop running Windows 10, and the original battery never gave me much time before needing a recharge. And here only 3 years later the actual time I got on battery was so short that I just gave up using it without being plugged in. Not great for a supposedly mobile laptop! So I just bought a replacement battery and want to do whatever I can to keep that one from going the same way. Thanks in advance for your advice!
Battery life has long been an unfortunate bugaboo for mobile computer users as well as anyone using devices that run on batteries. The problem is physics – there’s only so much power that a battery can hold (proportional to its size as well as its chemical makeup), and there’s only so many charge/discharge cycles the battery can undergo before it has to be replaced. But there are things you can do to prolong both how long the battery lasts between charges, and how long the battery can give you good performance before needing to be replaced.
Tip: Please note that all the advice I’m giving below is for modern Lithium-Ion batteries, older NiCD or NiMH batteries have different chemistry and different rules.
When it comes to how long a charge will last, you certainly want to take steps to reduce your power consumption in your laptop (while running on battery). Your goal here is to get your laptop to use the least amount of power needed. Sort of like a sippy cup keeps a toddler’s drinking controlled to avoid spills. Ok, I’m reaching here… As mentioned in my Digital Life Security checklist, you want to adjust your power options. Here’s more precisely what you should do:
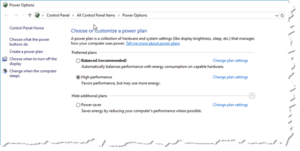
 Click Start, type “power & sleep” and hit your keyboard’s Enter key. That opens up the new settings window with only two power options on it. Click the link on the right side “Additional Power Settings” to open up the Control Panel where you choose a power plan. You should see several plans and a link to ‘Show Additional Plans’. You want to click that so you can see all the other power plans.
- Choose the High Performance (not the Power Saver), and then click the link to “Change Plan Settings”
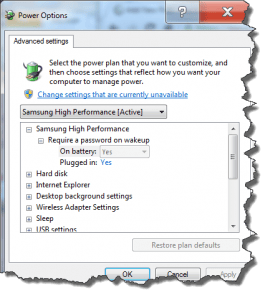
- Click the link to ‘Change advanced power settings’, which opens a new, smaller window. Near the top of this window you might see a link ‘Change settings that are currently unavailable’, so click that. You will probably have to click your UAC warning box to allow yourself to make changes to the computer.
Now you’re ready to go down the list and make custom settings to maximize your battery life. But not at the expense of performance (as the Power Saver plan would do). Here’s what you should change (going down the list on the window):
 Hard Disk/Turn off hard disk after: replace number entries for both battery and plugged in to both show 0 (zero). You don’t want to spin down the hard drive ever. It only saves a teensy amount of juice, and really slows down your computing experience.
- Internet Explorer/JavaScript Timer Frequency: change the On battery setting to Maximum Power Savings
- Desktop background settings/Slide show: change the On battery setting to Paused
- Wireless Adapter Settings/Power Saving Mode: change the On battery setting to Medium Power saving
- Sleep/Sleep after: make sure both say Never (put 0 minutes in to replace anything else)
- Sleep/Allow hybrid sleep: set both to Off
- Sleep/Hibernate after: set On Battery to 25 minutes or less (plugged in should be Never)
- Sleep/Allow wake Timers: change the On battery setting to Disable
- USB Settings/USB Selective Suspend Setting: change the On battery setting to Enabled
- Power Buttons and Lid/Lid close action: set On battery to Hibernate (plugged in to Do nothing)
- Power Buttons and Lid/Power button action: set On battery to Hibernate (plugged in to Shut down)
- Power Buttons and Lid/Sleep button action: set both to Do nothing
- PCI Express/Link state power management: set On battery to Moderate power savings
- Display/Dim display after: set On battery to 2 minutes
- Display/Turn off display after: set On battery to 5 minutes
- Display/Display brightness: set On battery to 20%, or 35% (or no more than 50%)
- Display/Dimmed display brightness: set On battery to 0% (or no more than 15%)
- Multimedia settings/When sharing media: set On battery to Allow the computer to enter away mode
- Multimedia settings/When playing video: set On battery to Optimize power savings
- Battery/Critical battery action: set On battery to Hibernate
 Notice I switch all opportunities for Sleep mode into Hibernate. No matter what version of Microsoft Windows you use, Sleep mode is probably the most bug-ridden. Many programs won’t work right on a computer in Sleep mode (think auto-updates and update checkers) and those problems can multiply to the point they crash the program (or computer). Besides, Sleep mode can be dangerous for a Windows laptop: in Sleep mode the computer is still running and generating heat. Throw your sleeping laptop into a bag to transport it, and it can easily overheat. And yes, this is still true in Windows 10. Hibernate mode is much safer as the computer is fully powered off, yet still starts up quicker than a normal shutdown/restart sequence (hibernate mode is more akin to Apple Macbook’s Sleep mode).
With the above settings, you should get quite a bit longer work time between charges – mostly because the display brightness settings are turned way down. Your display is the biggest power hog on the computer. You can extend power savings even further by only having one program or window open at a time, the more work your computer is doing (most of it in the background) the harder your processor has to work. This generates more heat, and heat is a big factor in battery performance. Go even further by turning off your Wi-fi and/or Bluetooth radio when you don’t need it (sometimes a hardware button on your laptop, sometimes a Fn and F-key combination press).
 About heat: The cooler your battery is, the longer it’ll last, both between charges and in its service life. Laptops are notorious for having poor air circulation (those small fans and air holes on the underside), so you’ll want to keep them off your actual lap at all times – adding your body heat to the laptop compounds the heat generation. Keep the laptop off of soft surfaces (like tablecloths) which can reduce airflow to the cooling fans. And get a can of compressed air and (with the laptop turned off and do this outside) blow air through every opening in the sides and bottom of the laptop to keep the air channels and fan blades clear of dust. You should do this once every few months, more often if you have pets or are in dusty environments a lot.
So the above heat warning is primary to increasing the longevity of your battery – the number of months or years before you have to replace the battery. Leaving your laptop (even if powered off) in the sun or inside a hot car can reduce both its charge cyle and service life by 20-50%. Even if you don’t do this every day, the more exposure to heat, the quicker your battery will die.
Other things you can do to increase the service life of your laptop’s battery:
- Only use the battery charger that came with the laptop (or a factory replacement). Third-party chargers may overcharge the battery, shortening its life and possibly causing a fire or explosion. Skip the so-called ‘fast’ chargers – even if they’re high quality they wear the battery out quicker.
- Don’t leave your laptop plugged in to the charger all the time, charge the battery and then unplug it. Smart circuitry in some brands/models of laptop and charger will automatically turn off when the battery is topped up, then wait till the battery has run part-way down before turning back on.
 Never let the battery run all the way down. If your battery gets to 20%, plug the laptop into electrical power, or shut it down. Using the battery below 20% should only be used in an emergency. If this is your habit (to always have an emergency), then invest in a spare battery or change your habit.
- A spare battery is always a good low-cost way to maximize your on-battery time. Modern Lithium Ion batteries don’t self-discharge quickly – they only lose about 5% in the first day, then about 2% each month thereafter when not being used.
By the way, these tips are good for any device that has a Li-ion battery, including smartphones. Remember that heat is your enemy, so avoid it! But don’t toss your device or battery into the freezer, batteries don’t work well in temperatures below freezing either! For more tips on smartphones, check out these two articles: Iphone Battery Life Tips and Android battery life sucks.
This website runs on a patronage model. If you find my answers of value, please consider supporting me by sending any dollar amount via:
or by mailing a check/cash to PosiTek.net LLC 1934 Old Gallows Road, Suite 350, Tysons Corner VA 22182. I am not a non-profit, but your support helps me to continue delivering advice and consumer technology support to the public. Thanks!
 Click Start, type “power & sleep” and hit your keyboard’s Enter key. That opens up the new settings window with only two power options on it. Click the link on the right side “Additional Power Settings” to open up the Control Panel where you choose a power plan. You should see several plans and a link to ‘Show Additional Plans’. You want to click that so you can see all the other power plans.
 Hard Disk/Turn off hard disk after: replace number entries for both battery and plugged in to both show 0 (zero). You don’t want to spin down the hard drive ever. It only saves a teensy amount of juice, and really slows down your computing experience.
 Never let the battery run all the way down. If your battery gets to 20%, plug the laptop into electrical power, or shut it down. Using the battery below 20% should only be used in an emergency. If this is your habit (to always have an emergency), then invest in a spare battery or change your habit.


