Mac Wipe
 Mac Wipe: a reader asks…
I have a late 2006 iMac, the white, 20″ screen that I’d like to send for recycling. Can you tell me what to do to make sure my personal data is wiped clean?
Anytime you want to send old computers off for recycling you need to first make sure that your personal data is wiped. In most cases it’s not enough to simply reformat the hard drive, since that doesn’t actually erase the data, and it’s possible for someone to ‘unformat’ your hard drive and regain access to your personal files. So what you want to do is securely erase the hard drive to make sure nobody can get to your info.
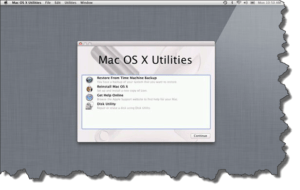
 With a Mac, that’s fairly easy. Start with your iMac turned off. On the keyboard, hold down the command and R keys and press the power button. Keep holding down the command and R keys until you see the Apple logo, then let go. Now wait a few seconds until the Mac OS X Utilities menu comes up. The menu items are your recovery tools, and there are several options.
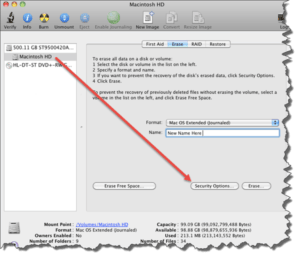
Click the Disk Utility menu item and press the Continue button. On the left-side of the Disk Utility screen, click to select the Macintosh HD, your hard drive. Then on the right-side, click the Erase tab. On the Erase tab screen, you’ll see some instructions, and some boxes and buttons. The Format box should already be selected with Mac OS Extended (Journaled). The Name box can be as it was (Macintosh HD), or you can name it anything you like. At the bottom is an Erase button, but before you click that, click the Security Options button. If you just clicked the Erase button, you would remove the partition, but not necessarily securely wipe all your files.
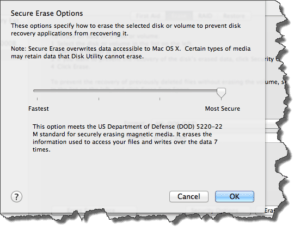
 The Security Options are quite simple, you see a slider that goes from Fastest to Most Secure. You want to move the slider over to the right. How far depends on your desire for security balanced against how much time you want this to take. At each stop on the sliding scale, text will appear telling you what that level of security does. For most people, the first or second stop is fine, the first stop can take 8 hours or more. If you want the Most Secure method, be aware that it may take a number of days to complete. Don’t worry as you’re not going to watch this, set the slider to one of the stops or all the way to the right, press OK, and then press the Erase button. You’ll need to confirm that you want to do this, and then you can go do something else for an hour up to several days (depends on the size of the hard drive).
Once the secure erase is done, you can shut down the iMac and safely send it off to recycling, nobody will ever be able to get to the files that were there.
If you would like to go a step further and get the iMac prepared for someone else to use, you can return to the Mac OS X Utilities and choose the Reinstall Mac OS X option. Please note that in order to do this, you must provide your Apple ID and password so that Apple can verify your ID owns the appropriate OS X license. Follow the on-screen instructions – this can take an hour or more. Once it’s done, you’ll see the initial Mac setup screen. You can shut down the iMac at this point, you don’t need to setup a user account.
This website runs on a patronage model. If you find my answers of value, please consider supporting me by sending any dollar amount via:
or by mailing a check/cash to PosiTek.net LLC 1934 Old Gallows Road, Suite 350, Tysons Corner VA 22182. I am not a non-profit, but your support helps me to continue delivering advice and consumer technology support to the public. Thanks!


