Windows 10 Standard User
 Windows 10 Standard User: a reader asks…
I have a new computer with Windows 10 on it. Everybody says to use a ‘Standard’ account for everyday use, and don’t log into your ‘Administrator’ account. I know I could do this easily in Windows 7, but I’m stumped on what to do in Windows 10. Can you point me in the right direction?
Microsoft really has made things both easier and harder for folks with Windows 10. Likely you created a Microsoft account when you first set up your new computer, and it’s the only account on your computer – so it’s currently an Administrator account. So when you go to create a new user account in Windows 10, the screen you see doesn’t make it clear what to choose. So here’s what I’d suggest: create a new Administrative account (local account), then go back and change your original account to a Standard account. That way you can keep using the account you already started working under, but have the protection benefit of it being just a standard account. Here’s how:
 Create a new, local user account and make it an Administrator:
- Click Start, then click Settings, then click Accounts. On the left-side pane, click ‘Family and Other Users’. Under ‘Other users’ (on the right-side) click ‘Add someone else to this PC’.
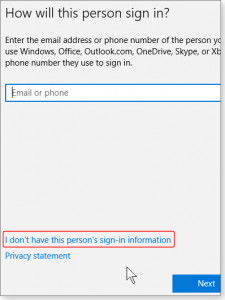
- Click the link near the bottom of the ‘How will this person sign in?’ window, click ‘I don’t have this person’s sign-in information’. When the new User window opens, don’t fill it out, click the link near the bottom ‘Add a user without a Microsoft Account’.
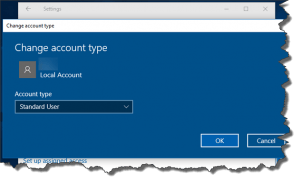
- Give that new account a username (such as “Admin”) and a password (not the same as your user account). Click Next and you’re back to the Accounts window. Click once on the Admin Account and click ‘Change Account type’. Click open the box that says “Standard User” and change it to Administrator, then click OK.
Change your original account to a Standard User:
- Sign out of your account (click Start, then your picture at the top of the start menu, then ‘Sign out’). Sign into the new Admin account you created above.
- Click Start, then click Settings, then click Accounts. On the left-side pane, click ‘Family and Other Users’. Under ‘Other users’ (on the right side) click on your original account, then click ‘Change account type’.
- Click open the box that says ‘Administrator’ and choose ‘Standard User’, then click OK.
Now you can sign out of the Admin account and back into your original account. Anytime you need Administrative privileges, you’ll have to provide the Admin account password. This may seem like a minor change and an inconvenience, but that extra step can help you protect yourself from inadvertently installing malware or otherwise opening your computer up for viruses and other problems.
If by chance you’d read my article about creating a local account instead of a Microsoft account when you first setup your new PC, then you still want to follow the instructions above to create a local administrative account and change your local account to a Standard User. Same as the instructions above.
This website runs on a patronage model. If you find my answers of value, please consider supporting me by sending any dollar amount via:
or by mailing a check/cash to PosiTek.net LLC 1934 Old Gallows Road, Suite 350, Tysons Corner VA 22182. I am not a non-profit, but your support helps me to continue delivering advice and consumer technology support to the public. Thanks!


