I’m a “prosumer” photographer, now using my iPhone 14 Pro to take photos. I prefer to take photos in RAW format and edit them on my PC using Photoshop, but am having trouble transferring those RAW photos to my PC for editing. I’ve tried using the OneDrive app on my iPhone to upload photos, but they keep coming across as compressed .JPG files instead of the uncompressed .DNG format. Is there a way to easily get my photos from my iPhone camera roll to the PC without them being converted?
Actually, there are two ways. The first way is automatic, and happens in the background. The second way is manual, and you do this for each photo or set of photos you want to transfer. The advantage of the first method is that it happens without you having to do anything, the disadvantage is that the actual transfer may not occur immediately. The advantage of the second method is that you have access to the RAW photos on your computer immediately after you transfer them, the disadvantage is you have to do the work of getting them transferred.
On to the first method: Install the iCloud app on your PC. Get this from the Microsoft Store. Download and install it, then log into the same Apple ID you use on your iPhone. In the iCloud app settings, be sure to check the Photos box, and click the Options button to check both boxes and note the location of the iCloud photos repository. On your iPhone, make sure you also have the iCloud Photos switch enabled (Settings>Photos> slide the iCloud Photos slider to On).
The iCloud app will automatically then put all the photos on your camera roll onto your PC in the iCloud Photos location on your PC. You can look in File Explorer and you’ll see an icon on the left-side folder list called “iCloud Photos”. Remember this folder synchronizes with your iPhone’s camera roll in the background, so it may take some time for the initial synchronization to complete, and when you take a photo with your iPhone, it may take some time to show up on your PC. Also, you can set your iCloud Photos folder on the PC to either save the actual files in the cloud, or copy them to your PC. Choose the latter if your PC’s hard drive has plenty of space.
When you make changes to a photo on your PC, you’ll see that you can’t simply save the changes and overwrite the .DNG file, you have to create either a .TIF, or some other format. If you save that photo in the same location as the original, it will also show up on your iPhone’s camera roll.
Advertisement
If you don’t want to copy all photos from the iPhone’s camera roll to your PC, the second method is for you. In this method, you have to remember a few caveats:
You must have the OneDrive app on your iPhone, and it must be logged into the same Microsoft account as your PC’s OneDrive app.
Your iPhone’s camera app must be set to save as “Most compatible”, not “High efficiency”. On the iPhone, tap Settings>Camera>Formats> and check Most compatible.
You also have to have the Apple ProRAW setting turned on (in the same menu).
A restriction on shooting and editing photos on the iPhone: When taking a photo, be sure to tap the RAW button in the Camera app to remove the slash so that you’re taking a RAW photo. Also, you cannot add a caption or make any changes to the photo you took on the iPhone. Make all changes after the photo is on your computer. The primary reason is that the iPhone automatically assumes that when you change anything in your camera roll, you are preparing the image for use elsehwere and changes the photo to a .JPG format.
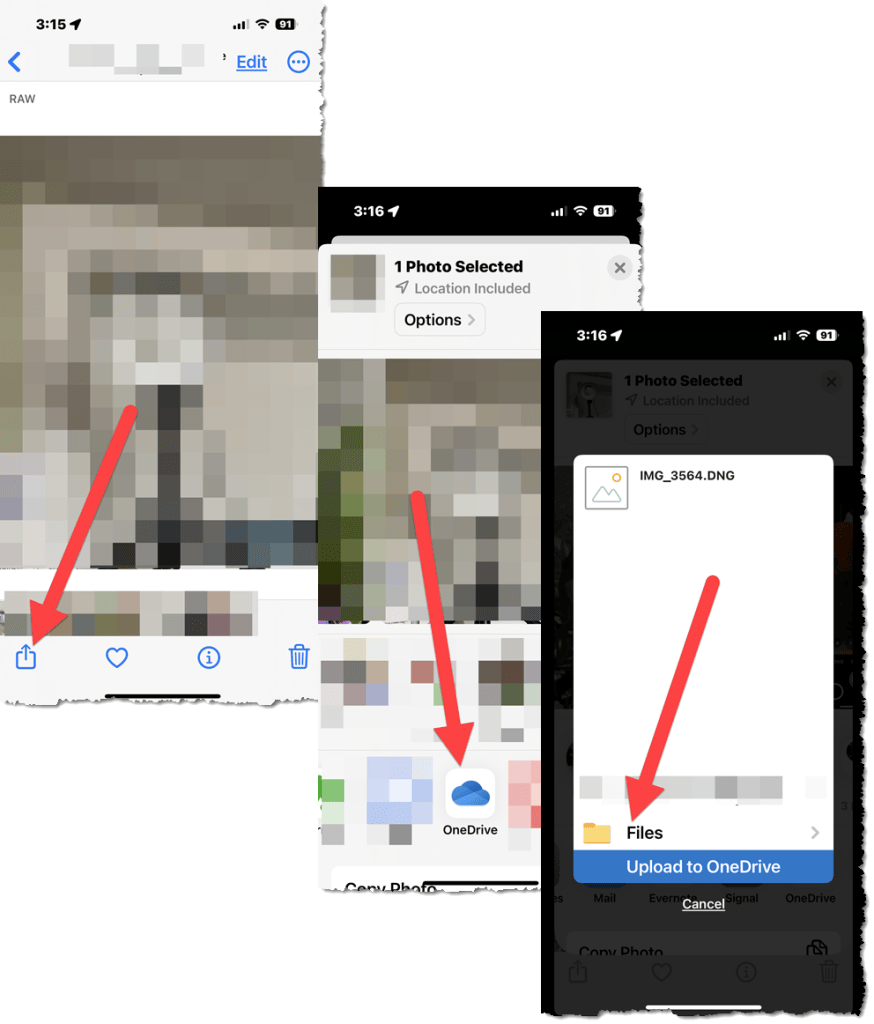
The way to get the .DNG file transferred to your PC is to use the Apple Photos app’s Share button (do not use the iPhone’s OneDrive app to transfer photos). After you’ve taken your RAW photo(s), open the Photos app. Tap to select the RAW photo (or tap the Select button and tap multiple RAW photos to select them all), and then tap the Share button at the bottom-left of your iPhone screen. Scroll to select the OneDrive icon, and you’ll see the img file with the .DNG exension. Tap the Upload to OneDrive button to start the transfer. Please note that DNG files are quite large, so the upload may take some time.
Viola, you now have the .DNG file(s) in your OneDrive folder, ready for you to open and edit in Photoshop on your PC.
Either of these methods will give you the RAW photo file on your PC, ready for you to edit and create your output format. You can use Photoshop to crop, retouch, rename, etc., and then select the appropriate format for the edited photo.
This website runs on a patronage model. If you find my answers of value, please consider supporting me by sending any dollar amount via:
(@PosiTek)
(Support@PosiTek.net)
(using any credit card)
or by mailing a check/cash to PosiTek.net LLC 1934 Old Gallows Road, Suite 350, Tysons Corner VA 22182. I am not a non-profit, but your support helps me to continue delivering advice and consumer technology support to the public. Thanks!
Author: Chris Gardner
Your Tech Coach at PosiTek.net
There are currently 1295 reader comments on published articles, care to join in? Use the Leave a Comment form below/at the bottom of any existing comments. This is a good place to ask follow-on questions on this subject.
"I'm all about helping you deal with our 21st century high-tech digital world so you can enjoy a healthy and secure digital life!"
About Me
Hi! I'm Chris Gardner, Your Tech Coach giving you Practical Help for Your Digital Life® since 1996. My job is to translate geek-speak into clear and concise advice and give you easy-to-understand how-to's and instructions about your consumer technology products and services.
Browse my library with over 1,000 of the types of questions and answers we all have about our consumer technology. Better yet, use the search bar above or pick a subject or keyword below to see a list of related posts you can read. And please sign up for my freeweekly digest and occasional email alerts!
If you don't find the answer to your question in my library, ask me a question - anything about consumer technology. I answer questions large and small, from how to use Siri on an iPhone to how to protect your computer, tablet or smartphone. I take arcane language from manuals and translate that into easy-to-follow instructions. This gives you better ways to use your consumer technology - helping you get more out of the gadgets and services you already own and use.
I provide all the above, supported by my readers who find my answers valuable (patronage model). Please consider supporting me by sending any amount via (send to @PosiTek), or via (send to Support@PosiTek.net), or via using any credit card (no Paypal account required), or by mailing a check or cash to PosiTek.net LLC 1934 Old Gallows Road, Suite 350, Tysons Corner VA 22182.
I am not a non-profit, but your support helps me to continue delivering advice and consumer technology support to the public.
If you need more immediate or direct support, please see my 1-on-1 Tech Support page. I don't profess to know everything about everything, but I'm great at finding and giving you exactly the right answer in the way you need to hear it. Give me a try and let Your Tech Coach help you get your technology working for you, not the other way around!
The information presented on this website and referred to in various social networking channels are the considered opinions of the authors. We accept no advertising, kickbacks or any sort of remuneration for any commercial products or services that we recommend or suggest. Furthermore, posts or links to external websites or other content do not imply endorsement, unless explicitly stated.
Any elements on this website that may be linked to or displayed, including trademarks and product/service images, are for educational purposes only under fair use copyright law. PosiTek.net LLC purchases licensing for commercial imagery used on this website via Shutterstock.com and any other imagery is licensed for our use via:


")


