Attach photo to Mac email
 Attach photo to Mac email: a reader asks…
I use a Macbook Air with the Apple Photos app. The only problem I have is when I try to attach a photo to an outgoing email, I tried but it won’t get to my photos library. What can I do?
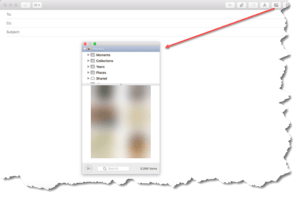
I’m guessing your Photos library file is pretty large, which can delay things if you don’t already have the Photos app running. If you’re using Mac Mail for email, then there is a photo browser button near the top-right of the app window that will quickly let you choose from photos in your library. It works even faster if your Photos app is running. You can tell if an app is running in the background because you’ll see a dot below the app icon in your dock.
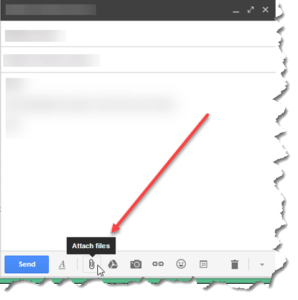
 If you use Webmail, things are a bit more complicated. This is because the Apple Photos app hides your photos inside the photos library file, which is really just a big database file. The actual photos files are stored in hidden sub-folders. You can navigate to your original photos by right-clicking/2-finger tapping on the Photos Library file in your Pictures folder, then selecting Show Package Contents. That opens up the library sub-folders. Open the Masters folder, and you can continue diving down in the sub-folders to find photos. But please note that this is horribly slow because the Photos app creates a separate folder and sub-folder structure for years, months and days in the month, with further sub-folders if you took photos at different times of the day.
Using Webmail, it would probably be simpler to first run the Photos app, find and export the photo(s) you want to share via email, and then attach the exported files to an email. You can save the exported files to your desktop or the Pictures folder temporarily until you’ve finished attaching and sending the email. Then, don’t forget to delete those exported photos because the originals are still in the hidden folders within the Photos library.
Other mail applications (like MS Outlook) have the same problem in that you attach a specific file. Only the Apple Mail app (included in all versions of MacOS and OS X) has the ability to look within the Photos library and let you browse for photos. This avoids the issue of having to export a photo from the Photos app in order to use it outside of the Photos app.
This website runs on a patronage model. If you find my answers of value, please consider supporting me by sending any dollar amount via:
or by mailing a check/cash to PosiTek.net LLC 1934 Old Gallows Road, Suite 350, Tysons Corner VA 22182. I am not a non-profit, but your support helps me to continue delivering advice and consumer technology support to the public. Thanks!


This was worthless. You didn’t tell how! I have the mail I’m composing, I clicked to have the Photos window open. There are the photos. HOW DO I GET THEM INTO THE EMAIL?! I clicked the image I wanted. Didn’t appear. Double-clicked it. Didn’t appear. Thought “Maybe I have to close the window with the photo selected.” Closed the window. Didn’t appear. Re-opened it. Selected my photo. Double-clicked it. Didn’t appear but the image got larger. Wondered what the secret might be. Clicked the rightward pointing arrow at the bottom. Didn’t appear. Different photo appeared in the photo window. Went back and re-selected the photo I wanted. Still didn’t appear. Decided to search how to add a photo on the web. Got a video on how to do it with Leopard! Useless for Big Sur. Came to your website which said to click the button to get the photo window. I’d already done that BEFORE I realized I had a problem!!!! Try to tell what you’re claiming to tell!
Hi Malcolm, thanks for your question, although I think your “worthless” determination is flat-out wrong. You may not have noticed that the article (written in 2017) was asking about why photos didn’t show up in the Mac Mail app’s Photos popup. The answer to that question is in the first paragraph of the article, e.g., have the Apple Photos app running in the background before you try to add a photo to an email. Meaning I did tell what I was claiming to tell…
You have the photos populated in the email’s Photos popup, but you don’t know how to get them into the body of the email. The answer to that question is: Both Mac and Windows computers have a common mechanism for moving or copying an object (like a photo) from one window to another – it’s called “drag-and-drop” (wiki on this is at https://en.wikipedia.org/wiki/Drag_and_drop). This mechanism has existed on macOS practically since the first Mac computer was released, so it’s not really a secret…
Here’s how to do this (using a trackpad): With your draft email open, click the icon at the top-right and open the Photos popup. Wait until the image icons show up (it may take a shorter or longer time depending on the size of your photo library). Locate the picture you want to add to your email. Click-and-hold on that picture icon (using one finger), then drag the picture to the body section of the email and then release your finger(s) from the trackpad.
You can use one finger to press down on the trackpad to select the photo and, while holding that finger down, drag it to the other window. Alternatively, you can use one finger to press down on the trackpad to select the photo, and another finger to slide across the trackpad, dragging the icon to the other window (while keeping the first finger held down on the trackpad).
If using a mouse, click and hold down the left-button with the cursor over the photo you want, and drag the cursor (moving the mouse with the button held down) to the body of the email, then leg go the mouse button.
One other aspect to this mechanism on the macOS Mail app: You can set whether you want the photo to be placed “embedded” within the text (with some text before and some after the photo), or if you want the photo (or all photos) to be attached at the end of the email message. Do this is by using the menu setting Edit > Attachments and either checking or unchecking the “Insert Attachments at End” option. This is like a light switch, click that menu item once to turn it on (if it’s not checked) or off (if it’s checked).