
Color-code Outlook
 Color-code Outlook: a reader asks…
I use Outlook 2016 and use that to collect email from several different email accounts. Sometimes I have email forwarded from a secondary account to a primary account, and sometimes I have Outlook poll the secondary account directly. I like having all mail come to one inbox but it can get a little confusing at times as to which emails came from where. Is there an easy way to differentiate the emails based on what account they were sent to?
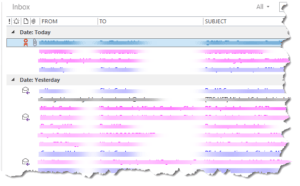
I have two methods for you, you can use one or both. I think color-coding your inbox is the best way as it gives you an easy visual cue as to what comes from where. But a very simple method is to simply add the TO column to your list of inbox messages in Outlook. Looking at that list, there are column headers at the top for FROM, SUBJECT, RECEIVED, etc. It’s easy to add a column to that display. Here’s how:
 Place your cursor over any of the column headers and right-click to bring up a context-sensitive menu (this is the “what-can-I-do” list). Choose (left-click) the Field Chooser option to open a small box where you pick a field.
- Scroll down the list and click-and-hold your cursor on the TO item. You might have to change the list of fields from Frequently-used Fields to All Mail Fields in order to see the TO item.
- With your mouse button held down, drag the TO item from the Field Chooser into the header area at the top of the inbox. Red arrows will help you know the position that the TO field will be placed. I suggest you drop it in-between the FROM and SUBJECT columns.
 Place your cursor over any of the column headers and right-click to bring up a context-sensitive menu (this is the “what-can-I-do” list). Choose (left-click) the Field Chooser option to open a small box where you pick a field.
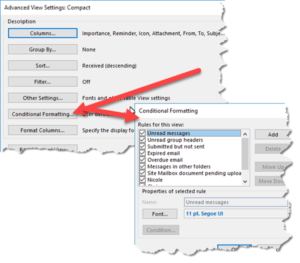 That’s easy and quick to do, and then you’ll see the address to which the email was sent easily. But that may not stand out for you easily, so in addition to that, I’d suggest you color-code your inbox messages by the account to which it was sent (which you can now see in the TO column). This involves a bit more work, which you have to repeat for each different account and/or color you want to use.
First, go to the View toolbar at the top of Outlook, so you can click on the View Settings ribbon bar button. That opens a smaller window called Advanced View Settings (with the type of selected view named). Click on the Conditional Formatting menu button which opens a Conditional Formatting window. Here’s where you’ll do the work to color-code emails.
- Click the Add button on the right to create a new entry. Call the new entry whatever you like, overwriting the “untitled” name that’s filled in and highlighted.
- Click the Font button to open a Font window and choose a different color by clicking open the drop-down list that’s initially set on “Black”. I like to stick with bold colors that will show up easily. The click the OK button to close the Font window.
- Now click the Condition button which opens a Filter window. You can fill in the Sent To box with the email address of your secondary account. Feel free to explore other conditions you can set (see the More Choices and Advanced Tabs). When done, click the OK button to close the Filter window.
To finish, click the OK button to close the Conditional Formatting window, and OK to close the Advanced View Settings window. Now all the emails in the inbox list that were sent to the secondary account will show up in the color you selected in #2 above. Repeat those 3 steps if you want to use a different color for your primary account, or just leave that one showing as the default black.
That’s all there is to it, and you’ll notice that unread messages remain bolded (but in the new color). Once you read them they will be unbolded (but in the new color as well).
This website runs on a patronage model. If you find my answers of value, please consider supporting me by sending any dollar amount via:
![]()
(@PosiTek)
![]()
(Support@PosiTek.net)
")
(using any credit card)
There are currently 1295 reader comments on published articles, care to join in? Use the Leave a Comment form below/at the bottom of any existing comments. This is a good place to ask follow-on questions on this subject.


