
Crowded Wi-fi
 Crowded Wi-fi: a reader asks…
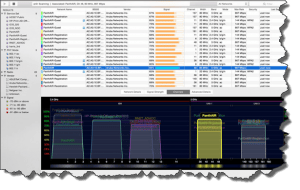
Hi Chris, I took your advice on figuring out why my home Wi-fi network is so spotty. I used the Acrylic Wi-fi snooper you suggested, and found that there are TONS of networks nearby. Here is what I get when running it for the first time; without even walking around with my laptop. Restarting my old Verizon FIOS router helped a little, but I still have lots of parts of the house with lousy or no Wi-fi coverage, even with an access point. What should I do now?
Wow, you have a crowded neighborhood! No wonder you’re having trouble connecting. Based on the screenshot you included, I’d say you might want to take a look at switching off your 2.4ghz Wi-fi network to a 5ghz Wi-fi network – there are just way too many 2.4ghz networks within range that are making things much harder for you in your house. Since the 5ghz band is newer, it’s usually not as crowded. Plus, the 5ghz band offers more channels than the 2.4ghz band. The downside is that the 5ghz signal doesn’t reach quite as far as the 2.4ghz signal, but you can solve that with Access Points (which you should do anyway to combat the crowded Wi-fi neighborhood). The other downside is that some equipment (mostly older computers, printers, etc.) only work wirelessly in the 2.4ghz band. So first you should check that all your wireless devices can use the 5ghz band.
 Assuming your various computers, etc. are 5ghz capable, then the first thing you’ll want to do is choose a replacement router. Ideally, you’ll want a dual-band (2.4ghz and 5ghz) model with multiple external antennas. Such as the Linksys WRT AC1900 or the Netgear Nighthawk AC1900. First take a look at your old router: does it connect to your FIOS network with a coax cable? That’s the round wire with a jack that screws into the back of the router. If that’s how you’re connected, then you might need to keep the old router, and just plug the new one into the old one. If instead your old router is connected to FIOS with an Ethernet cable (using the “WAN” port on the back of the router), then you can just switch out the old router for the new one. NOTE: If you are switching out routers, you might have to contact FIOS support (groan!) to get them to authorize that non-Verizon router. That’s just a matter of reading them the MAC address printed on the router (usually the underside).
Now you want to setup the new router to use both the 2.4ghz band and the 5ghz band. If your home Wi-fi network is called “Home” for example, you might want to call the 5ghz band “Home-5G” so you can connect to it with whatever devices have 5ghz capability. The rest will just connect to the 2.4ghz band. Either of the two routers I’ve suggested above have a easy to use management feature, just plug them in and then connect to the new network with your computer. You’ll log into the router control web page, and make these critical changes:
- change the password that’s needed to gain access to the router control web page
- change the SSID (Wi-fi network name) for both the 2.4ghz and 5ghz bands to something that fits your situation
- change the encryption passcode (and use WPA2) to something that’s not easily guessable.
 Now to Access Points: These devices can be used in various ways to extend your Wi-fi network. If you have a big house, you might want to put one on each floor. The best solution is to have an Ethernet wire that runs from the router up to a jack on each floor – connect your Access Point to that. You can use the Apple Airport Express, or a dual-band Access point like this one or this one. Similar to the router, they come with a placard and are fairly easy to setup. Similar to the router setup, you’ll want to change the password used to gain access to the control feature, as well as assign the same Wi-fi network name and passcode you used on the router – for each band.
How many access points you need depends on the size of your house. I generally like to place one access point on each floor (ideally in the center of the house), to give good overlapping coverage. That ensures there are no dead or weak spots. The strength of a Wi-fi signal drops quickly the more walls, floors, ceilings and furniture it has to travel from the router’s (or access point’s) antenna to your laptop, smartphone or other device. Wi-fi signal travel in a straight line, and can’t get through thick or dense walls or objects, especially metal. And it’s best if your Access Points have a wired (Ethernet) connection to your router. If your home doesn’t have Ethernet wiring, then you’ll have to use the Access Points in Wi-fi Extender mode (where the signals from Access Point to router are transmitted wirelessly).
 Because your neighborhood Wi-fi is so crowded, you might find a neighbor’s signal might be stronger than yours, especially if your router is in your basement, and your neighbor placed her router on the main floor near a window facing your house. The stronger signal will overpower the weaker signal, making it harder to have a good connection. Use the Acrylic Wi-fi snooper on your PC (or Wi-fi Explorer on your Mac) laptop and walk around the house, pausing in each room. Make a note of the signal strength of your Wi-fi network compared to others – yours should always be the strongest signal. If not, consider getting another Access Point.
In case you’re curious, you should always change the access password to these networking devices because the default passwords are published and if not changed, you’ve given hackers an easy way to crack into your home network.
Lastly, this is one situation where spending more money will give you a more solid wireless network at home. I prefer having more Access points than I need, so that the signal is very strong everywhere. In homes that are spread out, you might need an Access point at one end of the house and another at the other end.
This website runs on a patronage model. If you find my answers of value, please consider supporting me by sending any dollar amount via:
![]()
(@PosiTek)
![]()
(Support@PosiTek.net)
")
(using any credit card)
There are currently 1295 reader comments on published articles, care to join in? Use the Leave a Comment form below/at the bottom of any existing comments. This is a good place to ask follow-on questions on this subject.


