
Fighting Junk Email

Fighting Junk Email: a reader asks…
I’m inundated with spam! I get so much of it, way more than legitimate emails that I want to read. I’m using Outlook and know there’s a junk mail filter, but it seems like the spammers keep using different addresses and even if I mark emails as junk, they keep sending them to me and the junk mail filter doesn’t catch them. Is there anything more I can do?
Ok, this is going to take some explaining, so a longer article is needed to help you. Unfortunately, Outlook’s junk mail filter is a bit…primitive. Spammers know this and routinely figure out how to get around the filter. Microsoft is simply not keeping up (so far).
First off, marking an email address as junk is very easy in Outlook:
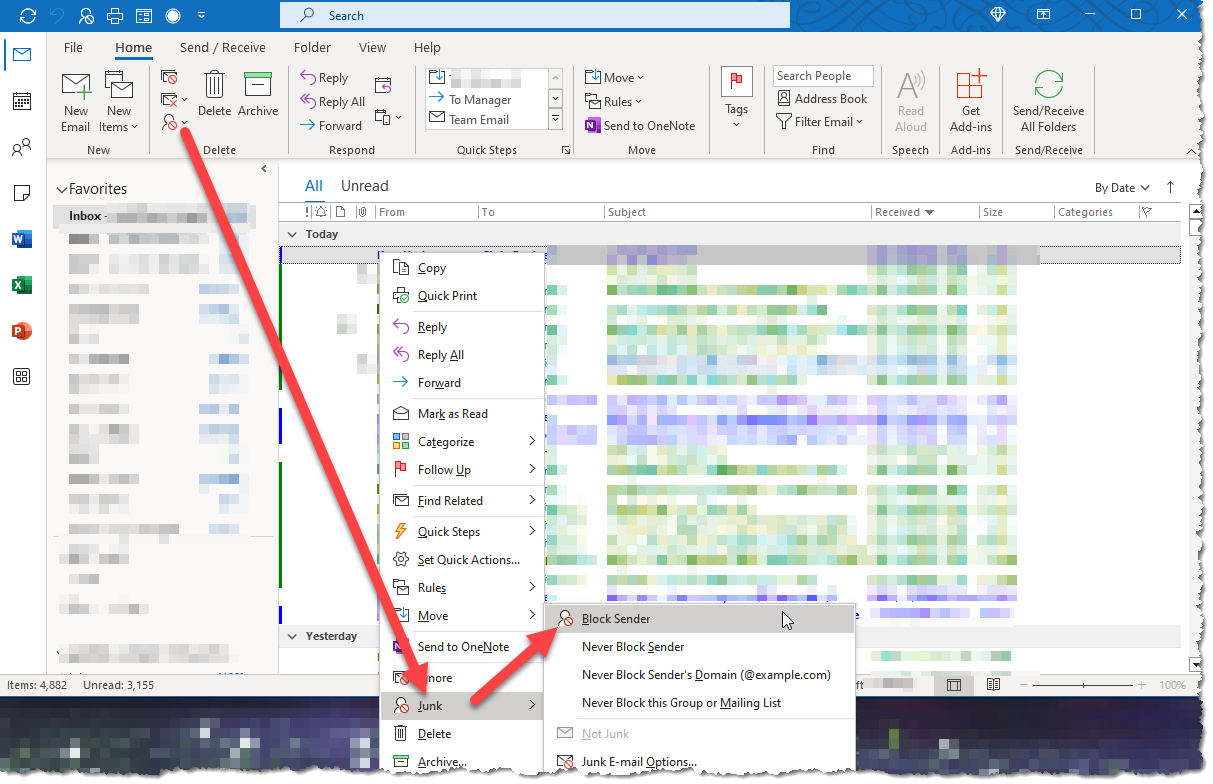
- From the Inbox list of emails, right-click on an email (2-finger click on a Mac touchpad) and hover your mouse over the menu item Junk, which brings up a sub-menu.
- Slide your cursor over to the right and click (left-mouse or 1-finger click) on Block Sender.
- This both sends the email directly to Junk Email and also adds the email address to your list of blocked senders.
You can make it even easier by adding a Block Sender icon to the area above the ribbon bar.
The biggest problem with this process is that you can only block the offending email address. Many/most times you’ll actually want to block the entire domain name. Spammers will often reuse a domain name with different user accounts sending the same junk email. You can block all that if you block the entire domain name, but Outlook doesn’t give you a button to do that (I wish they’d add that…).

So what do you do? What I do is go into my Junk E-Mail Options to the Blocked Senders list. I then painstakingly go through that list and for most items, I select the address, click the Edit button, and erase the @ symbol and everything to the left of that. This blocks the entire domain, so that any future emails from that domain are blocked.
This is a bit of a pain to do the first time as you probably have hundreds of blocked senders. So rather than doing the one-by-one method, this first time you should use a different method which I’ll outline below. Once you’ve done this, every week or two you can edit the blocked senders list by eyeballing the list and editing specific items (there will only be new ones you added to the list using the above Block Sender function). For those new entries, remove the email address part, leaving the domain name. This will make your junk mail filter enormously more effective, although spammers are constantly adding new domain names which they use to abuse email and annoy all of us. But it is an improvement!
This first time, you’re going to enlist the help of Excel’s Find and Replace function to go through the junk list and remove the email address part (the @ and everything to the left). First, you export your blocked senders list to a file, and then open that file in Excel. Here’s how to do that (starting in Outlook):
- In Outlook, click the Junk menu in the ribbon bar, then click Junk E-mail Options. That opens a window and click the Blocked Senders tab. Click the Export to File button and export the entire list to a file on your computer. I suggest you export that to your desktop, and call it junk.txt.
- Open Excel, and then click File > Open, navigate to your desktop and click open the little box to the right of the file name box (change that from “All Excel Files…” to “All Files…”). Now you’ll see all the files on your desktop, so click the junk.txt file and click the Open button at the bottom. You’ll see a conversion wizard and on that window click the Finish button. This will open that text file and convert each line to a cell in the first column.
Now you’re ready to start finding and replacing. You don’t want to replace all instances of the email address characters, since sometimes spammers use gmail.com, outlook.com, or other commerical domains that legitimate emailers also use. So you’re going to go down the list one by one and only replace the ones that aren’t domains belonging to people you know you want to hear from. We’re going to use the Find and Replace option in the Excel ribbon bar like this:

On the ribbon bar in the Editing section, click Find & Select, then click the Replace item on the resulting menu. That opens a little Find and Replace box that you’ll be using.
In the Find What box, type “*@” (without the quotes), which tells Excel to find anything with the @ symbol and which includes any characters to the left of that symbol. You don’t need to make any other changes to this window. The Replace with box is already blank, which is what you’re going to use.
Starting from the top entry, go down the list by clicking the Replace button for an item that you want to block the entire domain. If the item uses a standard commercial domain name (like gmail.com, outlook.com, etc.), click the Next button instead. Go through the entire list, clicking either the Replace or Next button till you get to the bottom. Yes, I know this is tedious, but less so than editing the list in Outlook directly. When you get to the bottom, click the Close button on the Find and Replace window to close that, and then click File > Save to save the junk.txt file. You can now close Excel.
Now go back to your Outlook window, you should still have the Junk Email Options box open to the Blocked Senders tab. Your next task is to delete all the entires in that list, and then import the junk.txt file you just finished editing, to repopulate the blocked senders list with your updated list of blocked domains (and some gmail.com, outlook.com, etc. email addresses). First, let’s clear the existing list:
- Click on the first entry. Scroll down to the bottom of the listing, either using your mouse wheel or using the vertical page bar (click and hold the square and drag it to the bottom).
- Hold down your keyboard’s left Shift key and then click on the last item on the list. This highlights all the items on the list.
- Click the Remove button. Your list is now empty.
To get the new junk list, click the Import from File button, and choose the junk.txt file (you may have to navigate in that window back to the desktop). then click Open. That’s it, you’ll see the entire list of domains (and some gmail.com, outlook.com, etc. email addresses) filling in that list. Click the Apply and OK buttons (or just the OK button), and you’re done.
From this point forward, you’re going to use the Junk > Block Sender button in Outlook just like before, either by right-clicking on an item in the Inbox list, or opening an email and using the ribbon bar’s Junk > Block Sender button. From time to time, as often as you want (although I try to do this weekly to save time), go back to the Blocked Senders list, scroll down it (in Outlook) and edit individual items that you’d recently blocked to remove the @ symbol and everything to the left of it.
I’m hopeful that at some point Microsoft will add more power to the junk mail filter. I think the best option is one Gmail uses, which is to crowd-source all their users’ actions when they use the Report Spam buttons on their Gmail window. This is much faster as millions of people get junk email messages and click that button to report the spam. Gmail then uses those reports to block spam from everybody.
This website runs on a patronage model. If you find my answers of value, please consider supporting me by sending any dollar amount via:
![]()
(@PosiTek)
![]()
(Support@PosiTek.net)
")
(using any credit card)
There are currently 1289 reader comments on published articles, care to join in? Use the Leave a Comment form below/at the bottom of any existing comments. This is a good place to ask follow-on questions on this subject.


