
Fix my Windows 7!
 Fix my Windows 7! A reader asks…
Hi Chris, my Windows 7 computer suffered a hard drive failure. Before the system failed, I followed your advice and created a system image of my drive, and also created a System Repair Disc. I replaced the hard drive, booted to the repair disc and used the system image to bring my computer back up to what it was before. It worked! Windows and my installed programs and my personal files all came back. Only one problem, I’m seeing a lot of errors and problems cropping up, and am thinking that my failing hard drive had corrupted some Windows files before I made the system image. I don’t want to upgrade to Windows 10 yet, but is there a way to fix my computer?
Yes, but this is a bit more complicated to complete – let me break it down for you. Basically, you’re going to to an in-place upgrade of your system to Windows 7 (yes, that’s not really an upgrade). You’ll overwrite your existing Windows setup, although the in-place upgrade will preserve all your installed programs, settings and personal files. To be safe, before you begin you should back up all your personal files to an external drive.
Before you start, you need to collect these things:
 A Windows 7 installation disc that matches the version of Windows already installed on your system. You can download a disk image from Microsoft and burn it to a DVD-R or USB thumbdrive. You need your original Windows 7 Product key.
- The license keys and/or installation media for your protection program(s)
 A Windows 7 installation disc that matches the version of Windows already installed on your system. You can download a
 Also before you start you’ll want to uninstall any protection programs (you can re-install them after the upgrade is complete), and perform a disk cleanup, then restart your computer and log into Windows to start the upgrade process.
Perform a Disk Cleanup:
- Set Windows Explorer to show hidden files and folders: Open Windows Explorer, click the Organize link, then click Folder and search options, click the View tab, and click Show hidden files, folders and drives. Then click OK. (remember this so you can reverse the process when you’re done).
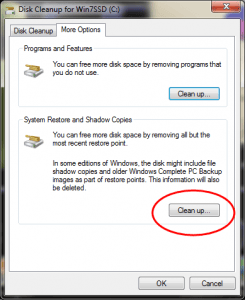
- Run Disk Cleanup: Click Start, then Computer; right-click on your C: drive and select (left-click) the Properties menu item. Select the Disk Cleanup button in the lower-right portion of the menu, and wait till you see the Disk cleanup window. click the Clean up system files button. Wait till you see the Disk Cleanup window again. Now click the More Options tab, and select the Clean Up button in the ‘System Restore and Shadow Copies’ section. Confirm by clicking the Delete button. Lastly, go back to the Disk cleanup tab and check every checkbox in the Files to Delete list and click OK. Wait till this is all done.
- Clean some folders: Open Windows Explorer to the C: drive again, and double-click the Windows folder. find and open the Prefetch folder, highlight and delete everything. Go back to the Windows folder, and open the Temp folder. Highlight and delete everything. Make sure you don’t delete either the Prefetch or Temp folders themselves, just the stuff that’s in them. Go back to the C: drive, then to the Users folder, then to your user folder, and then to the AppData folder, then to the Local folder, and finally to the Temp folder. Delete all of the files in this Temp folder as well (but not the folder itself).
 Run Disk Cleanup
 Finally, restart your computer and log into Windows. Now you can insert the Windows 7 installation disk. If the setup program doesn’t start automatically, open Windows Explorer to the disk drive and run the Setup.exe program. Click the Install Now button. Choose to download updates and accept the terms of service.
At this point, you’ll be presented with two options: Upgrade or Custom (advanced). You’ll want to choose the upgrade option because the custom option won’t save your personal files, settings, etc. while the upgrade option will preserve everything. If for some reason the upgrade option is not showing, you’ll need to do a workaround to get it to show up. Cancel out of everything and open Windows Explorer, and navigate to the disk drive so you can see the setup.exe file.
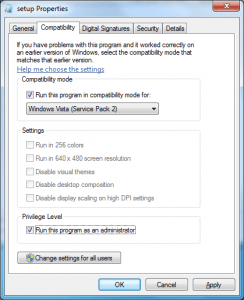
- Right-click the Setup.exe file and then select (left-click) the Properties menu.
- Click on the Compatibility tab, and check the checkbox marked ‘Run this program in compatibility mode for:’, then click the drop-down box and select Windows Vista (Service Pack 2).
- Also check the checkbox at the bottom marked ‘run this program as an administrator’ and then click OK.
 Right-click the Setup.exe file and then select (left-click) the Properties menu.
Now run the Setup.exe program again (by double-clicking the file name in Windows Explorer). You should now be able to choose the Upgrade option. The setup program will perform a compatibility check (your computer should have no problem passing that) and then you see a big “Next” button – click that. Sit back and let it rip. It might take up to an hour to complete.
At the end of the upgrade you’ll have to activate your new Windows 7 installation, and answer some questions about time and date, network settings, etc. Once that’s done, Windows will test your system and give it a Windows Experience Index rating, and then perform a few final updates and repairs to finish the job.When the upgrade is complete and your system is restarted, you’ll be able to log into Windows normally, and you should see all your files, installed programs and settings just as they were before. But wait, there’s a few cleanup things to do:
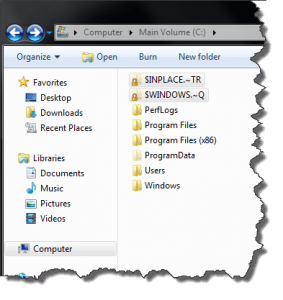
- Clear out the old stuff from your corrupted version of Windows 7: That means opening Windows Explorer and finding and deleting these two folders: $INPLACE.~TR and $WINDOWS.~Q. If you don’t see these folders in the C: drive, you might have to temporarily set Windows Explorer to show hidden folders and files (click the Organize link near the top, and choose Folder and Search Options, click the View tab, click ‘Show hidden files, folders and drives’ to select it and uncheck the checkbox ‘Hide protected operating system files’. be sure to reverse this when you’re done)
- Perform a disk cleanup, same as what you did before you started all this. See the procedure I laid out above.
- Reverse what you did in step 1 above to see hidden files and folders. Open Windows Explorer, click the Organize link, then click Folder and search options, click the View tab, and click Don’t show hidden files, folders or drives, and check the checkbox “Hide protected operating system files”. Then click OK.
 Clear out the old stuff from your corrupted version of Windows 7: That means opening Windows Explorer and finding and deleting these two folders: $INPLACE.~TR and $WINDOWS.~Q. If you don’t see these folders in the C: drive, you might have to temporarily set Windows Explorer to show hidden folders and files (click the Organize link near the top, and choose Folder and Search Options, click the View tab, click ‘Show hidden files, folders and drives’ to select it and uncheck the checkbox ‘Hide protected operating system files’. be sure to reverse this when you’re done)
Whew! When this is done, you have a fresh, new installation of Windows 7 without all the corruption and detritus from your old setup. If you notice any programs not functioning correctly, the solution is to reinstall the malfunctioning program, since it’s possible that program files were also corrupted.
This website runs on a patronage model. If you find my answers of value, please consider supporting me by sending any dollar amount via:
![]()
(@PosiTek)
![]()
(Support@PosiTek.net)
")
(using any credit card)
There are currently 1295 reader comments on published articles, care to join in? Use the Leave a Comment form below/at the bottom of any existing comments. This is a good place to ask follow-on questions on this subject.


