
Get my iPhone Photos

Get my iPhone Photos: a reader asks…
I have an iPhone with a ton of pictures on it. How do I get all those pictures onto my computer (Windows 10 PC)?
Years ago, you’d install iTunes, plug the cable from your iPhone to your PC, and go through the arcane iTunes menus to get to where you can get all your photos. Years before that (in the early days of iPhones), you could plug in your iPhone, connect it similar to a thumbdrive, and copy your photos using File Explorer.
Nowadays, you shouldn’t need to plug your iPhone into anything but a power outlet to charge it up. iCloud takes care of everything else. For photos, here’s what you need to do:
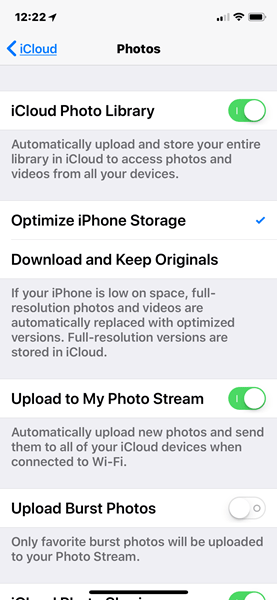 First, you need to make sure that you’ve turned on iCloud Photo Library on your iPhone. Go to Settings and tap on your name at the top to take you to the Apple ID page with controls for all your Apple apps and settings. Tap on the iCloud icon, which opens your iCloud settings page. Tap on the Photos icon, which opens the Photos settings page.
The first item on this list is iCloud Photo Library. Pretty much anyone who uses an iPhone should turn this on (if it isn’t already). What that does is stores all your photos in iCloud. That way you aren’t dependent on the iPhone, if it gets lost or stolen, all your photos are safe in your Apple account.
The 2nd item should be checked for most people – “Optimize iPhone Storage”. With this setting checked, the copies of photos that are actually on your iPhone are optimized for the iPhone screen size. That saves a ton of memory storage space. You don’t have to worry, the full-resolution photos are still in iCloud.
The next slider is “Upload to My Photo Stream”. This is actually a legacy item left over from earlier days. Before the iCloud Photo Library, this was the way to get your photos shared across your devices. With iCloud Photo Library, all photos from all devices are shared with all devices, no need to copy them around.
One thing you should be aware of is Apple’s current policy for iCloud storage allowances. I hate that it’s 2018 and Apple still has a 5gb limit before you have to spend money. Almost nobody who takes photos with their iPhone (much less videos) is going to remain under that 5gb limit. I’m hoping that Apple drastically increases that limit soon, it should be at least 200gb. For now though, you’ll need to purchase more storage.
On the iCloud settings page (one back from Photos), you see a link “Manage Storage” – tap that to get to the iCloud Storage page. Tap the link “Change Storage Plan” and choose an option. Some folks who don’t do a lot of photos and videos can get away with the 50gb ($0.99/monthly) increase, but everyone else should choose the 200gb ($2.99/monthly) option. It’s a pain, but $36/year is nothing compared to always running out of space for your precious photos and videos.
 Next, you’ll want to go to your PC and install iCloud. Visit https://icloud.com and at the top of the screen is a link to download iCloud for Windows. Download and install that app on your computer. You’ll of course need to sign into your Apple ID, and most likely verify using your iPhone.
Once the app is installed on your computer, you can open iCloud Settings and make sure Photos is turned on. On your Windows 10 computer, click Start (the 4 white window panes at the bottom-left of your screen), and scroll down the list of programs to the iCloud folder. Click on that to expand it and click the iCloud icon. This opens your iCloud Settings window. Click the Options button to the right of the Photos option (which should be checked) and you’ll open the Photos settings.
 Make sure that iCloud Photo Library is checked. You can also check the option “Download new photos and videos to my PC” – that’s for pictures and videos you take in the future. With that box checked, they’ll automatically download to your PC without you having to do anything else. There are other options you can choose if you wish, but those two are the most important. If you have other sources of photos (like a digital camera) and would like those photos added to your iPhone, check the box for “Upload new photos and videos from my PC” – note the location where you should place those photos.
You can then close the Photos options and also close the iCloud settings window. Now take a look at the bottom-right of your screen, the notification area. You should see a new iCloud icon there.
 Right-click on the iCloud icon in your notification area to get a small iCloud menu. You’ll see a button/link to “Download Photos” which opens a small box where you can check the “All” checkbox to get all your photos. Check that box, then click the Download button.
At this point, Apple is stupidly unhelpful in that you don’t get any indication that anything is happening. But what is happening is that all your photos and videos are downloading to a specific location on your hard drive. It’s usually:
C:/Users / [your account] / Pictures / iCloud Photos / Downloads.
If you have thousands of pictures and videos (as I do), this may take some time to complete and happens all in the background. I would give it a few hours if you have a lot of photos and videos. While all the above may sound like a big process, it’s only a one-time effort. From then on, all your precious photos and videos will be safely stored in iCloud and also available on your PC without any further effort on your part. Just keep your iPhone’s battery charged.
This website runs on a patronage model. If you find my answers of value, please consider supporting me by sending any dollar amount via:
![]()
(@PosiTek)
![]()
(Support@PosiTek.net)
")
(using any credit card)
There are currently 1295 reader comments on published articles, care to join in? Use the Leave a Comment form below/at the bottom of any existing comments. This is a good place to ask follow-on questions on this subject.


Chris,
I have a older computer running Windows 7, but the power of the PC is not in question. I am ripping my CD collection into itunes to play on the iphone. Apple does a nice job of labeling the disk and songs on the CD.
I was zooming along ripping CDs and decided upgrade itunes since it was an old version. Since the upgrade, ripping CDs takes in some cases upward of 8 hours or more for one CD. I check this out on the web and no one really has a long term solution to this issue. I have also checked out and turned off items in Task Manager, hoping this would speed things up, by the second CD, the slowness starts again.
I know I can rip the CDs with an MP3 ripper and import, but I would not have the nice “apple music format”, what would you suggest?
Hi Richard, thanks for your question. I found a relevant discussion at the Apple forums: https://discussions.apple.com/thread/1949684. The gist is that newer versions of iTunes (esp. on older versions of operating systems) might have compatibility problems. Such as iTunes might have changed the format being used to rip CDs from what you were using before.
The two solutions posed were to 1) start iTunes in safe mode (quit iTunes, restart your computer, then open iTunes while holding down the Ctrl + Alt keys), and 2) changing the ripping format (it may have previously been ripping to a simpler type of file and now is ripping to a more complicated/higher quality type file).
For #2, open iTunes, go to Edit > Preferences > Import Settings (button on the General tab). You should not have the Error checking checkbox checked, and you should be using either AAC encoder @ 128kbps or MP3 encoder @ high quality 160kbps.
One other thing to do is to locate the itunes.exe file in your Windows Explorer, right-click on that icon and then choose compatibility mode. No guarantees but it might force iTunes to work better with Windows 7.
As always, using older operating systems with newer programs and apps can yield odd problems. If you have Windows 7 System Restore turned on, you could revert your system to the day before you upgraded iTunes, which would put you back on the older (and safer for Windows 7) version of iTunes.