
How to Download iPhone Photos to PC
How to Download iPhone Photos to PC: a reader asks…
I use an iPhone and a PC. In the past, I’ve connected my iPhone to the PC to transfer photos, backup my iPhone and such. I’ve been told that this is passé and that I should be using iCloud to do this. I have expanded my iCloud storage per your previous recommendations and have turned on iCloud Photos and Backup my iPhone. My question is, how do I get my photos onto my Windows 10 PC?
Simple answer is that “there’s an app for that”. That app is iCloud for Windows. You can pick it up from the Microsoft Store app that’s installed on your Windows 10 computer, or just click this link, then click the blue button “Get in Store app” to go directly to the Microsoft Store page. Download and install the app, then you’re ready to set it up.

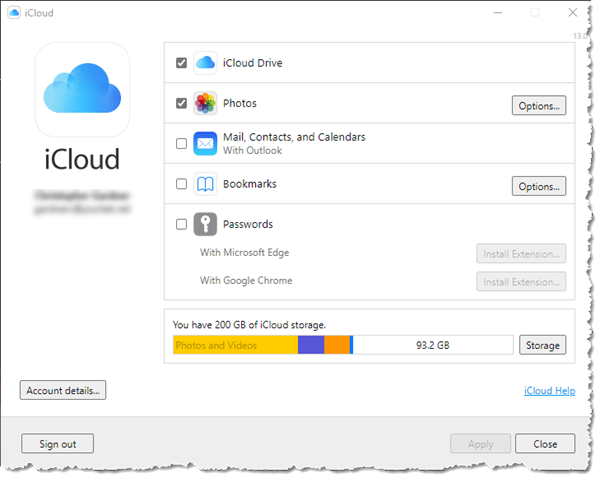
Have your iPhone handy because you’ll need it to verify security. On your PC, run the iCloud app from your Start menu. You’ll be asked for your Apple ID and password, and once you provide that you’ll get a notification on your iPhone to allow access. Click the Allow button on your iPhone, read the six-digit code on the iPhone and type it into your PC’s iCloud app. Once you’ve authorized your PC/iCloud app to access your Apple account, you’ll see a menu of items to check or uncheck. You should check at least these two items: iCloud Drive and iCloud Photos.
It will take a few minutes for iCloud to set itself up once you click the grey “Apply” button at the bottom of the iCloud window. Once that’s completed, you can click the “Close” button. Now, open the File Explorer app. You’ll see two new entries on the left-hand side, for iCloud Drive and iCloud Photos. Click the iCloud Photos option to see all your pictures from your iPhone.
Please note that these pictures will probably have a cloud icon in the listing in File Explorer. That means that you’re only looking at a thumbnail image of the actual file, and the file itself is still only stored in your iCloud account (“in the cloud”). No worries, open any file and the file will download to your computer. iCloud’s default operation is to save disk space by not downloading all the files to your computer, just the listing with thumbnail images.
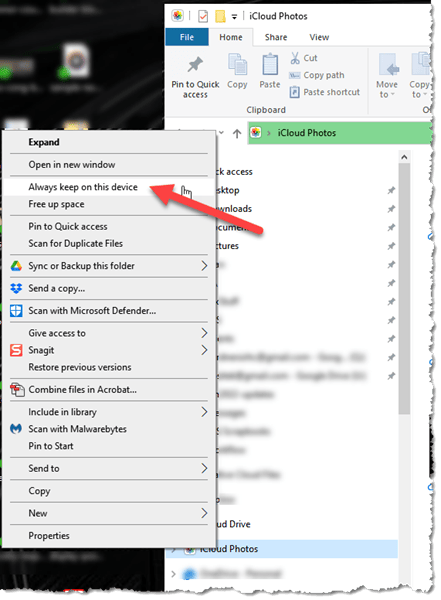
If you have plenty of hard disk space available, you can change this behavior to keep copies of all your photos on your computer (with the originals still safely stored in the cloud). To do this:
- in File Explorer, right-click the iCloud Photos entry on the left-side
- A context-sensitive menu will popup. Find the entry “Always keep on this device”
- left-click that entry.
It will take a moment to reset the properties of those files, and then you’ll start to see all the photos download to your computer. If you use iCloud Drive, you can do the same thing so that files in your iCloud drive are also stored on your computer (not just in the cloud). That cloud icon will change to two arrows in a circle – which means it’s pending download. At some point, this will change to a green circle with a white checkbox – which means the file has been downloaded to your computer (synchronized with the original file in the cloud).
Any changes you make to a file in iCloud Photos on your computer will be replicated to the cloud and back to your iPhone. Similarly, any changes you make to a photo on your iPhone will be replicated to the cloud and back to your computer – keeping the devices in sync. When you make changes to a photo such as cropping, brightness, etc., these changes can be reverted, the original photo is still stored in iCloud.

If you don’t want to download all the photos and don’t want to install the iCloud app, there is an alternative: go to https://icloud.com, log in and go to the Photos section, then select and download just the photos you want.
I should mention that these capabilities also works on a Mac, and in particular, the Mac Photos app is well-integrated with the Photos app on your iPhone.
This website runs on a patronage model. If you find my answers of value, please consider supporting me by sending any dollar amount via:
![]()
(@PosiTek)
![]()
(Support@PosiTek.net)
")
(using any credit card)
There are currently 1296 reader comments on published articles, care to join in? Use the Leave a Comment form below/at the bottom of any existing comments. This is a good place to ask follow-on questions on this subject.


