iPhone Sync Slip-up
 iPhone Sync Slip-up: a reader asks…
Hi Chris, When I have been deleting emails from my iPhone, they aren’t deleting on my desktop Outlook – both use Microsoft Exchange server (I get my service from Sherweb). I think you once mentioned a way to set it so it deletes from both, but can’t find that Practical Help article.
Sorry, the old article you mentioned was talking about older email services (POP or Post Office Protocol) and a way to get those to play reasonably nicely when using multiple computers to access your mail. Your problem is somewhat different. You’re actually using a Cloud-based information sharing and control service. Sherweb keeps your data safe, and all your devices display a copy. When you make changes on any copy, those changes are uploaded to the cloud, then downloaded back to your other devices. Sometimes, your iPhone can slip up on this synchronization (so could your computer or any other device).
The first thing I’d suggest you do is restart both your computer and your iPhone. That’s the first part of my 80/80/20/20 rule: 80% of the time a problem with your consumer technology will be solved by restarting or repowering the computer or device. But I’m guessing that you’ve already tried that and it didn’t help any.
 What you’re most likely experiencing is a communication problem between your iPhone and your Microsoft Exchange server. This crops up from time to time, and the solution, while simple takes a little time. It’s a 3-step process:
- First, you’ll delete your email profile from the iPhone. Don’t worry, your MS Exchange account keeps everything safe, so you’re only deleting your local copy on the iPhone (that’s not working right anyway).
- Second, you’ll re-add your email profile back into the iPhone, setting it up just as you had it before
- Lastly, you’ll give it a little time while the Exchange server syncs everything back to the new account on the iPhone.
And in case you’re suspecting, yes this is very much like my 80% fixit rule, you’re turning off the email service and then turning it back on. So let’s go through how to do the first step:
- Tap Settings, Mail, Contacts, Calendars, and then tap on the Account that’s your Sherweb Exchange account.
- Look at the bottom and you’ll see a red Delete Account link. Tap that and confirm.
Ok, now let’s add back the email account fresh. This is a little more work than the last step. Sherweb has some helpful instructions at https://admin05.sherwebcloud.com/Help/Show/620, but I have to say that they’re not complete or fully correct. Here’s the corrected version (these are for Sherweb-supplied Exchange 2013):
- Tap Settings, Mail, Contacts, Calendars, and then tap Add Account. Select the Exchange option.
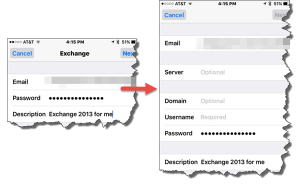
 You’ll see a screen with 3 fields. In the Email field, put in your Sherweb-specific extended email address (yourname@yourdomain-com.sherwebcloud.com), then add your password into the 2nd field and name the account in the third field. Tap the Next button at the top-right
- You’ll now see a screen with 6 fields, the 3 you already completed are filled in for you. In the Server field, put webmail05.sherwebcloud.com, leave the Domain field blank, and in the Username field put your regular email address (yourname@yourdomain.com). Then tap the Next button at the top-right. You’ll want to turn on all the features (mail, contacts, calendar, and notes) and then tap Save to verify and save the account.
The account will start to sync your mail, contacts, calendar and notes right away, but it may take a few hours before everything’s replicated from your Exchange account to your iPhone. At that point you’ll be right back where you were before, only now you should see full synchronization between the iPhone and Outlook on your desktop.
While you’re waiting, you might want to revisit some of the options in the Mail, Contacts, Calendars settings page. Most are going to already be set for you, but I’d suggest you change a few:
- Organize by Thread – I leave this off, but you might prefer threaded conversations (where emails back and forth with the same subject line are put together)
- Always BCC Myself – turn on or off as you wish, I like mine off
- Default Account – if you have more than just the one email account, you might want to specify which one to use automatically (you can always use a different one as needed)
- Contact Sort/Display Order – I like to show and sort by first name, but set it however you prefer
- Contacts Default Account – same as the above default account, set it to whichever account you use the most.
- Default Calendar – same as the above default account, set it to whichever account you use the most.
You’ll also want to visit the account settings for your newly refreshed Exchange account, and change the Mail Days to Sync setting to No Limit (so all email in your inbox shows on your iPhone rather than just the last 3 days worth).
For folks who use another mail service (such as another Exchange server or Gmail), you’d follow the same steps, just substitute your mail service settings and information.
 Lastly, if you’re planning on using Siri‘s feature for nicknaming, you’ll need a contact entry for yourself that isn’t in the Exchange Contacts list. To set one up, open Contacts and tap the Groups button at the top-left. You should see an iCloud Contacts (called All iCloud). Tap to deslect (remove the checkmark) from all the other entries, and then you can tap the top-right Done button to go back to your contacts list. Don’t worry that it’s empty, just tap the + button at top-right and add a new contact for yourself. You should probably distinguish it somehow (I put “Chris for Siri” in the Name field) so you can go back to the Mail settings page, scroll down and choose that entry for your My Info field.
 The Siri nicknaming feature is nice, you can just activate Siri and tell her about your relationships. She can then remember those relationships so you can use the relationship instead of the person’s name when calling them (or creating appointments, texting and a bunch of other commands). I have a nice video that shows exactly how you do this in this article.
This website runs on a patronage model. If you find my answers of value, please consider supporting me by sending any dollar amount via
 (send to @PosiTek),
  (send to Support@PosiTek.net),
  using any credit card (no Paypal account required), using Zelle, Apple Pay or Google Pay, or by mailing a check or cash to PosiTek.net LLC 1934 Old Gallows Road, Suite 350, Tysons Corner VA 22182.
I am not a non-profit, but your support helps me to continue delivering advice and consumer technology support to the public.
Thank you!
 You’ll see a screen with 3 fields. In the Email field, put in your Sherweb-specific extended email address (yourname@yourdomain-com.sherwebcloud.com), then add your password into the 2nd field and name the account in the third field. Tap the Next button at the top-right


