
Laptop Power Options
 Laptop Power Options: a reader asks…
Hi Chris, I have a Windows laptop. Can you tell me what Power Options I should set to get the most out of my laptop?
Ok, here’s a quick rundown of the Windows Power options. For Windows 7 & 10, just click the Start button and then type “Power Options”, for Windows 8/8.1, you have to invoke the search bar charm (swipe in from the right of the screen). You’ll start with the general Select a Power Plan screen where you choose one, such as “Balanced” or “High Performance”. There’s a link on that window to show or hide additional power plans. Most manufacturers will have one of their own, customized for the brand and model of laptop. Regardless, you’re going to want to change the power plan you use. My suggestion, start with the Performance Plan as will leave you with fewer advanced options to change.
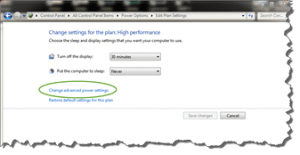 Once you’ve selected the Performance Plan, click the link to the right that says “Change plan settings”. That will switch your window to one that gives you the ability to make a few changes. Don’t bother with those changes, just click the link that says “Change Advanced Power Settings” which opens up a new, smaller window titled Power Options with one tab “Advanced Settings”.
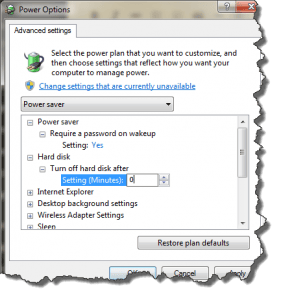
The first thing you’ll want to do is click the link “Change settings that are currently unavailable” which may trigger a UAC warning. Just confirm that you want to make changes on the UAC warning so you can proceed. Once you’ve done this, you’ll have all advanced power options available to change. Now you’ll go down the list in this window. Don’t worry about changing anything except the items on the list below. When everything’s set, click the OK button to apply the changes and close the window. You can then also close the bigger “Edit Plan Settings Window”.
You may have to expand some items on the list to see the sub-entries. Click the plus button on the left side to expand.
 Require password on wakeup… on battery YES, plugged in NO
- Turn off hard disk after… on battery 0 (aka never), plugged in 0
- JavaScript Timer Frequency… MAXIMUM PERFORMANCE on both battery and plugged in
- Slide Show… on battery PAUSED, plugged in AVAILABLE
- Sleep after… NEVER on both battery and plugged in
- USB selective suspend setting… DISABLED on both battery and plugged in
- Power button action… on battery HIBERNATE, plugged in SHUT DOWN
- Sleep button action… DO NOTHING on both battery and plugged in
- Link State Power Management… OFF on both battery and plugged in
- Dim display after… on battery 3 MINUTES, plugged in 10 MINUTES
- Turn off display after… on battery 10 MINUTES, plugged in 25 MINUTES
- Display brightness… on battery 50%, plugged in 100%
- Dimmed display brightness… 30% on both battery and plugged in
- When sharing media… PREVENT IDLING TO SLEEP on both battery and plugged in
- When playing video… OPTIMIZE VIDEO QUALITY on both battery and plugged in
- Critical battery action… on battery HIBERNATE, plugged in DO NOTHING
- Low battery action… DO NOTHING on both battery and plugged in
- 3rd party Graphics setting… on battery MAXIMIZE BATTERY LIFE, plugged in MAXIMIZE PERFORMANCE
 Require password on wakeup… on battery YES, plugged in NO
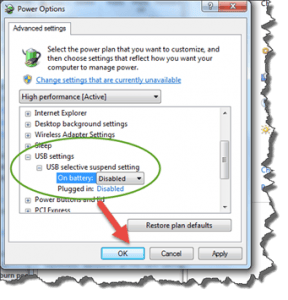 When playing video… OPTIMIZE VIDEO QUALITY on both battery and plugged in
You might notice that I’ve disabled Windows’ sleep function on these power settings. That’s because I’ve yet to find a version of Windows (including Windows 10) where sleep mode doesn’t have bad ‘side effects’ on your computing experience. For some reason, Apple was able to implement a very good sleep mode on their Macbooks, but Microsoft has consistently implemented sleep mode in such a way as to cause potential problems sooner or later. Here’s why:
- Windows’ sleep mode leaves parts of the computer running and generating heat. So when the computer gets hot, the fan automatically switches on to cool the system down. But if the computer is in a bag, sleeve or briefcase where there’s no good air circulation, your laptop will overheat and shut down – often causing heat-related problems with your hardware and hastening the demise of your laptop.
I’ve also disabled the hard drive power down feature, which also causes problems:
- 3rd party programs often have auto-update or other automatic features running that depend on timing or they will cause a software error. If your system responsiveness is delayed while the hard drive spins up, your software might show an error message which must be cleared before the program can resume normal operations. In some cases, an error might corrupt some aspect of the software. This can happen in virtually any program you install on your computer (other than the Windows operating system).
Both of these ‘features’ were put in place by Microsoft engineers to help you save power, extending the run-time of your computer when on battery power, and just to conserve electricity. But these side effects can easily cost you a lot more than the few cents a year in electricity they save. So I suggest you spend a few cents a year (really that’s all it is) and avoid the potential problems.
 The reality is that your screen is what uses the most power on a laptop, so lowering the brightness while using it or turning off the screen whenever you’re not using it is the best way to save electricity. Most laptops have a key combination (usually the Fn key and one of the arrow keys on your keyboard) to allow you to quickly adjust the brightness. Anytime you’re on battery power you should reduce the brightness as much as you can (without having to squint to see the screen). And with the above settings, shutting the lid will immediately power down the screen to save electricity when plugged in. Just open the screen and seconds later you’re back in computing business.
This website runs on a patronage model. If you find my answers of value, please consider supporting me by sending any dollar amount via:
![]()
(@PosiTek)
![]()
(Support@PosiTek.net)
")
(using any credit card)
There are currently 1296 reader comments on published articles, care to join in? Use the Leave a Comment form below/at the bottom of any existing comments. This is a good place to ask follow-on questions on this subject.


