
Lock iPhone with Apple Watch
Lock iPhone with Apple Watch: a reader asks…
I read about this hack where you can setup your Apple watch to lock your iPhone. Unfortunately, the instructions aren’t correct and I can’t make it work. Can you give me better instructions? My friend got their iPhone stolen in a public place while it was unlocked, and I want to make sure that if it happens to me, I have a way to quickly lock the iPhone.
Thanks to Tom’s Guide who published the hack, and further below I’ve given some instructions to do that which may be easier to follow. However, there are other ways to remotely lock an iPhone. Further, it sounds like the goal is to prevent a thief who has your iPhone from accessing any of your personal data or using the iPhone, and having a better chance of recovering your stolen (or lost) iPhone. So the following method may better fit your goal.
First, if the iPhone was lost or taken moments ago, you can use your Apple Watch to activate a ‘ping’ sound and if you can hear that, you might know where to look to locate your iPhone. You have to do this quickly, as it only works when the iPhone is within Bluetooth range (about 30′).
Second, from either your Apple Watch, iPad or your Mac computer, or even from https://icloud.com (instructions from Apple here), you can use the Find My app to activate Lost Mode – marking the iPhone as lost. That will lock the iPhone and add another measure of protection – it will also suspend use of any credit cards (or Apple Cash) while the iPhone is in Lost Mode. Whoever has the iPhone would see a note and phone number you provide when activating Lost Mode, and the iPhone would be locked. Turning off Lost mode (from the iPhone itself) requires the iPhone to be unlocked with the correct lock code. As further protection, the Apple ID password will need to be entered and 2-factor authentication will be required (from another of your Apple devices) to restore full functionality to the iPhone.
You can activate Lost Mode from any of your other Apple devices (your Apple Watch, iPad or Mac) or from https://icloud.com by opening the Find My applet. Using your Apple Watch, tap on the Find My icon and tap on your iPhone (its last known or current location will be shown). Swipe down the list to the bottom and tap the Lost Mode to turn it on. Follow the on-screen instructions to provide a phone number to call and a message – this is in case it was actually lost and found by someone who could return it to you. A good message would be “This iPhone was lost and has been locked. If found, please call (another phone number where you can be reached) and I will arrange for its return to me.” The lost iPhone will only be able to dial the number you provide and an emergency call, all other functions will be locked.
One caveat is that the Find My app on the Apple Watch doesn’t always work right. It seems that Apple has neglected to make it rock-solid, and it may not work the first time you open the applet on your Watch. Be sure to test this out before you depend on your watch to activate Lost Mode on your iPhone.
That said, what makes this a really good way to deal with a stolen (or lost) iPhone is that it works even if the iPhone isn’t nearby or even turned on. You can turn on Lost Mode, and the next time the iPhone is turned on and connected to either the cellular network or Wi-Fi, Lost Mode will be activated. You’ll also be notified of its location on your other devices which can be helpful for the police to track down the thief.
Ok, onto Tom’s hack. If you simply want another way to remotely lock the iPhone (without those other protections) from your Apple Watch, then the process below will do that for you. However, this is a complicated process, so be warned. You may want to print this page out to help you follow along.
To setup the hack, you’ll need to follow these instructions carefully, any missed step and it won’t work. I think this is why Tom’s advice was so hard to follow. Those pesky Apple engineers keep updating iOS 😮 and change things just enough to throw off instructions, so even the below may become dated in the near future.
Before we start, recognize I’m doing this on a late-model iPhone (14 Pro) running the current version of iOS (17.4.1) and a late-model Apple Watch (Ultra 2) running the current version of WatchOS (10.4), but this should work on any iPhone that has iOS 16 or higher and any watch Series 3 or higher using WatchOS 7 or higher.

And also before we start, the first thing you should do is make sure you have a good (e.g., long and unguessable) password on your Apple account, make sure you have a good lock code (6 digits, none repeating) on your iPhone, and that 2-factor authentication is not disabled on your Apple account. It might be worth logging into your Apple account and verifying what trusted devices are listed (log in at https://appleid.apple.com/account/manage and click the Account Security option to check your trusted devices.
Here are the chunks where I’ll break down how to set up locking your iPhone from your Apple Watch (e.g., Tom’s hack):
- First, we’ll create a new Focus Mode on your iPhone.
- Second we’ll create a new Automation in the Shortcuts applet on your iPhone.
- Third, on the iPhone we’ll customize that new Shortcuts automation to accomplish all the things that are required to secure your iPhone.
- Fourth, we’ll show you how to activate this automation from your Apple Watch.

First, let’s create a new Focus mode on your iPhone. Tap Settings > Focus > and tap the + sign at the top-right of the screen. Tap Custom, then tap in the Name box and type a name (I typed “Lock iPhone”). Then choose a color (I chose red) and an icon (I chose a key icon). Tap the blue Next button. You must now click the Customize Focus button. At this point, I would suggest you go through each of these items:
- Under Silence Notifications – tap “People” and tap to uncheck anyone who’s got a green dot with white checkmark to deselect them. You can leave yourself and/or an alternate phone number/contact checked (if you want to call the thief). Then tap Next (at the top-right).
- You’ll see Choose Calls to Allow – choose “Allowed People Only”, which only allows whoever you selected in #1 above to bypass the focus. Then tap the Done link at the top-right of your screen. That takes you back to the main Lock iPhone Focus page in settings.
- Tap the Apps link in the middle and uncheck all apps by tapping on them to remove the green circle & checkmark. Then tap Done (top-right). That again takes you back to the main Lock iPhone Focus page in settings.
- Tap Options and make sure Hide Notification Badges is selected, the other sliders are off, and the Silence Notifications is set to Always.,Then tap the Back link at the top-left, which takes you back to the Lock iPhone Focus page in settings.
- In the Customize Screens section below, tap the left-most blue Choose link, and choose a lock screen. Here I clicked the Gallery link (Pick a Lock Screen from the Gallery) and chose a red color screen with no widgets. Tap the Add button at the top-right, then tap Set as Wallpaper Pair. That means for this focus mode nothing will show except a red screen with the time (no widgets).
You can now go back to your Home screen as the Focus mode has been created and customized to work for you.
Second, let’s create a new Automation in the Shortcuts applet on your iPhone. Find and open the Shortcuts applet. Tap the Automation button at the bottom middle of the screen. If you have no existing automations, tap the blue New Automation button, otherwise, tap the blue + sign at the top-right. Scroll down till you find the Lock iPhone entry (near the bottom) and tap it. Then in the When section:
- Make sure When Turning On has a blue dot with a white checkmark inside it (selected),
- Make sure the When Turning Off is not selected (grey circle),
- Tap the Run Immediately option to place a blue checkmark beside it, and make sure the Notify When Run slider is off (grey). then tap the Next link (at the top-right of your screen).

Third, we’ll customize this automation so that it accomplishes just the actions needed to secure your iPhone. You should be on the screen that’s titled “When turning Lock iPhone on”. You need to start by tapping the “New Blank Automation” icon under “Get Started”, and then tap the blue Add Action button/link that appears. You’ll now search for and add six actions, adding each one in turn:
- type in the search box “Lock Screen” and when the icon appears below (under the “Scripting” header), tap that icon.
- near the bottom of the screen, tap in the Search for apps and actions box, type “Set Bluetooth” and tap the icon that appears. You’ll see it appear under the Lock the screen item. Be sure it says “Turn Bluetooth On“. If it says Off, tap Off to turn it to On.
- again near the bottom in the search box, type Set Wi-Fi (or tap it if it’s listed), and make sure it says “Turn Wi-Fi On“. If it says Off, tap Off to turn it to On.
- back in the search box at the bottom, type “Set Airplane Mode” and tap the icon to add it to the list. Here, it’ll say “Turn Airplane Mode On” and you’ll tap the On link to turn it to Off.
- in the search box at the bottom, type “Set Voice & Data mode” and tap the icon to add it to the list.
- in the search box at the bottom, type “Low Power Mode” and tap the icon to add that to the list. It will say “Turn Low Power Mode On”, so tap the On link to change it to Off.
Tap the Done link in the top-right of the screen to complete setting up the automation. You’ll notice I left out one of Tom’s items, Show Notifications. I did this because the notifications don’t reliably show, so it’s not worth adding. Go ahead and add that before tapping Done if you want (replace Hello World with your message to the thief), but it may or may not show anything on the screen.
You’ll now be returned to the Automation screen and you’ll see the automation set with the six actions listed. That’s it, you’re now ready to use this on your Apple watch. If your iPhone is stolen or lost, you must do this as quickly as you can after you notice it missing, since this automation relies on Bluetooth or Wi-Fi to work.
Fourth: On your Apple watch:
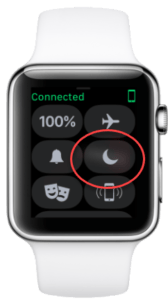
- tap the side button (the flat one, below the knob) which brings up the control center
- tap and hold the crescent moon icon (Focus mode) to bring up the focus modes, swipe up to get to the bottom of the list and tap the Lock iPhone menu item.
- Tap the On button.
That’s it, in a few seconds you’ll see the iPhone lock and switch to the red screen (or whatever you set), and “Lock iPhone” will show at the bottom of the screen. Your iPhone is locked and can only be unlocked with your passcode or your FaceID or fingerprint (for older iPhones with a Home button). You can also turn off the Lock iPhone focus by tapping the focus button on your watch’s control center.

I should note that if you’ve also set the option to let your watch unlock your iPhone, that may unlock the iPhone while the thief still has it, and so you’ll need to tap the Lock iPhone button (which appears on your watch after it unlocks the iPhone) to re-lock the iPhone.
Again, this procedure isn’t as secure as the first method I noted above, but can be an additional action you can take quickly before the iPhone leaves your immediate area. Even if you do this, you should still use the first method above as soon as possible to better secure your iPhone from the thief.
This website runs on a patronage model. If you find my answers of value, please consider supporting me by sending any dollar amount via:
![]()
(@PosiTek)
![]()
(Support@PosiTek.net)
")
(using any credit card)
There are currently 1296 reader comments on published articles, care to join in? Use the Leave a Comment form below/at the bottom of any existing comments. This is a good place to ask follow-on questions on this subject.


