
Mac Filing
 Mac Filing: a reader asks…
Thanks for your advice! I recently switched from a Sony VAIO PC to a MacBook Pro connected to a giant monitor on my desktop. I’m very pleased with its performance, but I have not read enough instructions yet to figure out how to make my own filing tree. It’s a little different from Windows!
I’m happy that you’re satisfied with the Mac’s performance. That giant monitor is a real help, makes everything so much easier to see.
One of the handiest lessons I’ve gotten from using a Mac is the use of context-sensitive menus. They existed on your PC as well. By right-clicking on any object or space, you’d get a popup menu of things you could do. This list includes creating subfolders when right-clicking on the white space inside a folder using Windows Explorer). So left-click to select or execute, right-click to get a list of things you can do. Great concept!
 For the Mac, this same concept is there as well, but it’s done with a one-finger click versus a two-finger click. Or tap if you have tap-to-click turned on. You can also (using the System Preferences > Trackpad settings) turn on left or right clicking using the bottom left and bottom right of your touchpad. It’s pretty easy to customize the way you like to use your touchpad.
While Windows uses Windows Explorer to look at the hard drive, Mac uses Finder. Open Finder and you’ll see on the left-side your basic set of folders for filing things – documents, pictures, music, etc. Click on any one of those to see (in the right-side) what’s in that main folder. If you 2-finger click in the white space on the right-side, you’ll get a menu that includes the option to create a sub-folder. You can then open that sub-folder and create another sub-folder inside that, and continue as deep as you want. That’s how you can make your own filing tree quickly and easily.
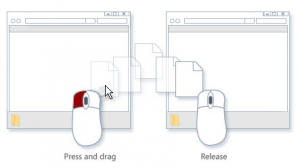 Moving files into those sub-folders is just a drag-and-drop affair. My favorite method is to actually have two Finder windows open. Place one on the left-side of your screen and one on the right-side. On the left-side window, navigate to find the files you want to move. On the right-side window, navigate to where you want those files moved to. The process is then a quick 3-steps:
- Select one or more files on the left-side window
- Click and hold on them and drag your cursor over to the white space on the right-side window
- Let go, and the files move to the new location
- There’s a caveat to this: when moving files around on your internal hard drive, the above works just fine as the default action for the drag-and-drop is ‘move’. If you plug in an external hard drive or thumbdrive and try to move files from the internal hard drive, that won’t work as the default action is either ‘copy’ or ‘create a shortcut’. So when moving files between external hard drives, you would do the same thing as above, but the use two fingers to click and hold. When you let go, you get a menu that lets you choose whether to move, copy or create a shortcut.

If you have an Apple Store nearby you can sign up for a free workshop they put on to help you learn more about using your Mac. Start at http://www.apple.com/retail/learn/ to find out what’s available near you. If you don’t have an Apple Store, then you might want to explore youtube.com. There are hundreds of handy video tutorials, such as this one: https://www.youtube.com/watch?v=h7djm1L2Fkc. For something more structured (but not free), you can sign up for the excellent Lynda.com video tutorials. Use this link: https://www.lynda.com/Mac-OS-X-training-tutorials/252-0.html. And I’m also a big fan of the ‘for dummies’ books. They are an excellent reference source for looking up how to do something as well as going over the fundamentals. You don’t even have to buy the books, they have a bunch of fundamentals online at http://www.dummies.com/how-to/computers-software/macs-os-x/Mac-Basics.html.
This website runs on a patronage model. If you find my answers of value, please consider supporting me by sending any dollar amount via:
![]()
(@PosiTek)
![]()
(Support@PosiTek.net)
")
(using any credit card)
There are currently 1296 reader comments on published articles, care to join in? Use the Leave a Comment form below/at the bottom of any existing comments. This is a good place to ask follow-on questions on this subject.


