Mac to PC with iPhone
 Mac to PC with iPhone: a reader asks…
I’m moving from a Mac to a PC. I use Gmail and Google Chrome, and I have an iPhone. What do I need to do to move over my iTunes library? I have iTunes Match and a lot of music in iTunes, both albums I’ve ripped and music I bought from the iTunes Store. It’s all backed up to iCloud.
With iTunes syncing to iCloud (and iTunes Match covering most/all your ripped music), the process is very simple. You could simply download and install iTunes on the PC, authorize the computer and sign into your Apple ID – then all the music and playlists will appear. Some caveats with this method:
- music will be in iCloud, not on your computer. You’d have to click the cloud icon on each song/album in order to download them to your computer.
- iTunes Match only matches music you’ve ripped that is also in the iTunes Store library (meaning that Apple sells the music). Any albums you’ve ripped that aren’t in Apple’s library won’t show up.
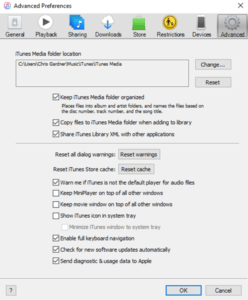
 A safer and more complete method is to copy your entire music library folder from the Mac onto an external hard drive or thumbdrive. Be sure that the external hard drive or thumbdrive you use is formatted as ExFAT (PC’s can’t read Mac-formatted drives). You can then import that into your PC’s iTunes. Before you do this, be sure to visit the iTunes Preferences.
- Go to the Advanced tab
- Check the checkbox Keep iTunes Media Folder Organized
- Check the checkbox Copy files to iTunes Media folder when adding to library
Click OK to set those preferences and shut down the preferences window. Now you can click the iTunes main menu: File > Add Folder to Library. Navigate the File Explorer window that appears to the folder on your external hard drive or thumbdrive and select the iTunes folder where you copied the files from the Mac. Some things to consider:
- If your external hard drive or thumbdrive was formatted for Mac, your PC can’t read those files without 3rd party utility software. You can get a program (such as Paragon’s HFS1 for $20) that will allow your PC to read & write to Mac-formatted drives.
- If any of the music was protected by Digital Rights Management (DRM), then before you can actually play the music, you’ll need to authorize your computer to your Apple account (see below).
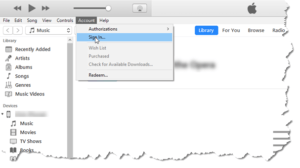
 Now that you have your entire library imported into the PC, you’ll need to get iTunes and your Apple account connected. In iTunes, click the menu item Account > Sign in and provide your Apple ID and password. Next go to the Menu item Account > Authorize computer – you’ll need to provide your Apple ID and password again. If you were smart and have 2-factor authentication enabled on your Apple ID, you’l need to plug in a 4-digit code that shows up on your iPhone to get signed in and authorized.
At this point, iTunes should be ready to use, with your entire library and your playlists showing and playable just as they were on the Mac. Don’t forget to de-authorize the Mac’s iTunes from your Apple account if you plan on getting rid of the Mac – you can only have a maximum of five computers with iTunes in use for your Apple ID.
Your next task is optional. You can connect your iPhone to the PC, and use that to backup your iPhone (to the computer), or you can choose to backup your iPhone to iCloud. If you choose to use the PC, when you connect your IPhone to the computer iTunes will warn you that it will replace the existing music library on the iPhone with the music library on the PC. Even though the libraries are identical, Apple considers each computer’s music library a separate one for the purposes of DRM, and an iPhone can only sync with one computer. Don’t worry about this since the libraries are identical, go ahead and sync the iPhone.
After you’ve connected the USB cable between PC and iPhone, iTunes will show you a sync menu where you can backup your iPhone to iTunes, and where you can choose which music is synced to your iPhone (or all of it if it will fit on the iPhone). Go through all of the screens and make your choices on what to sync (music, pictures, etc.). When the sync is complete you can unplug the iPhone and go back into iCloud on the iPhone to reset it to backup to iCloud. That’s about it, you are moved over to the PC.
This website runs on a patronage model. If you find my answers of value, please consider supporting me by sending any dollar amount via:
or by mailing a check/cash to PosiTek.net LLC 1934 Old Gallows Road, Suite 350, Tysons Corner VA 22182. I am not a non-profit, but your support helps me to continue delivering advice and consumer technology support to the public. Thanks!


