
Mac Word 2-sided Printing
 Mac Word 2-sided Printing: a reader asks…
My printer prints 2-sided (auto-duplex), and most of the things I print give me the option to do so. When I print a Word document I’ve created on my Macbook Pro, it does not and it always comes out 1-sided. Some pre-print windows in other programs on my Mac have a button that says “printer” which you can use to get 2-sided. The Word documents do not. Can you help?
Microsoft Word for Mac operates a bit differently than it does on the Windows computer platform. I think it’s unnecessarily obtuse, and double-sided printing in Word (or any MS Office type of file) should be straightforward and on the main print dialogue box. But that’s just me. The software engineers at Microsoft apparently think it’s ok to bury the 2-sided printing option down in the weeds of print/printer settings. Here’s what you have to do. With your Word document open:
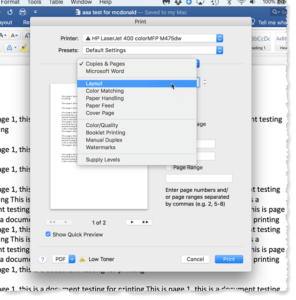
 Click File > Print, or Command P. That opens up the main print window with the document ready to print.
- Click open the 3rd item, Copies & Pages, then click the Layout menu item.
- Click open the Two-sided menu box and choose “Long-edge binding” (this flips the page on the long edge)
 Click File > Print, or Command P. That opens up the main print window with the document ready to print.
Then click the blue Print button. Your document will print out double-sided. Unfortunately, this change isn’t saved to the document, every time you want to print something you have to do this stupid 3-step operation. There is a way to cut it down just a tad though, by creating a preset option. What you do is complete steps 1-3 above, but then click the Cancel button instead of the Print button. That takes you back to the main print window.

At this point, click open the 2nd item “Presets” and choose the option “Save Current Settings as Preset…”. You’ll be prompted to name this new custom preset, I’d suggest you name it “2-sided printing”.
From this point on, when you want to print a document double-sided, follow this 2-step process instead of the 3-step process above:
- Click File > Print, or Command P. That opens up the main print window with the document ready to print.
- Click open the 2nd item, Presets, then click the 2-sided printing option (you created above).
Then click the blue Print button. Your document will print out double-sided.
 If you happen to print double-sided almost all the time, you’ll save even more clicks by unchecking a box in the “Show Presets” dialogue box. That’s the one that says “Reset Presets Menu to “Default Settings” After Printing”. Then print something using the 2-step process above. The next time you want to print a document, it’ll remember the last preset you used (2-sided printing) and use that, which saves you from having to do anything but click the blue Print button. This works across documents, so you only have to remember to change the Preset if you don’t want double-sided printing. And remember to change it back next time you print something (and want it double-sided).
This website runs on a patronage model. If you find my answers of value, please consider supporting me by sending any dollar amount via:
![]()
(@PosiTek)
![]()
(Support@PosiTek.net)
")
(using any credit card)
There are currently 1298 reader comments on published articles, care to join in? Use the Leave a Comment form below/at the bottom of any existing comments. This is a good place to ask follow-on questions on this subject.


