
Mouse Busted!
Mouse Busted!  A reader asks…
Hi Chris, I have a Windows 7 laptop PC and am using a mouse that connects to my laptop’s USB port. For the past two mornings, I have had to take the battery out of my laptop to get the mouse to move! I have been ok once I did this, but it’s really annoying to have to do this, can you help?
Microsoft Windows and the laptop manufacturers have some pretty standard ways they setup a computer to work. For laptops, they fiddle with the power options to make the computer last as long as possible on battery power. That means turning off everything they can. Most likely this is the cause of your unresponsive mouse problem. In your case, the laptop was probably set to power down the USB ports when they weren’t in use, and fortunately, it’s pretty easy to fix:
 First, you need to open up the Advanced Settings for your Power Options:
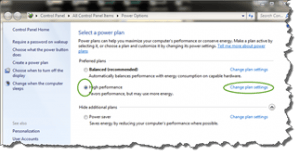
- Click Start, then type “Power Options” and hit your keyboard’s Enter key to open it up. You’ll open a window that says “Select a power plan” and has one selected. To the right of that is a “Change plan settings” link which you should click on
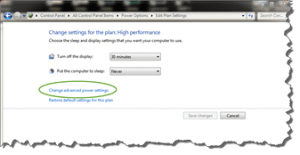
 That switches to a window that has a link “Change advanced power settings” on it – please click on that:
- That will open a new, smaller window with a list of settings on it. You will see a link that says “Change settings that are currently unavailable” – if that’s not greyed out, click it (you may have to approve that action in a UAC popup box).
 That switches to a window that has a link “Change advanced power settings” on it – please click on that:
Now this window has a long list of settings, many that have a little button to the left with a plus sign in it. You’ll need to click the plus button to expand the entries:
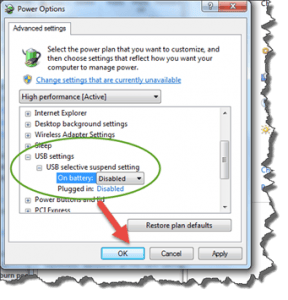
- Find the item on that list titled “USB Settings and click the little plus button that’s to the left of it to expand it. You may then see a “USB selective suspend setting” so click the little plus button to expand that as well.
- You’ll now see two items to change. They may say “Enabled” and you’ll want to click on each ‘Enabled’ word and click on ‘Disabled’ to change them both.
- Then click the OK, button to apply the changes and close that window.
 Find the item on that list titled “USB Settings and click the little plus button that’s to the left of it to expand it. You may then see a “USB selective suspend setting” so click the little plus button to expand that as well.
Once this is done, your mouse should continue to work without problems.
This website runs on a patronage model. If you find my answers of value, please consider supporting me by sending any dollar amount via:
![]()
(@PosiTek)
![]()
(Support@PosiTek.net)
")
(using any credit card)
There are currently 1298 reader comments on published articles, care to join in? Use the Leave a Comment form below/at the bottom of any existing comments. This is a good place to ask follow-on questions on this subject.


