My Computer’s folders
 My Computer’s folders: a reader asks…
I have two Windows 10 computers and am worried about losing my personal files. I would also like for them to have the same exact files in the personal folders, and keep them synchronized. Is there an easy way for me to have all my personal files automatically backed up to the cloud? I use Dropbox and have plenty of space for the files, but I don’t want to have to copy everything from my personal folders to Dropbox every time I want to back them up. Is there an easier way?
 The easier way is to change the file location for your personal folders from the standard location where they are now, to folders located within your dropbox folder. That way everything you put in your personal folders is automatically saved to Dropbox, and even if your computer were to be lost, you can still get them. They keep updated automatically and almost instantly (except for the first time when you change the location). If you do this on both computers, they will share the same files in personal folders and any change you make to one computer will get twinned onto the second computer.
I previously wrote about changing the personal folders location in my article Change Windows Default Folder Locations. That article lays out what to do. It was written for Windows 7, but the process works almost identical for Windows 10:
First you want to open File Explorer, navigate to your Dropbox folder, and create new folders with these names:
 Desktop
- Documents
- Downloads
- Favorites
- Music
- Pictures
- Videos
I’d suggest you first create a folder in Dropbox called Computer and then open that folder and create all the sub-folders inside it so it doesn’t get mixed in with any other Dropbox folders you already have. To create a new folder, right-click on any of the white space in the Dropbox folder area, and left-click the New > Folder menu option. Optionally, you can also create folders for Links, Saved Games and Searches, but for most folks that’s not necessary.
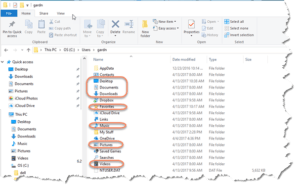
 Second, you’ll want to navigate your File Explorer window to your personal folders. That’s generally under C:/Users/[your username] and you’ll see a folder list. In turn for each of the above folder names, you’ll follow the below steps to move the location.
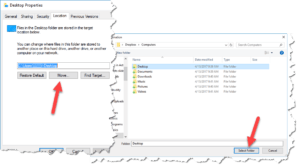
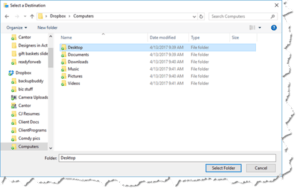
- Right-click on a folder name, and choose the Properties menu item at the bottom. Click on the Location tab, then click the Move button. That will open new Windows Explorer window.
-

click to view larger Navigate to the Dropbox location you created above with the same folder name, click once on the folder name to select it and click the Select Folder button.
- That will close this window and you can now click the Apply button on the previous Location tab window. You’ll see a warning which you must OK (read it first), and then you can click OK on the previous location tab window to close it.
Proceed to the next folder, rinse and repeat until you’ve moved all the folder locations to your Dropbox. You’ll know that the location is copied to the cloud because you’ll see a green circle with a white checkmark on the file icons or File Explorer list of files. You’ll notice that some of the folders will disappear from the File Explorer location C:/Users/[your username] because they’ve moved to the new location, while others will show a standard folder with the same name, but empty.
You can check to make sure this works right by opening a File Explorer window to your Dropbox > Computers > Desktop and seeing the list of files that matches the files you currently have on your desktop. Also, the personal folders in your Dropbox location will have special “Personal Folders” icons rather than the simple folder icons they had before.
 Two little caveats:
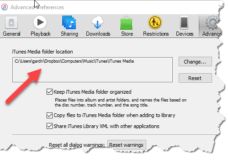
If you use iTunes you should open the Settings (Edit > Preferences > Advanced) and check that the correct Dropbox location is set for your iTunes library. While you’re there, make sure the first two checkboxes are checked to Keep iTunes Media folder organized and to Copy files to iTunes media folder when adding to library. This will keep your iTunes folder working right. In most cases, iTunes will automatically update itself when you move the Music folder location, but it doesn’t hurt to check.
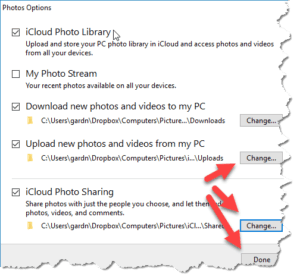 If you have iCloud installed and iCloud Photos options set to download, upload and share photos, you’ll have to open the iCloud settings and change the locations for those three items to match the Dropbox locations.
Once you’ve completed all the above on one computer, you can go to the next and repeat all the stops on the 2nd computer. Again a potential caveat, if you use iTunes you should make sure the library is identical on both computers before you start working on the 2nd computer because you could end up with some duplicates showing in the library, or some songs that aren’t showing in the library (but are in the Music folder).
If you get stuck with iTunes, you can simply delete all songs from iTunes on the 2nd computer (don’t delete the files, just the library entries) and then import the entire Music folder back into your iTunes library.
This website runs on a patronage model. If you find my answers of value, please consider supporting me by sending any dollar amount via:
or by mailing a check/cash to PosiTek.net LLC 1934 Old Gallows Road, Suite 350, Tysons Corner VA 22182. I am not a non-profit, but your support helps me to continue delivering advice and consumer technology support to the public. Thanks!
 Desktop