
My New Mac
My New Mac: a reader asks…
I just bought myself a new Macbook Air M2 to replace my old Macbook Air from 2018. What should I do to get this setup and everything transferred over? My old Mac is running macOS 14.0 Sonoma already, and I have an iPhone 14 with iOS 17.0.3.
Apple gives you pretty good instructions, check out these two links:
- https://support.apple.com/en-us/HT204350 is the guide for transferring to a new Mac with Migration Assistant.
- https://support.apple.com/guide/macbook-air/set-up-your-mac-for-current-mac-users-apdead65a6b3/2023/mac/14 is the Setup guide for
I’m not going to repeat these instructions, just give you some tips and hints to hopefully make the process go smoothly and easily for you. Set aside about an hour to do this, although you may want to start the transfer process and then go do something else while the transfer takes place. You might want to do this later in the day or evening and let the process complete overnight – especially if you have a hard drive full of personal files and apps.
Once you have the new Mac unboxed, set it up next to the old Mac. Make sure your old Mac is turned on and logged in, and that both Macs are plugged into electrical power. Power on the new Mac, and go through the initial startup process where you’ll choose some options, then connect to your Wi-Fi network. These options include choosing your country and some accessibility options. Please read the screens carefully as your new Mac has capabilities your old Mac didn’t, and you’ll want to make sure you’ve made conscious choices about what things to enable and what you don’t want.

Be sure you know your Apple ID and the correct password, as you’ll need that to authorize the new Mac access to your account. You’ll also need to have your iPhone nearby as you’ll be asked to verify your identity using 2-factor authentication. That’s the popup on your iPhone with an “Allow” link that generates a six-digit code to be used on the Mac.
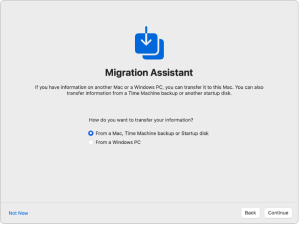
On your new Mac, you’ll be asked if you want to transfer data from the old Mac. That will kick off the Migration Assistant wizard which will guide you through making choices about what to transfer. Most people do this wirelessly, which works fine as long as both the old and new Macs are on the same Wi-Fi network. You’ll also have to run Migration Assistant (in the Applications > Utilities folder) on the old Mac as well. Most people will choose to select everything that you want to transfer (Applications, User account, Other Files & Folders, and System & Network), and most folks will choose to Replace rather than Rename the user account (if you’ve already setup a user account on the new Mac).
Once you’ve made the choices and start the transfer, now it’s time to go find something else to do, possibly for several hours, while the transfer completes. Don’t sit and watch it, or you’ll be tempted to mess with it when you think it’s not working. Patience is key here, and don’t turn off or unplug either Mac from electrical power before the Migration Assistant has finished.
Once it’s finished, shut down Migration Assistant on both Macs, then shut down the old Mac. On the new Mac, you may want to rename the computer, by opening System Settings (formerly System Preferences) and then clicking the General icon and choosing the About menu item. Type the new name in the box, something meaningful (and different than your old computer).
I typically make a few changes to make my user experience better. First off, I change my Battery settings (click the Battery icon at the top of the screen and then click Battery Preferences), and adjust the slider to keep the display awake for a longer period of time and enabling Power Nap. If you don’t plan on using your Mac much when on battery, you can also click the checkbox to keep the Mac from going to sleep when the display goes off. It will still go to sleep when you close the lid.

I’ll also go into the Displays setting and turn on Night Shift to work from Sunset to Sunrise, and slide the color temperature slider most of the way to the right (More Warm). At night, my screen will show less blue light, which is preferable (in my opinion).
There are quite a lot of new features and changes from what you’re used to. Even though you say you’ve updated your older Mac to Sonoma, Sonoma only came out a few weeks ago, and you may not have explored all the new features and figured out where things have gone. I like Brandon Butch’s video that guides you through many of these:
Apple is continuing to more tightly integrate your experience across your Apple devices. Since you have an iPhone with iOS 17, the video above shows you how you can add widgets from your iPhone onto your Mac so they are more similar. You may or may not appreciate this, but having a similar user experience across your devices can make it easier for you to use your devices.
This website runs on a patronage model. If you find my answers of value, please consider supporting me by sending any dollar amount via:
![]()
(@PosiTek)
![]()
(Support@PosiTek.net)
")
(using any credit card)
There are currently 1296 reader comments on published articles, care to join in? Use the Leave a Comment form below/at the bottom of any existing comments. This is a good place to ask follow-on questions on this subject.


