
Old Computer Recycle
Old computer Recycle: a reader asks…
I have recently upgraded to a new Windows 11 PC, and transferred everything from my old Windows 10 desktop. Before I take my old Dell desktop PC to the recycle center, what should I do?
Congrats on the new PC, and glad you’re looking at recycling the old PC. Here’s what I’d recommend you do to prepare that computer for recycling:
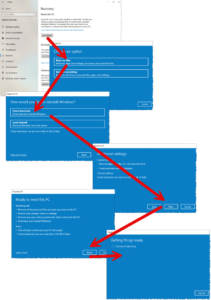
Your quickest option is to reset the PC – this feature is built into Windows 10. Open Settings, then Recovery, and then click the Get started button under Reset this PC. You’ll see an option to keep your files or remove everything, choose the latter. The next screen will ask you if you want to reinstall Windows from the cloud or locally, choose the former (Cloud Download) if you are connected to the internet. Then you’ll be shown a screen with Additional settings, just click the Next button. You’ll next see a Ready to reset this PC box and you click the Reset button. Now you’ll have to wait awhile, while the reset feature completes. When done, you’ll log into Windows like it was a new computer, and create a new Administrative user account (local, not a Microsoft account), then you’ll skip to the end of this article and run the ‘cypher’ command. However, if at any point the reset process doesn’t work, reboot and try again. If multiple attempts fail, then you’ll need to reset the computer manually. Read on!
Since you’re logged into your user account, make sure it has administrative privileges. You can check this by going to Settings > Accounts > and make sure your account says “Administrator” on the Your Info page. If it’s a Standard user account, you’ll need to log into an Administrator account on that computer to proceed.
As an Administrator for that PC, you can make any changes you want. Start by uninstalling all the 3rd party apps you’ve installed. From Settings > Apps, go through the list and uninstall everything that you added since you first set up the computer, one at a time. This may take a bit of time, and you don’t need to uninstall everything, just anything that might have files tied to any data of yours.

Next, you’ll go to Settings > Accounts and create a new, local user account. This will be in Settings > Accounts > Family & other users – scroll down to Other users and click the link ‘Add someone else to this PC’. Choose the link ‘I don’t have this person’s sign-in information’, then ‘Add a user without a Microsoft account’. Choose a simple name, like “Computer User” and a simple password like “password”, and create three security questions and answers (these don’t matter but you can’t proceed without doing so). Click the Next button and you’ll return to the ‘Family & other users’ screen. Click the account you just created and then click the Change account type button. Change from a Standard user to an Administrator and click the OK button. Do not skip this last step!
Now you’re going to log out of your user account and log into the new, local Administrator account you just created. It will take a few minutes to log in as Windows has to create all the local directories and settings. Once you’re logged into Windows, go back to Settings > Accounts and click on your old user account, then delete it. Be sure to select to delete all your personal files and folders. This can take a few minutes or more, please be patient. When that’s all done, proceed to the last step:
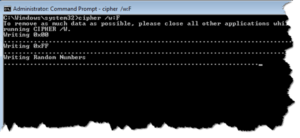
The last step is to securely erase all the unused space on your hard drive by using the ‘cypher’ command. You’ll need to use an old DOS-style command prompt window. Type “run” into the search bar next to your Start button, and type “cmd” – then choose the “run as Administrator” option on the right-side of the Start window. Click your cursor inside the command prompt window and type the command “cipher” followed by the parameters “/w” (overwrite/erase available unused space) and “C” to designate the entire primary hard drive. So the command will look like:
C:\WINDOWS\system32>cipher /w:C
Once this is showing in the command prompt window, press your keyboard’s Enter key to start the secure erase process. This process can take quite a bit of time to run, since the Cipher command will overwrite the disk three times. Three iterations of the overwrite function are done to make sure that there’s no way to recover the data that was written previously.
The Cipher command can do a number of other things (depending on the optional switch parameter you use) but the /w switch will only affect the available free space on your computer. I should mention that there are 3rd party software programs that can do this and can do even more iterations of the overwrite job (to supposedly more securely erase your data), but in most cases this is overkill. Of course, this advice is for consumers, not for you if you have national secrets stored on your computer!

When the cypher process is done you’ll see a confirmation in the command prompt window and you can type “exit” and press your Enter key to close the window. Your computer is now free of all your personal files and data, and you can donate or recycle the computer anywhere without worrying about the security of your digital life.
This website runs on a patronage model. If you find my answers of value, please consider supporting me by sending any dollar amount via:
![]()
(@PosiTek)
![]()
(Support@PosiTek.net)
")
(using any credit card)
There are currently 1295 reader comments on published articles, care to join in? Use the Leave a Comment form below/at the bottom of any existing comments. This is a good place to ask follow-on questions on this subject.


Chris,
Is a factory reset not enough?
A reset will delete things from the hard drive, but it really only deletes the disk navigation markers, not the data itself. So it could be reconstructed.
Adding the cypher procedure ensures that your personal data is destroyed and never recoverable from the hard drive.