
Old-school Backup
 Old-school Backup: a reader asks…
Hi Coach, I’ve got a 2 year old Windows 7 laptop, and a brand new 2tb Passport external hard drive. I’m finally ready to follow your advice and backup my computer. I don’t want to store any files on the internet, but I want to be covered in case of disaster. Can you give me a quick how-to for backup?
Congratulations, you’re joining about 3% of consumers who actually do backup. I should note that for the other 97% and who does suffer a computer disaster, 100% of them regret not backing up their computer. In these days of ransomware attacks, a good and recent backup is more important than ever. So first, let me lay out the main types of disaster, and then I’ll cover the backup strategies to enable you to recover from said disasters.
 First, you have your hard drive crash. This type of disaster is the most common, where your spinning hard drive just conks out on you. To recover from this type of disaster, you’ll have to replace the internal hard drive, and restore your computer using a System Repair Disk, and a System Image – both of which you create. Once your system is restored onto the new hard drive, you can use Windows Restore to get right back to the last point before the hard drive crashed when you ran a backup.
Second, you have problems where your hard drive hasn’t crashed, but has gotten so messed up that Windows will barely run. The errors will increase to the point where you can no longer do your work. This can be caused by virus or malware infections, a slowly failing hard drive, or just the vagaries of spinning hard drives (which are imperfect data storage devices and subject to problems sooner or later). If the disk itself isn’t failing, you can use the same process above without replacing the hard drive. This category of disaster also includes a ransomware attack.
 Third, your laptop is stolen, dropped or otherwise rendered useless. In this case, you’ll go out and buy a brand-new laptop to replace it. You’ll install all the programs you need that had been installed on the old computer (from the installation disks or other media), and once it’s all setup as a new computer, you’ll copy back your personal files that you backed up using the Manual Backup method.
So you’ve got four tasks to complete: create a System Repair disk, create a system image, turn on and run Windows Backup (I suggest the daily schedule and late at night), and Manual Backup. Let me take these one at a time:
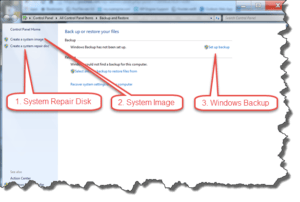 System Repair Disk: This is a one-time job, and you’ll need one record-able CD or DVD (if you were on Windows 10 that would be one 8gb or larger USB thumbdrive). Creating this is easy, click the Start button and type “backup”, then click on the Backup & Restore menu item that pops up.That opens up a Control Panel Backup & Restore window. On the left side is menu option “Create a system repair disc” – click that, insert your recordable CD/DVD and follow the on-screen instructions. When done, mark this disc and put it someplace safe, perhaps your Computer Disaster Recovery Kit.
System Image: This job you’ll do perhaps once a year or more often and you’ll use that shiny new Passport external hard drive. Plug it into your computer. Click Start, type “backup” and then click on the Backup & Restore menu item that pops up.That opens up a Control Panel Backup & Restore window. On the left side is menu option “Create a system image” – click that and follow the on-screen instructions. You’ll choose the Passport drive to store the system image. When done, leave the external hard drive plugged in.
Windows Backup: This is an automatic backup feature of Windows that you’ll turn on and leave running, so it’s a one-time job for you. With the external hard drive plugged in, click Start, then type “backup” and then click on the Backup & Restore menu item that pops up.That opens up a Control Panel Backup & Restore window. On the right side is menu option “Create a system image” – click that and follow the on-screen instructions. You’ll go through several screens where you’ll choose the external hard drive, let Windows choose the files to backup, and finally change the schedule (I suggest daily or weekly, depending on your level of paranoia). Save and run your first backup. All future backups will happen automatically as long as your external hard drive is plugged in and the computer is on at the scheduled day and time.
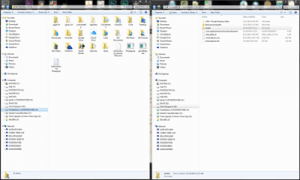 Manual Backup: This is my triple-redundancy failsafe, which you should do weekly or more often. The System Image and Windows Backup contain all your files in a compressed form and you must run the Backup & Restore program to use them. A manual backup will let you easily access any of your personal files from any computer to which you attach the external hard drive. With the external hard drive plugged in, open a Windows Explorer window to that drive. Move that window to the right side of your screen, and create a new folder in it called “ManualBackup”, and open that folder. Now open a new Windows Explorer window to your user account folders (click Start, then your username at the top of the Start Menu on the right). Move this window to the left side of your screen.
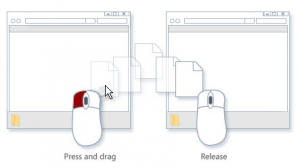 On the left-side window, select all the folders that have your personal files (usually that would be Desktop, Downloads, Favorites, My Documents, My Pictures, My Music, & My Videos). Using your right-mouse button, click and hold down the button over any of these selected items, then drag the cursor over to the right-side window (white space area), then let go of the mouse button. A menu pops up and you’ll select (using your left-mouse button) “Copy”. Let it go and come back later to make sure it finishes correctly. A few notes:
- The first time you do this, you’ll create the ManualBackup folder. Every time you do this (daily or weekly) you can choose to overwrite the files you’d previously copied, or you can create a new ManualBackup folder. If you go with this option, add the date to the folder name, e.g., ManualBackup10Apr16, ManualBackup17Apr16 and so forth. If you choose to overwrite, you’ll have a few stopping points in the backup where you have to confirm that you want to merge the folders and overwrite the files. Whenever you see these, be sure to check the checkbox at the bottom “Do this for all”.
- If you use very long file or folder names, you might get an error in copying because the combined folder/filename is longer than Windows allows (Windows is limited to 256 characters). So D:/ManualBackup10Apr16/My Documents/Folder1/subfolder1/subsubfolder1/verylongfilenamethatbecomeshardtouse.docx might overcome this simple Windows manual backup routine. If this is your situation, then you’ll either have to rename files and folders to shorter names, or use a 3rd party backup too (such as the excellent Acronis True Image).
 If all the above sounds like a lot of work, please note that of the four tasks above, two are one-time only tasks, and one is a once-a-year job. Only the manual backup is going to be some work for you on an ongoing basis. If you decide to only do the first three items and skip the manual backup, then you’re still covered for most of the common types of disasters you’ll experience. Not that I’m telling you to skip the manual backup, I think it’s important to be fully covered! If you think the manual backup task is too much work, then consider using 3rd party software to do this for you.
These tasks will ensure you have a way to recover from disaster, so let’s quickly go over what you’ll do to recover:
If recovering your original laptop (with or without a new internal hard drive), you’ll plug in the external hard drive, insert the System Repair Disc, and startup the computer – booting to the disc. Sounds easy, but only if your computer’s BIOS is set to be able to boot to a disc. When starting up the computer with the disc inserted, you should see a pre-Windows bit of text (white on black screen) that says something like “Press any key to boot from CD…..” be sure to press a key on your keyboard to startup, otherwise you’ll boot into Windows and have to start over. If you don’t see that option, you have a couple of alternatives:
- When booting up, enter your BIOS and change the Boot order so that the CD/DVD drive is a higher number than your hard drive. When starting up, you should see an option to enter BIOS, some computers have you press the F1 key, some the Esc key, it depends on your brand and model of computer.
- When booting up, some computers are set so that if you tap (repeatedly) the F12 key you can choose what device to boot from – choose the CD/DVD drive.
 Once you’ve started up the computer with the System Repair disk (you’ll go through some options like picking the keyboard), you should see a small window with system recovery options. The first step in restoring your computer is choosing the System Image Recovery option to restore your system to the image file you created sometime in the last year. click on System Image Recovery and follow the on-screen steps, choosing the recovery image you’d created. When that’s done, you can restart your computer into Windows and your computer will look exactly as it did when you created that system image. At this point it’s time to fire up the Backup & Restore app, and restore your personal files to the latest Windows Backup, which will be newer than the system image set.
For this second step, click Start, type “backup” and select the Backup & Restore item on the menu, opening up the Backup & Restore app. You’ll see options at the bottom of the window to restore your computer. Click the Restore My Files button, then choose what you want to restore (you’d probably choose everything). Complete the screen options and kick off the restoral, which may take an hour or more to run. When that’s done, your computer is back to where it was before the crash, ransomware attack, or whatever disaster struck.
If your disaster was of the get-a-new-computer type, then you’ll want to setup the new computer fresh with all the software you need. I have a handy new computer setup guide here. Once it’s set up, you can then proceed to the second step of the above restoral procedure, where you only restore your personal files.
 A special note for Microsoft Outlook users: If your Outlook personal folders file (probably outlook.pst) is not located somewhere in your My Documents folder structure, then you might have a small wrinkle to deal with. In Outlook, click File > Info > Account Settings > Account Settings and click on the Data Files tab in the window that opens. Click the Open File Location link to see where on your hard drive Outlook is storing your data file. Be sure to include that folder location in your Windows Backup. Better yet, get Outlook to store your personal folders file in a subfolder within My Documents (such as C:/users/youraccount/My Documents/Outlook Files). You’ll do that by:
- Find the current location and opening that folder. In Outlook, click File > Info > Account Settings > Account Settings and click on the Data Files tab in the window that opens. Click the Open File Location link. Leave that window open and go back and shut down Outlook completely. Wait for a good 15 seconds before proceeding.
- Now open another window to your My Documents folder, create a new folder (call it something like Outlook Files) and open that folder. Now drag your .pst file from the other window into the Outlook Files window. Make sure that you move the file instead of copying it.
- Now open your Control Panel, and the Mail app. Click on your Profile and Email Accounts, to get to the same Account Settings window shown above. Double-click on your data file entry and you’ll get an error message since it no longer is there. Click OK to shut down that warning and you’ll be able to tell Outlook where the data file is now, by navigating to the folder you created in step 2 above.
This website runs on a patronage model. If you find my answers of value, please consider supporting me by sending any dollar amount via:
![]()
(@PosiTek)
![]()
(Support@PosiTek.net)
")
(using any credit card)
There are currently 1298 reader comments on published articles, care to join in? Use the Leave a Comment form below/at the bottom of any existing comments. This is a good place to ask follow-on questions on this subject.


