Photo Magic
 Photo Magic: a reader asks…
I want to do some photo editing with Adobe Photoshop. I’ve looked through tutorials but am not sure I understand them. What I want to do is take a color photo that has some rose petals in it, and turn the entire photo black and white but with the petals still red. Can you help?
Photoshop is a very powerful tool for creative artists to make true works of art out of just about any photo. A talented artist can take a mundane photo and manipulate it – sometimes pixel by pixel – to craft a beautiful image that would bless any gallery or museum. Top artists in this field command very high salaries in part because of the huge skillset they must acquire and in part due to their inherent talent and eye for art.
That’s not to say that amateurs and enthusiasts can’t do something similar, but it’s well-known that Adobe Photoshop has a pretty steep learning curve, and proficiency can take hundreds of hours of learning and experimenting. You’ll find lots of Youtube videos that show you how to do what you want, as well as high-end tutorials such as you’ll find on Lynda.com and Adobe’s own tutorials. Unfortunately, many of those tutorials may be a bit hard to follow. Let me see if I can give you a more straightforward how-to. And as you may have come to know, there are probably a number of different ways you can accomplish your task. I’m going to show you one method – perhaps not the most elegant, but I think the easiest one to demonstrate in such a way that you can do it yourself.
If you’ve used Adobe Photoshop you should have a basic understanding of how the program works. A single image can be broken up into multiple layers, and effects can be applied to just one layer. This is the way you’ll remove the color from the photo, except for the rose petals. What you’re going to do is open the image in Photoshop, create a new, blank layer (let’s call it Petals), and then copy just the rose petals into that layer. By placing that layer above (on top of) the main image (aka “Background”), you can then change the background to black and white, while keeping the red petals showing. Let’s break this down:
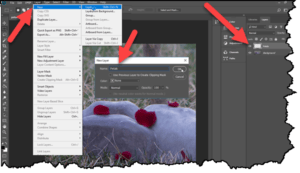 First, you open the file in Photoshop. Since you are working with a .JPG file, you want to first save it as a .PSD file (that’s the native Photoshop format that supports layers). Your first action on this photo is going to be to create a new, blank layer by clicking the menu selection Layers > New > Layer. Before you click OK, rename the layer from the default Layer 1 to Petals.
You should have the Layers pane showing on the right-side of the Photoshop window. If it’s not showing, you can make it appear by pressing F7 on your Windows computer or selecting the menu item Window > Layers. Make sure that the new Petals layer is above the Background layer. You can drag and drop layers in the Layers pane to put one or the other above or below. Also notice in the Layers pane that there’s an eye icon on the left of each layer – click that to make the layer visible or invisible.
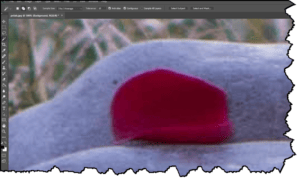 Next, make sure that you have the Background layer selected (by clicking on it in the Layers pane). You are going to use the Magic Wand tool for this next operation. Click on the tool (from the left-side tool icons or just press the W key). I’d suggest you take this opportunity to zoom in on your image as much as possible, so you can more easily select exactly what you want. You zoom in by pressing the Ctrl & +, and zoom out by pressing the Ctrl & – keys, or use the view menu. For now, let’s zoom in on the left-most rose petal.
With the Magic Wand tool selected, just below the top Photoshop menu you’ll have some options to choose to refine how that tool is used. the first set of four icons determines how your clicking will select items. You’ll want to choose the second one “Add to selection”. Next you can play with the Tolerance setting, changing it from 10 to a higher or lower number (to help you select just the rose petal). You can also select or unselect the Anti-alias checkbox. For now, leave the settings at:
- Add to Selection
- Tolerance: 10
- Anti-alias and Contiguous both checked with Sample All Layers unchecked
To select the rose petal, click in the center of the petal. That will select the deepest part of the red. Click again in an unselected red area and repeat until you’ve selected the entire petal. Be sure to select all the red including the pink edges. Don’t worry that you’re also getting a little of the grey rock behind it, as long as you don’t get too much. If you accidentally get too much, you can use the menu Edit > Step Backwards to back up. The selected area will have a visual outline and you want to make sure there are no holes inside the rose petal that are unselected. Keep clicking on areas until the entire petal is selected (along with the edges of the petal).
Now that you have the petal selected, you can copy that and paste it into the Petals layer. The simplest way is to use the Ctrl & C keys to copy it, then select the Petals layer in the Layers pane, and then press the Ctrl & V keys to paste that petal into the new layer.
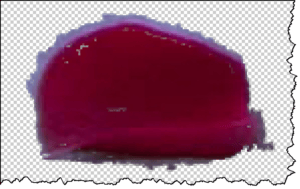 At this point you can check your work by clicking the eye in the background layer (in the Layers pane) to make the background invisible and look only at the Petals pane. It’s ok if there are some rough-looking pixels in this layer, because you’re zoomed in so tightly. When the picture is finished and resized for your intended purpose (for a website, photo print or for on-screen display) it won’t matter. Please note that if you want to print the photo onto huge photo paper or poster size for promotional materials, you’ll have to do a much better job of selecting exactly the pixels to use – this is beyond the scope of this tutorial.
Note: the grey/white checkerboard in Photoshop represents transparency, meaning there is no image so that the background layer(s) will show.
You’re going to repeat the above step of selecting each petal in turn and copying and pasting them into the Petals layer till you have all the petals copied. In the image you sent me, there are eight petals in total. When selecting the petals that have grass blades in front of them, be more discerning about your pixel selection so you don’t accidentally select part of the grass blades.
Once you have all the red petals copied to the Petals layer, check them by clicking the background layer on and off (using the eye icon in the Layers pane) to make sure you have all eight (after zooming out so you can see the entire photo). You’re now ready to change the background layer to black and white. This is pretty easy:
 With the background layer selected (in the Layers pane), click Image > Adjustments > Black and White. This brings up a slider pane that you can use to adjust exactly how you want the background part of the image to appear (fully black and white or just more lightly colored).
- The image will show with the changes, and your petals will remain red since they are on the Petals layer, which is not affected by your change. When you have the image looking the way you like it, click the OK button on the Black and White slider box.
Note in this example image I’ve only done the first petal. There’s no need to remove the petals from the Background layer since the Petals layer will sit on top and cover the black and white version of the petals.
If you zoom in on the image you’ll probably see some pixilation around the petals, with edges that don’t look very smooth. Don’t worry about this, as you’re going to resize the image and save it as a .JPG and that will make it so the pixilation is unnoticeable. To prepare this image and export it for use:
 Use the menu Image > Image Size and choose a size that fits your intended purpose. If you’re going to post this online, choose a size that’s no larger than 600 pixels along the longest edge. If you’re printing this on 8×10 photo paper, you’ll want to save it in the same size as the original photo.
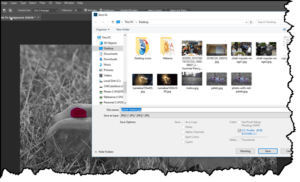
- Once the photo is resized, use the menu File > Save As and change the Save as type box from Photoshop to the JPEG format. Be sure to give it a unique name (so as not to overwrite the original photo). When you click Save button, the JPEG Options window will let you choose the quality of the image you want to save. Usually you’ll want the best quality (12, Maximum) unless this is just for a website in which a lesser quality (perhaps 8, High) is good enough.
You now have an image as desired, black and white with the rose petals remaining red. If you’re not happy with what you got, go back and start over. I’ll tell you that the selection of exactly which pixels to use (and which not to use) is going to make a difference in how professional the output photo is going to look. There are tons of other minor tweaks and adjustments you can make to fine-tune the image before you create the final output version – beyond the scope of this basic tutorial. That’s why professional Photoshop artists command the salaries they do!
This website runs on a patronage model. If you find my answers of value, please consider supporting me by sending any dollar amount via:
or by mailing a check/cash to PosiTek.net LLC 1934 Old Gallows Road, Suite 350, Tysons Corner VA 22182. I am not a non-profit, but your support helps me to continue delivering advice and consumer technology support to the public. Thanks!
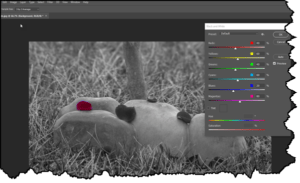 With the background layer selected (in the Layers pane), click Image > Adjustments > Black and White. This brings up a slider pane that you can use to adjust exactly how you want the background part of the image to appear (fully black and white or just more lightly colored).
 Use the menu Image > Image Size and choose a size that fits your intended purpose. If you’re going to post this online, choose a size that’s no larger than 600 pixels along the longest edge. If you’re printing this on 8×10 photo paper, you’ll want to save it in the same size as the original photo.


