
Power Program Icons
 Power Program Icons: a reader asks…
I’m a coder who usually works in Linux. I recently ported over to Windows 10, and have a bunch of GNU-type programs that are simply exe files and not installed. Programs like ImgBurn.exe, gnuplot.exe, python.exe, and APT.exe. I want easy access to them. I know I can drag them down to the taskbar, but that gets cluttered up because I have too many of these. In Linux, I put these into a folder window and resized that window to match the content, then placed the window at the bottom-right of my screen. But if I try that in Windows 10, every time I use File Explorer it changes all File Explorer windows to the size and location of the last one I used. Annoying! I also can’t drag and drop those executable files into the Windows 10 start menu. Is there another way?
Yes, Windows 10 allows you to put tiles (new-fangled icons) into the start menu that represent any file you want. The trick to do this is to right-click on the item you want added to the Start Menu, and then select (left-click) the menu item Pin to Start. This context-sensitive menu is available just about anywhere.
Since you have quite a few of them you have three choices for how to fit them all into the Start Menu without ending up with a long scrolling list of tiles. First, you can resize the tiles from medium to small (this is handy to also visually segregate your power program tiles from ordinary Windows programs). Second, you can make your start Menu wider to accommodate more tiles without scrolling down. Third, you can set your Start Menu to be full-screen ala Windows 8. Here’s how to do each of these things:
 To resize Start Menu Tiles:
- click Start, then right-click on the tile you want to resize.
- Hover over the Resize menu option and choose Small (versus Medium).
- Rinse and repeat for all the tiles you want to resize.
Tip: you can drag and move these tiles around on the Start Menu tile section. You can also have separate sections by putting a little space between the tile above. When you create these sections, you can click on the blank area above the section and name it.
 To make your Start Menu wider:
- right-click the taskbar (any blank part without an icon), then left-click Settings
- Click the Start menu item (menu down the left-side)
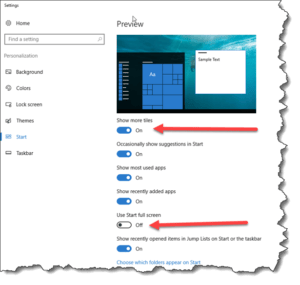
- Slide the slider to on that says Show more tiles
To use the Start Menu full-screen:
- right-click the taskbar (any blank part without an icon), then left-click Settings
- Click the Start menu item (menu down the left-side)
- Slide the slider to on that says Use Start Full Screen
I’ve found that by removing unneeded tiles from the Start Menu I have plenty of room to arrange what I like. When you install Windows 10, Microsoft clutters up the Start Menu with a bunch of junk I never use. So the first thing I do is clean it out. Then I go down the All Program list (to the left of the tiles area and helpfully alphabetized), and right-click in turn on each item I want on the Start Menu. You can also drag-and-drop from this area, but I find the right-click method faster. For your situation you can also open a File Explorer window to the location of your executables and right-click each one to add to the Start Menu.
Once you have all your preferred tiles on the Start menu you can drag them around to organize them however you like.
 Let me give you one alternative method to get a bunch of files easily accessible but without filling up either your taskbar or your Start Menu. Create a new taskbar toolbar. Here’s what you do:
- Create a new folder on your hard drive (for example, C:/MyStuff) I’d suggest you place this folder in your user folders (C:/Users/[you])
- Either copy all your executable files into it, or create shortcuts in that folder to the executable files. You can put anything in this folder, text files, images, executable files, etc.
- Right-click on your taskbar (any clear place without an icon), hover over Toolbars (which expands to the right with another list) then clcik on Add new Toolbar. Navigate and select the folder you created in Step 1.
 That puts a new item on your taskbar just to the left of the notification area, with the label (e.g., MyStuff) and two right-arrow brackets. Click on the brackets and a list pops up with all your items in it – all clickable. If you want, you could put multiple toolbars in this place, they’ll stack to the left. Note that if you right-click on the taskbar again and hover over the Toolbars menu entry, you’ll see your toolbar entry with a checkmark. Click it to uncheck the entry and the toolbar goes away. If you want it back you have to recreate it using the third step above.
This website runs on a patronage model. If you find my answers of value, please consider supporting me by sending any dollar amount via:
![]()
(@PosiTek)
![]()
(Support@PosiTek.net)
")
(using any credit card)
There are currently 1296 reader comments on published articles, care to join in? Use the Leave a Comment form below/at the bottom of any existing comments. This is a good place to ask follow-on questions on this subject.


