
Ransomware Protection
 Ransomware Protection: a reader asks…
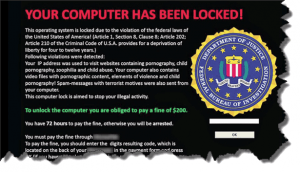
Hey Coach, I’ve been reading warnings about ransomware being the big threat for 2016, read about the recent and successful attack at the Hollywood Presbyterian Medical Center, and am starting to worry. What’s a regular consumer tech gal to do? Even the FBI says your best bet is to pay the ransom. I haven’t been infected yet, but am worried it’s only a matter of time. Got a hot tip for me? I use Windows 10 btw.
Yes, every technology and computer security journalist is banging the drum about ransomware, and you’re right, it’s only gonna get worse. It doesn’t matter if you’re a big company, a government organization, or just a regular consumer – we’re all at risk. So I’ll tell you the absolute best, first step you can take to protect yourself. But first, I think you’re right, it’s only a matter of time. Hackers are hard at work thinking up new and creative ways to get malware on your computer, and frankly, they’re way ahead of law enforcement and computer protection services (like Norton, Trend Micro and even Bitdefender). I think of the latter as accountants – they can tell you what’s already known, but can’t predict one microsecond into the future for what’s coming. That falls into the territory of political pundits, weathermen, and fortune tellers. I think we all know their…lack of accuracy?… in predicting the future. So most likely you’re going to become familiar with ransomware after you’ve been infected.
Ok, so if prevention isn’t truly possible, you’re left with what to do after you’ve been infected – e.g., disaster recovery. You really only have three choices, pay the ransom, live without your files and data (and possibly replace your computer), or the one thing you should do before you get infected. So what’s that one thing you should do? Backup your computer! My (almost) famous saying is:
97% of consumers don’t bother to backup their computers. Of the ones who get hacked, 100% of them regret not doing so.
 97% of consumers don’t bother to backup their computers. Of the ones who get hacked, 100% of them regret not doing so.
The only sure-fire way to recover from a ransomware attack without paying the ransom is to restore your entire computer from a backup. That wipes out the infection. There are a ton of backup programs and functionalities available. On a Mac, you have Time Machine, which is a great tool, but takes some systematic setup in order to make sure you’re fully protected. And yes, don’t think for a minute that a Mac isn’t subject to ransomware – ask the 6,500 Mac users who downloaded the popular Transmission program (before Apple fixed it), and got their systems locked up. On a Windows 10 computer, you have File History, which is pretty good. Previous versions of Windows had Backup and Restore, a decent feature. But these backup utilities don’t give you that full computer backup you’ll need to recover from a ransomware infection. For that you need to create a system or disk image of your computer.
All Mac and Windows computers have the ability to create a recovery drive/disk image/system image. This is the best backup protection method to recover from ransomware (or a crashed hard drive). Why? It’s all about disaster recovery. It’s one thing to suffer a disaster (which is what ransomware does to you), it’s quite another to go through the steps to get back up and running. With a disk image, recovering your system is pretty simple and will take an hour or so (depending on the size of your hard drive). Having a disk image not only covers you for a ransomware infection, but you are also covered in case of the much more common type of disaster – a crashed hard drive.
 When you create a disk or system image, you capture your entire hard drive so you can restore your computer to exactly the way it was as of when you created the system image. Of course, it’s important to do this before your computer is infected with ransomware! Depending on your level of paranoia, I’d suggest you create a system image of your computer once a year, once a month, or once a week. You can do this manually yourself, or purchase a 3rd party software program to automate this, such as the excellent Acronis True Image ($50 and up, Mac or PC, with other options to include iOS and Android).
But you don’t have to spend money. You can create a system image (and a bootable USB thumb drive or system repair disk) with the tools built into your computer’s operating system. Here’s how to do it manually on your Windows 10 computer.
 First, you need to get yourself an 16gb thumb drive. You’ll be reformatting this to be a bootable thumb drive, so anything that’s on it will be wiped out. You’re best off getting a thumb drive you’ll dedicate to this, and label it for disaster recovery. Microsoft says you need 8gb of available space on a thumb drive for this, so get a 16gb as the actual usable space is less than what it says on the label. You’ll also want either:
- an external hard drive, such as a My Passport (here’s a great 2tb one for $89 at amazon.com), or
- a network storage drive, good for backing up all the computers in your home or office (I like the Synology brand of storage drives, such as this 2tb one for $180 at amazon.com). For Mac households, a Time Capsule is fine.
 an external hard drive, such as a My Passport (
If you have more than one computer to back up, it’s worth the investment in a network storage drive since you don’t have to connect the drive directly to each computer. The network storage drive connects to your router, and all the computers connect to it through your wired or Wi-Fi network. But I could make the case that you do want that external hard drive, because it won’t be connected to your computer if/when disaster strikes, and that’s an added layer of protection. The technology behind ransomware has the potential to lock up any drive that’s connected to your computer – via cable or Wi-Fi. So to be safe, use an external storage drive and don’t keep it plugged into the computer except when you’re creating a system image. Again, I’d label this external storage drive and dedicate it solely for disaster recovery. You can use a network attached storage drive for standard backups (e.g., Windows 10’s File History), and to share files between computers.
Once you have a thumb drive and a backup drive in hand, you can proceed.
Second, you’re going to make your thumb drive into a bootable drive (aka recovery drive, which is the same as a system repair disk). This is so you can boot up your computer with it instead of the operating system that’s on the internal hard drive – critical if your hard drive has been encrypted with ransomware (or if it crashed and you’ve replaced it with a new, blank hard drive). To create your recovery drive in Windows 10:
- Insert the thumb drive into the computer. Wait a few seconds till your system recognizes the thumb drive (it may have to load drivers). You can close any windows that open (such as the one that asks you what you want to do with the thumb drive).
- In the “Ask me Anything” or Cortana box at the bottom-left of your screen, type “RecoveryDrive”, then choose the recoverydrive run command option that appears at the top. Press your keyboard’s Enter key. The Recovery Drive program will start. Choose whether or not to include your system files (check or uncheck the checkbox) and click Next. The program will scan your computer, locate the thumb drive and let you know if it’s capable (large enough) to be used as a recovery drive.
- The program will tell you it’ll wipe everything off the thumb drive. Click the Create button. The Recovery Drive program will reformat your thumb drive and create a bootable USB drive. This process could take awhile. When it’s done, you can unplug the thumb drive, label it and set it aside.
 Insert the thumb drive into the computer. Wait a few seconds till your system recognizes the thumb drive (it may have to load drivers). You can close any windows that open (such as the one that asks you what you want to do with the thumb drive).
An alternative option to the above is if your computer has a writeable CD/DVD drive and you have a writeable CD/DVD disk. Then you can create a standard System Repair Disk. See below in the third section, get to step 3 when you see the second control panel window, instead of System Image Backup, choose Create a system repair disk and complete that process. Label the disc and set it aside for now.
Third, you’re going to create a system or disk image on the removable storage drive, or on your network attached storage drive. This is the backup that will contain everything on your hard drive. You can use this (with your thumb drive) to wipe out the ransomware infection and put your computer back to the way it was. Please remember that this image is a snapshot in time as of when you create it, so you may want to repeat this process as often as you wish to feel safe.
- Plug in the USB cable to connect the external storage drive to the computer. Wait a few seconds till your system recognizes the drive (it may have to load drivers). You can close any windows that open (such as the one that asks you what you want to do with the thumb drive). Skip this step if you’re using a network attached storage drive.
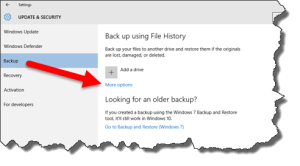
- In the “Ask me Anything” or Cortana box at the bottom-left of your screen, type “file history settings”, then choose the File History Settings (system settings) option that appears at the top. Press your keyboard’s Enter key. The Settings window will open to the Backup section. Click the More Options link under Back up using File History, and then click the See advanced settings link under Related Settings. This will open a new window to your Windows 7 style Control Panel.
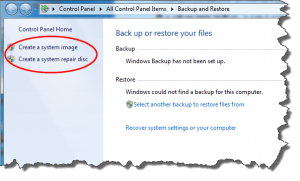
- Choose the link at the bottom-left of this window, System Image Backup. This will open another Control Panel window to Backup and Restore (Windows 7). It will look for attached drives, when that’s done choose the drive you want to use as backup (either the attached external drive or a network attached storage drive). Click Next, and confirm your settings, then click Start backup. Now go have a cuppa coffee, it’s gonna take awhile. When it’s done, you can unplug the drive. You’ll want to repeat this process as often as makes you feel safe. I’d suggest either monthly or weekly.
 Plug in the USB cable to connect the external storage drive to the computer. Wait a few seconds till your system recognizes the drive (it may have to load drivers). You can close any windows that open (such as the one that asks you what you want to do with the thumb drive). Skip this step if you’re using a network attached storage drive.
 Choose the link at the bottom-left of this window, System Image Backup. This will open another Control Panel window to Backup and Restore (Windows 7). It will look for attached drives, when that’s done choose the drive you want to use as backup (either the attached external drive or a network attached storage drive). Click Next, and confirm your settings, then click Start backup. Now go have a cuppa coffee, it’s gonna take awhile. When it’s done, you can unplug the drive. You’ll want to repeat this process as often as makes you feel safe. I’d suggest either monthly or weekly.
You now have the tools you need to quickly recover from a disaster – either a ransomware infection or a crashed hard drive. Please note that this is not the same as a backup you’d use to migrate to a new computer. For that you’ll want to copy all your personal files to either the external hard drive or your network attached storage drive. Heck, might as well do that too, because that’s the other potential situation (your computer is lost or stolen). Again, do that as often as makes you feel safe.
Ok, now comes the part that you’ll do after your computer is infected with ransomware (or if the hard drive crashed and you replaced it with a new, blank hard drive). This is actually pretty simple:
- Boot up the computer with the thumb drive or system repair disk
- Once you’re in the recovery environment, select Troubleshoot, then System Image Recovery. Follow the on-screen instructions.
 Sounds simple, huh? Step 1 might be a little tricky, since your computer may attempt to start up in Windows 10 even with the thumb drive or system repair disk in place. If you can boot into Windows, you’ll want to click Start > Settings > Update & Security. That opens a settings window. Click the Recovery option on the left, then click the Restart Now button under Advanced Startup. When the system restarts, you’ll see the “press any key…” words show up before Windows starts. Press a key so you can boot to the thumb drive or system repair disk.
If your computer won’t boot into Windows and/or you don’t see the ‘press any key…’ option, then you’ll have to get into your computer’s setup screen to set it so that it looks for a USB or CD/DVD device – you’ll find it in the BIOS setup, probably under Boot Order. Once that’s changed (be sure to save the changes), you can restart the computer and press a key when indicated so you can boot to the thumb drive or system repair disk.
Step 2 is pretty straightforward, and when you’re done, shut down the computer (if it isn’t already), unplug the thumb drive and external hard drive, and restart. Your computer should boot up looking exactly the way it did when you made the system image. with no trace of the ransomware.
If the above sounds like a lot of work, it is, but paying ransom to crooks is probably more painful. As an alternative to the above process, you can spend some money and get a 3rd party backup program like Acronis True Image, but I can tell you that using that program is only going to be slightly less work. You’ll still need a thumb drive or system repair disk and an external hard drive or network attached storage drive. Tell you what, since I’ve already got that program, I’ll do a walkthrough of the process in a future article so you can compare it with the these instructions.
This website runs on a patronage model. If you find my answers of value, please consider supporting me by sending any dollar amount via:
![]()
(@PosiTek)
![]()
(Support@PosiTek.net)
")
(using any credit card)
There are currently 1295 reader comments on published articles, care to join in? Use the Leave a Comment form below/at the bottom of any existing comments. This is a good place to ask follow-on questions on this subject.


