
Scan to Computer
 Scan to Computer: a reader asks…
I have an HP all-in-one printer that has a scan-to-computer function. I’m not sure how to set it up on my Windows 10 computer. I’ve got the HP AIO app from the Microsoft App Store. Can you help me?
If you run the AIO app and click the Scan button, you’ll see that you also need another app, “HP Scan and Capture” which you get from the Microsoft Store (it’s free). Once you download and install that app, when you run the AIO app and click the Scan button, the scan and capture app runs. The first time you run this app, you have to select the device, and you’ll probably want to set some options like whether you want to scan in color or black-and-white, whether to scan the entire scan area or a specific size (like 8.5″ by 11″), and scan options for both photo and documents. Don’t forget to click the Settings menu item as that’s where you can specify where scans are saved. Note that this setting is for when you initiate a scan from your computer. That may be all you need, so you’re done!
 If you want to go a step further, you may want to setup ‘Kiosk” mode where you can initiate a scan from the printer itself. To set this scan-to-computer function that the printer uses (a button or icon on the printer), you need to visit the settings and preferences in the AIO app. Look down the left-side of the AIO app and you’ll see some icons. Click on the one that looks like a printer (just below the Home one that looks like a house). That gives you another menu where you pick ‘Printer Home Page (EWS)”. Click that and the right-side of the window changes to show you the printer’s control page. Click the Scans tab – this is where you can create a new Scan to Network profile. Don’t worry if you don’t have other computers, you’ll be creating a folder on your computer to receive those scans.
S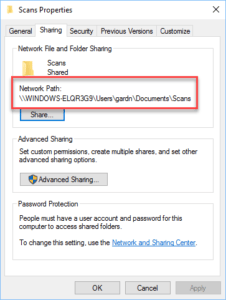 ince the HP’s EWS Scan page is going to need a ‘network location’, you have to create a shared folder location that the printer can get to. Leave the printer EWS page up, but open File Explorer on your computer and navigate to your Documents folder. Create a new folder called Scan. Then:
- Right-click on the Scan folder to bring up a menu, and left-click on the Properties menu item. That opens a small window with tabs – select the Sharing tab.
- Right-click on the part under the name “Network Path” and left-click on Select All.
- Right-click again on the highlighted path and then left-click on Copy.
You’ve now got the correct network path copied into your (invisible) clipboard. You can close all the File Explorer and properties windows.
Go back to the Printer EWS page, and make sure you’re on the Scan tab. Click the New button to create a scan profile. You’ll see a Display Name field, which you can fill in with whatever you want to show up on the printer’s scan menu (such as “My Computer Scans”). The next box down is labeled Network Path – here’s what you do with that one:
 position your cursor inside the Network Path box and right-click. That brings up a menu of things you can do.
- left-click on the menu item “Paste” and the network path you copied above will be filled in.
 position your cursor inside the Network Path box and right-click. That brings up a menu of things you can do.
The next two boxes are the username and password to your computer (when you turn it on and log into Windows). Skip the Pin assignment and look at the Scan settings – make sure they are what you want. Once that’s done, click the Save and Test button at the bottom to create the new scan button on the printer (e.g., a scan profile), and test it to make sure it works. If you did all the above exactly correctly, the test should show successful completion and you can now start scans to your computer right from the printer.
You can of course repeat this process to create multiple profiles, which will make mutiple scan to computer options on the printer. Some folks do a lot of different types of scanning, so may make up several profiles, such as:
- receipts
- tax documents
- important documents
You can create as many of these as you want, just make new folders on your computer for each of the scan types you want.
If the above instructions don’t work perfectly for you, please leave a comment with the printer brand and model and I can look up the manual for yours online and help you more specifically. The above was generated for an HP M475dw multi-function printer.
This website runs on a patronage model. If you find my answers of value, please consider supporting me by sending any dollar amount via:
![]()
(@PosiTek)
![]()
(Support@PosiTek.net)
")
(using any credit card)
There are currently 1295 reader comments on published articles, care to join in? Use the Leave a Comment form below/at the bottom of any existing comments. This is a good place to ask follow-on questions on this subject.


