
Setup new Windows “S” Laptop

Setup new Windows “S” Laptop: a reader asks…
I just got a new Lenovo notebook PC. I’m not a savvy computer user. Can you give me some tips on how to set it up correctly? I do have a gmail account, and I had a Windows PC before that’s now died so I’m starting fresh. I tried to install Google Chrome but my new PC wouldn’t let me. Something about “Windows S”. Can you tell me what to do to setup this new laptop correctly?
You probably got a low-cost computer, which often comes with a cut-down version of Windows (called Windows S). That only lets you install apps from the Microsoft store. So first you need to switch out of S mode to use Windows 11 normally. Of course, if you don’t mind the limitations of staying with Windows 11 S, then by all means don’t proceed, just recognize your use will be more limited, such as you can’t use Google Chrome instead of the Microsoft Edge browser.
Assuming you want to switch, one caveat is that this is a one-way switchover. Once you leave S mode you can’t return. Likely this is going to be what you want to do anyway, although your new laptop will be a bit more susceptible to hacking and scamming as a regular Windows computer than a Windows S computer. My recommended setup steps below will mitigate that and make your Windows 11 laptop as safe as a Windows 11 S laptop. Let’s start with switching you out of S mode, and then I’ll go into how to setup your Windows 11 computer for maximum capability and safety.
Here’s how to switch out of S mode:
First, you need to visit this Microsoft support page and click the link which will take you to the Microsoft Store and the page “Switch out of S mode”. Click the Get button and wait for it to finish. Once you see a confirmation you’ll be able to install apps other than from the Microsoft Store.
Steps to setup your new Windows 11 Laptop

Now that you have a fully-functioning Windows 11 computer, you can go through the steps to configure your computer for your use, including installing Google Chrome (click this link and click the button to download the app installer, then run the app installer to install Chrome on your computer). Once Chrome is installed and open, you’ll want to log into your Google account. Then turn on Sync. Hopefully your bookmarks and such will have been saved to your Google account from the old computer and it’ll all appear in Chrome on this new computer.
Next, you’ll want to go through your installed apps and uninstall any that you don’t need. Right-click the Start button (4 blue panes in a square), then left-click the Settings menu item. That opens a window to your computer settings with another menu down the left-side. On that menu, click the Apps item, which will bring up a list of all the installed apps on the right side. Click on any of the items in turn on that list, and click the Uninstall option that pops up. Rinse and repeat till all the apps you won’t ever use are uninstalled. If your computer came with any ‘trial version’ software you should probably uninstall it. Also uninstall any 3rd party protection programs (like McAfee, which you’ll replace with Malwarebytes). I don’t recommend any 3rd party protection apps other than Malwarebytes Premium for your Windows 11 computer.
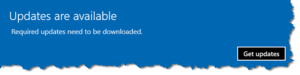
Likely your computer will not be completely up-to-date, so you’ll need to run Windows Update to install any available updates. Open the Settings menu as above, then choose the Windows Update at the bottom of the left-side menu. On the right side of the window, click the Check for Updates button.
There may be an available Windows update marked Optional that has its own Download button. Click that to add that to your list of updates to install. Please note that the updates may take quite a bit of time to install, and may require you to restart the computer to complete the updates. After you’ve restarted (and the restart will take longer to finish the updates), you should check Windows Update again and check for updates – you may see more appear. Keep updating till Windows Update doesn’t offer you any more updates.
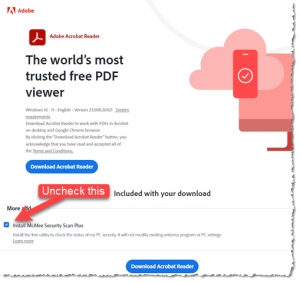
Next, you may want to install helper apps, such as Adobe Acrobat Reader. A note on this, Adobe’s webpage also offers you freeware from McAfee Malwarebytes Premium. I recommend you uncheck the optional additional software before you click the Download button to install Acrobat Reader. For that matter, I don’t recommend any of the freeware or trialware that is offered unless I specify it.
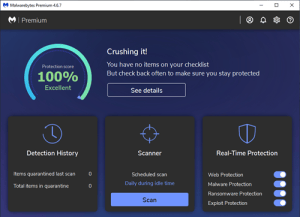
An example of the freeware I do recommend: Malwarebytes Browser Guard. This is an add-on to the $40/yr Malwarebytes Premium subscription I recommend for additional protection for your Windows computer. Microsoft Windows 11 includes the excellent Microsoft Security applet, which does a good job of protecting your computer. Adding Malwarebytes Premium gives an added layer of protection which I think is worthwhile.
To get Malwarebytes Premium, visit the website, download and install the app, and purchase a subscription. If you don’t purchase the subscription, the app will revert to the free version (after the trial period ends) and you’ll have less protection. Basically:
- The free version will let you scan your system on-demand and remove any malware it finds
- The Premium version will operate in the background and prevent malware from getting on your computer.
As part of the installation, you’ll be offered the free Malwarebytes Browser Guard, and I think it’s a great addition to any web browser. It works pretty seamlessly to protect you from bad websites, ads & trackers, and scams. Of course, nothing is perfect, you still need to practice safe computing.
One other thing to do in Malwarebytes is adjust the settings. Click the gear icon and:
- On the Security tab, turn on all sliders except leave the slider off for “Always register Malwarebytes in the Windows Security Center”.
- On the Notifications tab, turn on all sliders except I generally leave off the one under “Marketing Preferences” and the two under “Scan Reminder”.

Other things to add/install: If you have a subscription to Microsoft 365 (Personal Home or Family), then you’ll want to log into your Microsoft account and install the desktop apps. If you use an iPhone you may want to install the iCloud and/or iTunes apps (from the Microsoft Store). If you use any cloud file storage services, install those (Dropbox, Google Drive, Microsoft OneDrive, etc.). If you have a printer, plug its USB cable in to install it on your computer. If it’s a network printer, you’ll want to add the printer: Settings>Devices>Printers & scanners> Add a printer or scanner (check first to see if Windows already found and installed it).
Now you may want to make some basic configuration changes to your new computer to make it easier for you to use. Here’s a list of the most common things to set or change:

- Get Windows Updates fast, and for everything Microsoft. On the Windows Update screen, slide on the slider to get updates as soon as they’re available. Scroll down and expand the Advanced options, turn on all sliders except the 2nd one. Look for any optional updates and install any listed.
- Customize the Taskbar to remove items you won’t use and add items you use often.
- Customize the Start menu to remove items you won’t use and add items you use.
- Customize the Windows background either by using a background image or using a Microsoft Theme.
- Adjust your power options. My recommendation is to use the High Performance profile, and/or set advanced power options to 1) never use sleep mode, 2) never power down the hard drive or any other internal devices like PCI or USB, and 3) setup hibernation to activate only when on battery power and the battery level is “critical”.
- Finally, customize the Taskbar to show all notification icons (the set at the right of the taskbar). You can also move the Start button and pinned apps list from the default center of the taskbar to the left side (like it was in Windows 10) if you like.
Once you’ve done all this, your computer should be ready for everyday use.
This website runs on a patronage model. If you find my answers of value, please consider supporting me by sending any dollar amount via:
![]()
(@PosiTek)
![]()
(Support@PosiTek.net)
")
(using any credit card)
There are currently 1296 reader comments on published articles, care to join in? Use the Leave a Comment form below/at the bottom of any existing comments. This is a good place to ask follow-on questions on this subject.


