
Setup Windows 10 in 2021
Setup Windows 10 in 2021: a reader asks…

I finally bit the bullet and purchased a new Dell laptop PC direct from dell.com. It is due to arrive in the next day or so. Can you give me some tips on how to set it up correctly? Thanks!
I’ve written a number of articles on setting up new computers over the years, but it’s been awhile so here’s the latest for new Windows 10 computers in 2021. Firstly, you’ll want to follow any unboxing instructions that came with the laptop. Depending on what model you bought, this can include installing the battery, or simply plugging in electrical power and pressing the power button. When you first power on the computer, you’ll need to select your general location (region), connect to your WiFi network, and make some initial choices on apps and features. Plus, you’ll have to accept the all-important EULA (end-user-license-agreement) – don’t bother reading it as you have to accept it in order to use Windows. The EULA outlines the relationship and data-sharing rights you have with Microsoft, but is a ton of legalese that isn’t worth the effort of reading for most consumers.

The initial startup screens for Windows 10 have changed over the last few years, but still for the most part, you follow the on-screen instructions. Read each screen so you understand the choices you are making, don’t just blindly hit “Next” as you might miss important issues (like privacy). If you’re new to Windows 10, you’ll find that Microsoft wants you to create an online account and tie that to your user account on the PC. This is optional, but Microsoft pushes it pretty heavily. My feeling is that you may find it worthwhile to have a Microsoft account, especially if you also use any of the Microsoft Office apps like Word, Excel or Powerpoint. A Microsoft account may also be helpful to find your laptop if it gets lost or stolen. If none of that matters to you, look at the bottom of each of the account creation screens for the option to create a local user account (aka “offline” account).
When creating an account, you’ll want to create a decent password to secure that account. This is like the key to your front door, so make sure you can remember it. You can also choose an alternate sign-in method, such as a PIN or face recognition. When creating a Microsoft account, I highly recommend you secure that with two-factor authentication. This sends you a text message when logging into your account from new computers or geographic locations – very useful in stopping hackers.
Whichever type of user account you create, this first account will be an “administrator” account with full capabilities for making changes to the computer, installing apps, etc. This may not be the account you use day-to-day though. I’d suggest you’ll want to create a “standard” user account after you finish the setup. You’ll use that account for day-to-day use, and leave the administrator account to use only when you see a Windows 10 security popup requesting elevated privileges. This helps to keep your computer from getting hacked.
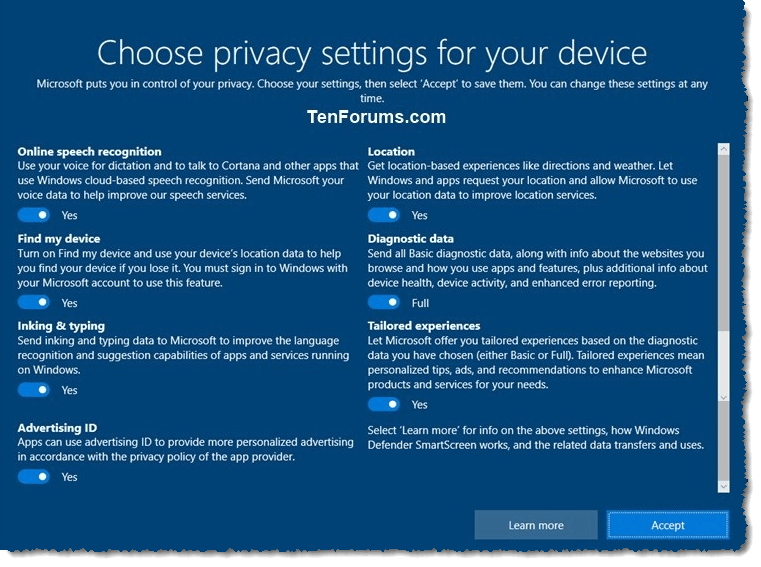
During the initial setup screens, you’ll want to pay attention to understanding the privacy and data-sharing options you make. I generally choose to share as little information as possible. You will want to share your location, as apps for weather and maps won’t be as useful unless you do.
You will probably see a vertical scroll bar to the right of the screen “Choose privacy settings for your device”, so be sure to look at and make setting choices for everything on that screen before pressing the Accept button.
Complete the initial setup screens and at some point you’ll see the standard Windows 10 desktop. It’s at this point where I suggest you create one or more standard user accounts for your day-to-day use. If multiple family members will be using the computer, you may want to create a separate account for each of them. Once you’ve created your own standard user account and finished some other initial setup items (see below), you’ll log out of the administrative account and log into the standard account to finish setting up the computer and start using it.
Initial computer setup: From the administrator account you’ll want to install any apps that all user accounts will…use. Such as Microsoft Office. You can also install your printer if you have one. And, if you choose to beef up your computer security, install a security app. I recommend Malwarebytes Premium. And if you’ll be using an alternative web browser (e.g., Chrome or Firefox), install that.
To install Microsoft Office, you’ll open a web browser and navigate to microsoft.com. Log in with your account credentials, and click the Microsoft 365 menu link at the top. If you haven’t already purchased a subscription of Microsoft 365, you’ll want to do that, this gives you access to all the Office apps. Once purchased, click the link on the website to install Microsoft 365 onto your computer. Then, when you’ve installed it, run any of the Office apps to activate the program with your Microsoft. account.
To install your printer: If the printer is wireless or network-connected, click the Windows 10 start button (bottom-left of your screen, A “Type here to search” box will appear to the right and you can type “printers & scanners” and press your enter key. You’ll see an icon “Add a printer or scanner” to click and have the computer find and install the printer. If the printer is to be connected via USB, connect the cable to your computer and Windows will install the needed driver.
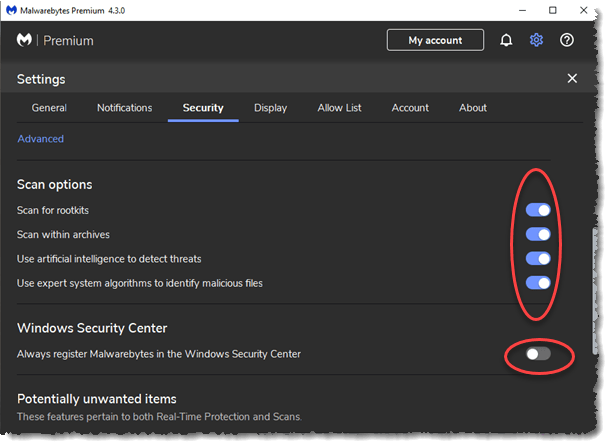
If you want better computer security, visit malwarebytes.com and purchase Malwarebytes Premium ($40/year). Download, install and activate the app, then visit the Settings page of the app and the Security tab. Be sure to slide on the “scan for rootkits” and “use expert system algorithms to identify malicious files” sliders, and slide off the slider under “Windows Security Center” (“Always register Malwarebytes in the Windows Security Center”). Why do this? to help prevent Malwarebytes and Windows 10’s built-in Windows Security apps from interfering with each other. These two programs work well side-by-side to protect your computer. I don’t recommend any other 3rd party security programs (including the ones that might have come with your new computer).
Install any other apps or services you want or need. This can include an alternative browser (Windows 10 comes with Microsoft Edge which works just fine), music apps like iTunes, Spotify or Pandora, and any smart apps you can get from the Microsoft Store (icon on your start menu). You may also want to go through the list of installed apps and uninstall any you don’t need. Computer manufacturers often put a bunch of “trial-ware” and unneeded 3rd party apps on the computer (they get kickbacks for doing this), so feel free to uninstall them. Click Start > Settings > Apps and go down the list. Click on each one in turn you want to uninstall, and you’ll see a handy “Uninstall” button appear.
Lastly, you’ll want to adjust your power options. Click the Start button and start typing “Power & sleep settings”, pressing enter once that option is highlighted in the search results. Here I suggest you adjust the screen turnoff option to 5 minutes or so, and choose “Never” for Sleep mode. Sleep mode still doesn’t work right in my opinion, causing problems with computer and app operation. Next, click the “Additional power settings” link, which opens a new Power Options window. Under “Choose or customize a power plan”, pick the High Performance plan and then click the link “Change plan settings”. On the following screen, click the link “Change advanced power settings” which opens another small window. On this window, you can adjust the various options any way you like, but I’d recommend these:
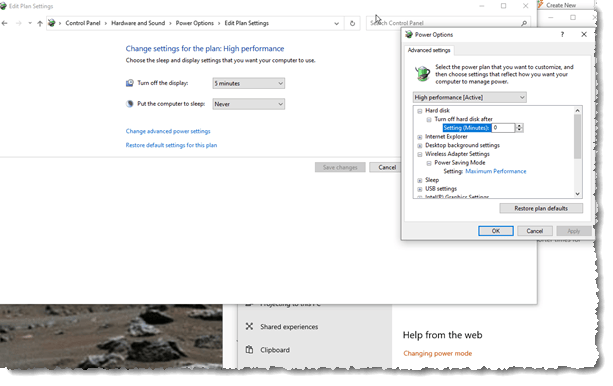
- “Hard disk”>”Turn off hard disk after” is set to 0 or never (both battery and plugged in)
- “Wireless Adapter settings”>”Power Saving Mode” is set to Maximum Performance (both battery and plugged in)
- “Sleep”>”Hibernate after” is set to Never when plugged in and 25-45 minutes when on battery power
- “USB settings”>”USB selective suspend setting” is set to Never when plugged in
- “PCI Express”>”Link State Power Management” is set to Off when plugged in
Once this is all done, it’s time to log out of the administrator user account and log into your standard user account. In your standard user account, you’ll want to open any Office program and activate Microsoft 365 (using your Microsoft account credentials) if needed. You’ll also want to organize your desktop and start menu (under Settings > Personalization):
- For your Desktop taskbar, set the notification area to show all icons. Click Start, then type “taskbar settings” and press the enter key to open that settings window. Lock the taskbar, choose “When taskbar is full” for “Combine taskbar buttons”, and click the link “Select which icons appear on the taskbar” – slide the slider on to “Always show all icons in the notification area”. Go back to the Settings > Taskbar screen and turn off “Show contacts on the taskbar” unless you will be using the Windows 10 built-in addressbook.
- Go back on that screen to the Personalization Settings window, and you can change other options, such as…
- On the Personalization > Start setting page, you may want to turn on the slider for “Show more tiles on Start”
- On the Personalization > Themes page, you can switch themes (including downloading free themes from the Microsoft Store). I like using themes with multiple photo backgrounds that automatically rotate (choose the “daily” or other option rather than every minute or so which can be distracting).
- On the Personalization > Themes page, you may want to hide some desktop icons like the Recycle Bin (for that, click the link “Desktop icon settings” and uncheck the various desktop icon checkboxes on the resulting “Desktop Icon Settings” window that opens). Personally, I like a clean desktop with only icons (shortcuts actually) there for documents and such that I’m actually working on.
- On the main Start menu, you can drag and drop icons to the tiles section on the right, and create different sections of Tiles for whatever arrangement of often-used apps you like. I prefer having tiles there for all the programs I use often, along with some handy tiles like Weather and News. Hint: for weather and news apps, you’ll need to run them once to get the tiles to start filling in and showing you updated information.
You can click-and-hold any icons from your Start menu and drag them to your taskbar so they’re always one-click away from runnning. Drag your most-used apps to the taskbar to the right of the search box. You can also re-arrange them by dragging an icon left or right. Also, look at the notification area to the right at the bottom. You’ll want to get used to seeing those icons and be aware if any new ones show up, or any disappear that are normally there (see “early warning system” below).
If you use email, set that up. For Gmail users, I suggest you install Chrome and log into your Google account. For those using a Microsoft Exchange or Outlook.com account, I suggest you set that up using the Outlook app. You can also use the built-in Mail app that comes with Windows 10, or your favorite 3rd party email app. If you use webmail (email in a web browser like Edge or Chrome), then you’ll want to read my article Email Links on Websites.

Next, setup any other apps or online services you use so you can access them quickly. And if you’re moving from an older computer to a newer one, you’ll want to copy all your personal files from the old computer and get them on your new computer. I suggest a simple external hard drive (like this one), which can then also serve as a simple backup device. After you’ve copied the files onto your new computer, click Start, type “backup settings” and hit your enter key. That opens a window where you can add that external drive to use to “Back up using File History”. Then just plug in that drive once a week or so for the day, and it’ll automatically keep your personal files backed up.
Ok, you’re just about done. I have one more task you might want to consider, and that’s to add to your early-warning system for computer problems. Your main early-warning system is the notifications area – those icons at the bottom-right of your screen. Anytime you see new icons appear, or icons disappear that you normally see, it’s a warning that you may need to restart your computer and/or check for something wrong.
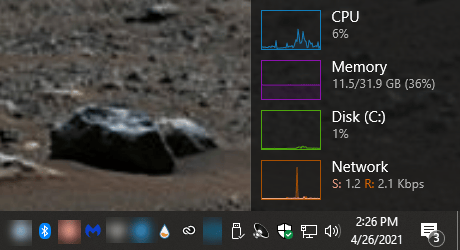
To improve on your early-warning system, you could add some handy meters similar to the Task Manager’s Performance indicators. I use an app called “Rainmeter” (get it here). Install Rainmeter (choose to run with Windows), and right-click-and-close each item that appears on your desktop – these are the default “skins” for Rainmeter. Next, get this “skin” called Windows 10 Widgets (get that here). Download and install that, and then right-click-and-close every item that appears on your desktop except for the one that has four meters for CPU, Memory, Disk and Network (this is called the Performance – Combo widget). You can then click-and-hold that widget and drag it down to the bottom-right of your screen, just above the notifications area.
Final tips: Anytime your computer isn’t working right, restart the computer. If you see any of the meters at the bottom-right of your screen that are pegged out at 100%, your computer is too busy to do much for you. Take a break until they settle down, or restart your computer. Restarting your computer will fix 80% of all computer problems! And finally, be very wary of downloading or installing apps from the internet, there’s a lot of bad stuff out there! Ok, and finally, finally, stop clicking on links in emails, surfing the web indiscriminately, and ignoring warnings and popups. If in doubt, ask someone (feel free to ask me).
This website runs on a patronage model. If you find my answers of value, please consider supporting me by sending any dollar amount via:
![]()
(@PosiTek)
![]()
(Support@PosiTek.net)
")
(using any credit card)
There are currently 1296 reader comments on published articles, care to join in? Use the Leave a Comment form below/at the bottom of any existing comments. This is a good place to ask follow-on questions on this subject.


