
Shiny New Chromebook Setup

Shiny New Chromebook Setup: a reader asks…
Santa brought me a new laptop computer, yay! I looked at all your setup guides but didn’t find one for what I received – a Chromebook. So you have any tips for the best way to setup a Chromebook?
Congrats! I’ve been warming up to Chromebooks for awhile now, as they offer a very much simplified computing experience compared to either a Mac or Windows PC (and for some, even easier than an iPad). If most of what you do on your computer is within a web browser (e.g., Chrome), then a Chromebook might be your ticket to easier computing.
A Chromebook is basically a laptop that runs the Google Chrome web browser. Most everything you do will be in that browser. In addition, most Chromebooks can also run apps which are designed for Chromebook, as well as Android apps built for smartphones. The nicest part is that Chromebooks are very simple to operate and boot up very quickly. And one more thing – you can use Sleep mode without worry. This is different than Windows PCs where sleep mode interferes with various apps and update features.
Setting up a new Chromebook is pretty simple, you turn it on, connect to your Wifi network, and provide your Google account login email and password, and are pretty much ready to go. If you don’t already have a Google/Gmail account, you’ll need to create one. If you used Google Chrome and/or Gmail on another computer, all your bookmarks, saved passwords and extensions should synchronize to your new Chromebook.
Once you have it up and running, there are a few things you might want to do to customize it for your use. Many Chromebooks today have the ability to use Chrome apps, which you get from the Google Play Store. The Play Store is an applet that comes pre-installed on your Chromebook. You can visit the Play Store and install various apps. Apps that I’d suggest to add (depending on what you use):
- Google Photos
- Cloud Storage apps (Google Drive, Dropbox, OneDrive etc.)
- Video chatting apps (Zoom, Microsoft Teams, Google Meet, etc.)
- Streaming Video apps (Disney+, Paramount+, Hulu, Netflix, etc.)
- Streaming Audio apps (Google Music, Amazon Music, Apple Music, Spotify, etc.)
- Social apps (Facebook, Twitter, Instagram, Linkedin, etc.)
- Helper apps (Adobe Reader)
Of course, most of these you don’t absolutely have to have, these will all run in the Chrome browser.
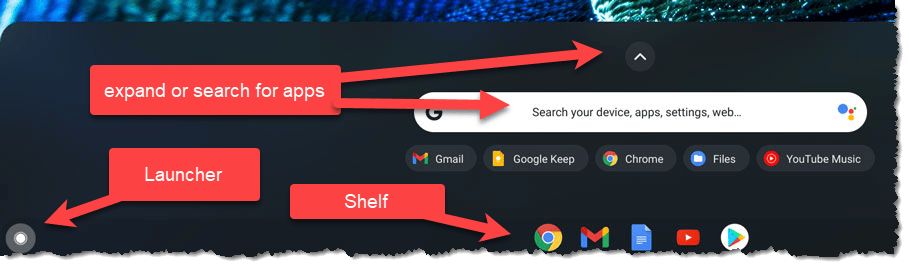
Your new Chromebook has a dock at the bottom just like Windows and Mac computers, where you can pin your most-used apps. Chromebook calls this the “shelf”. the circle icon at the left is called the Launcher, click that to see all your installed apps and search for anything (like “Settings”). Your Chromebook comes with a minimal set of icons already docked on the shelf, but you can add other installed apps. Chromebooks differ on how to do this:
- Some Chromebooks allow you to right-click on any icon in the from the Settings applet. Click the Launcher icon to open the simplified list, click the up caret (^) to expand it and right-click (aka, 2-finger click) on any item, then single-finger click on the menu item “Add to shelf”.
- Other Chromebooks make you go to the Settings pages to add apps to the shelf. Click Start > Settings > Apps > Manage your apps. Click on each app that you want to add to the dock (one at a time), and Slide the “Pin to shelf” slider to on. Repeat this for each app you want to add to the shelf.
One other thing I recommend for most people is to turn off Tap-to-Click for your Touchpad. For almost every human I’ve encountered, we lack the fine motor skills to use tap-to-click without mistakes, and mistakes can have unpleasant and unexpected consequences. When tap-to-click is turned off, you have to actually press down on the touchpad to activate a click (not a big deal imo). To change tap-to-click, click Start > Settings > Device > Touchpad > and slide the sliders to Off for “Enable tap-to-click” and “Enable tap dragging”.
Of course, Chromebooks are streamlined for use with Google services, such as an Android-powered smartphone – not great if you use an iPhone and Apple’s Photos app. If this is you, you’ll probably want to add a few apps to your iPhone to make things easier using an iPhone and a Chromebook. Such as…
- Google Photos
- Google Drive (or other cloud storage apps you use)
Setup the Google Photos app on your iPhone to copy the contents of your camera roll (and any new photos you take) to your Google Photos. That way they’ll show up on your Chromebook in the Photos app. You can choose how to organize photos, but if you use the Apple Photos app, the albums and other organizing features won’t transfer over to Google Photos – you’ll have to repeat whatever organizing feature you set into Google Photos for it to show up on the Chromebook. That’s just one of the many drawbacks of using different companies – they don’t like to play nice with each other.
Google Drive is the handy place to copy or save any files you download from your iPhone, as opposed to saving them to Apple’s iCloud Drive. Saving them to Google Drive means they’ll be accessible on your Chromebook.

For MS 365 users, things are a bit klugey, but it’s workable. First, go to https://office.com and log into your account. This gives you web access to all your Office apps. Once you’re logged in, click the 3 horizontal dots at the top-right of the Chrome window to bring up a menu, and click the “Install Microsoft 365…” item. Install the app which then opens and displays your MS 365 app (which is really just a specially formatted window of Chrome using the Chrome extension you just installed).
There’s no way to install the Microsoft 365 app from the Google Play Store, and the menu item to add the extension doesn’t appear until you log into office.com on the Chrome browser. Once the app is installed you can pin the Microsoft 365 app to your shelf and use it directly. If you go to office.com in the future and click on the 9-dot menu on the top-left, you can choose to open an app either in Chrome or in the Microsoft 365 app (if you choose the latter, click the checkbox so your choice will be remembed). Some functions of Microsoft 365 will still open a regular Chrome window (like OneDrive, Teams, OneNote, & Outlook), but Word, Excel, and Powerpoint will work in this app window just fine. I expect that as time goes on, Microsoft will better integrate all Office apps to work the same way as Word, Excel and Powerpoint do now.

If you want to print something from your Chromebook, you’ll first have to install a printer. Chromebook works best with network printers (such as a printer with Wi-fi on your home network). The quickest way is to try to print something (shortcut press Ctrl & P) and when the print window pops up, look for the Destination, click the down arrow and select See more…, then choose your printer. If it doesn’t show up, you’ll need to add it manually:
- Go to Settings > Advanced > Print and Scan > Printers > Add Printer > Print Server (button) and type in the IP address of your printer to add it to Chrome.
- If you don’t know the IP address of your printer, you can usually get it from the screen that’s on the printer’s control panel – look for Network Address, it’ll probably be something like 192.168.1.xxx.
If you have a printer with a USB cable you can try plugging that into the Chromebook directly, but compatible printers is a limited list. Once you plug in your printer, a notification window appears with instructions to follow to add the printer to your Chromebook.
One little handy feature is to take a screenshot (or video) of a window or your entire screen. Some Chromebooks have a dedicated button for that, but for all Chromebooks you can press this key combination to start a screen capture: Ctrl + Shift + the Show Windows button (usually the one above the #6 key whose icon is a rectangle with two vertical lines to the right). There are tons more tricks for using a Chromebook, and folks have put helpful videos up on Youtube, such as this one from Google:
Unlike Windows and Macs, there’s no handy volume control icon in the notification/control area (bottom-right of your screen in Windows, top-right of your screen in Mac). Click the time at bottom-right of the screen to bring up a control window that includes the volume control, brightness control, power button and more. There will be a physical power button, and your Chromebook may also have physical volume control buttons.
And finally, some people like Google Assistant, some hate it. It’s a voice-powered control interface, similar to Window’s Cortana, or Amazon’s Alexa. Under Settings > Device > Google Assistant, you can enable or disable it. If enabled, you activate it the same way as any other Google device, by saying “Hey Google” or “Ok Google”. There’s a handy Retrain button you can use there to quickly set Google Assistant up to recognize your voice. Personally, I find this a little creepy, but some folks like their computing devices always listening for their voice.
I’ve found that for many seniors looking to simplify their lives, it makes sense to switch to a Chromebook. And it’s a good choice even for younger folks who want a simpler computing solution. If you are neck-deep in the Apple ecosystem, it might not be the best choice, but if you have a Gmail account and do most of your work on the computer using Chrome (or other web browser), then a Chromebook just might be right for you.
This website runs on a patronage model. If you find my answers of value, please consider supporting me by sending any dollar amount via:
![]()
(@PosiTek)
![]()
(Support@PosiTek.net)
")
(using any credit card)
There are currently 1296 reader comments on published articles, care to join in? Use the Leave a Comment form below/at the bottom of any existing comments. This is a good place to ask follow-on questions on this subject.


