
Terminal App in Mac and Dock-Explained
Terminal App in Mac and Dock-Explained. a reader asks…
I have a 2021 M1 Macbook Air that is working just fine. One thing I’ve noticed is that the apps that show on my Dock change from time to time. In particular, there’s a black square icon labeled “Terminal” that seems to appear at random in the dock. Is this something I need to be worried about? Can you give me a quick tutorial on how the Dock works?
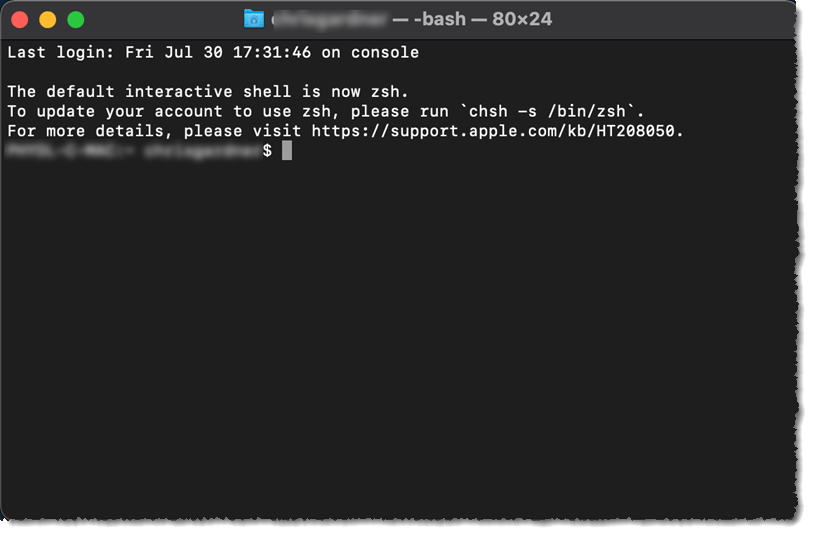
The Terminal is an app that allows for powerful “command-line” types of apps to run. This app is generally only used by administrators or power users. If that’s not you, and you haven’t let someone like that use your computer recently, then you should be feeling the hairs on the back of your neck rise. This is because hackers also like to use the Teminal app when they’ve broken through your security and have compromised your Mac.
If you’re worried about this, here’s a short list of things you should do:
- If the Terminal app is running (there’s a dot underneath the icon on the Dock), then 2-finger tap that icon, and quit the app.
If the app is running and you didn’t intend to do so (and didn’t accidentally start it, or let someone else use your Mac), then by quitting the app you are taking the first step to stopping a potential hacker. If you or someone else ran the app, you or they may have simply forgotten to quit the app (which you should do), and/or it may be simply sitting in the recently-used section of the dock (and is harmless sitting there).

- Look at the top menubar on the Mac screen. There are a bunch of icons at the right-side, and most of them are standard icons on all Macs. Hover your cursor over each one and verify that they are something standard, or something you purposefully added.
The left-side of this area (left of the usual icons including Wi-fi, battery, Bluetooth, and volume control) is where additional icons might be showing. Pay particular attention to these icons, as there should be nothing there you didn’t purposefully add. Things you might have added include LastPass (or other password manager), Malwarebytes (or other protection app), and Dropbox (or other cloud-storage app). If there’s an app icon you don’t recognize, hover your cursor over it to see what it is. Most likely you’ll want to quit that app and remove it from your Applications list (Finder > Applications) – sending the app to the trash. Especially if it’s a RAT!
Hackers like to install RATs (e.g., Remote Access Terminals) that give them remote access to your Mac. RATs can take over your computer and the hacker can then do nearly anything to it that they could do if sitting in front of your Mac. Bona fide support technicians (like PosiTek.net) may use a RAT legitimately, but that’s the only time a RAT could or should be running on your Mac. If you have a RAT and you’re not using a tech support person to help you, by all means end that RAT to stop a hacker from controlling your Mac.
Ending the RAT usually means using a 2-finger click on the icon, and then choosing a quit or similar option from the menu. RATs come in many flavors, including LogMeIn and TeamViewer, or an odd or unfamiliar name (like AlienSpy). Sometimes a hacker gained access using the macOS’ built-in remote support tool, so to stop this, open System Preferences > Sharing, and uncheck all the options listed, including Screen Sharing, File Sharing, Remote Login, and Remote Management. If you suspect a RAT but don’t see a way to disable it, read on for more tips.
- Open System Preferences > Users and Groups and make sure you are the only user and that the Guest User account is turned off (greyed out).
My recommendation is that you have two user accounts for yourself, one with Admin privileges, and another that’s a Standard account. If you only see your own user account and it is listed as an Admin, create a new User Account (click the plus sign at the bottom of the left-side list, after unlocking the padlock at the bottom-left). Make this new account an Admin account (select the account and click the checkbox “Allow user to administer this computer”), make sure you set a different password for this account, and restart your computer.
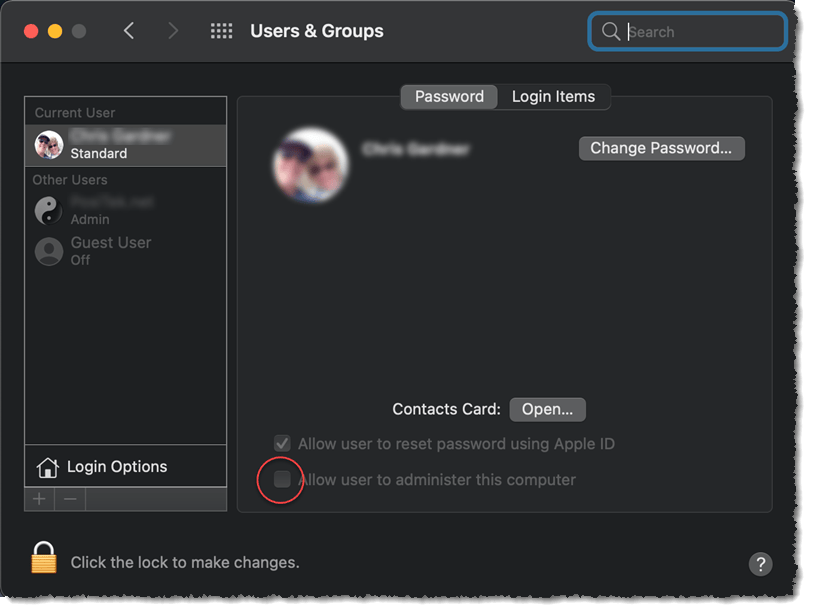
Now log into that new account and revisit the System Preferences > Users and Groups page. Change your original account from an Admin to a Standard account (by selecting that account and unchecking the checkbox). Now log out of your new Admin account and log back into your Standard account.
The recommendation above is to help prevent hackers from accessing administrative controls to your computer. You should use a Standard account (your original account) for all normal day-to-day use of the Mac. Anytime you try to do something that requires administrative privileges, you’ll have to approve those actions using the password you created for the Admin account. This extra step helps keep you (or anyone else) from approving changes to your Mac that you don’t purposefully intend to make.
- Go to your browser (Safari, and/or Chrome and/or Firefox) and make sure there are no extensions installed or changes made to the search engine or home page. Open Safari, click Safari > Preferences and go through each of the pages from General through Advanced, and verify that there are no settings changed that you didn’t intend to make.
You want to make sure that nobody changed your search engine. It should be Google, or any other search engine you specifically chose. If it’s something different, change it back to Google or your preferred choice. Also make sure that the home page (under the General tab) is either the standard (http://www.apple.com/startpage/) or something you specifically chose. Make sure the checkboxes under the Security tab are checked, and also on the Privacy tab (maybe not the “block all cookies” checkbox as that will significantly hamper your use of the web pages you visit). Under the Extensions tab, click the Uninstall button on any extensions that you don’t recognize and specifically chose to use. Under the Advanced tab > Proxies, click the Change Settings button, and make sure the Proxies page that pops up has no checked boxes (other than “Use passive FTP Mode”). The box under “Bypass proxy settings for these Hosts & Domains should have only one entry “*.local, 169.254/16 ” – if there are any other entries, use your cursor and keys to delete them.
If you use an alternate browser, go to the settings and verify all the settings are as you intended, or as they are set by default. Make sure your home page opens to the page you want, make sure the search engine is what you want to use, and make sure there are no extensions that you didn’t intend to use.
- Make sure your macOS is up-to-date and also any installed apps.
The reason why Apple and all software and computer hardware manufacturers and developers continually pester you with updates to their systems is because hackers and scammers are always finding and exploiting new vulnerabilities. No system or software is perfectly constructed, and the bad guys are highly motivated to exploit weaknesses. This is the world we live in, and your best defenses are active and updated constantly. Ignore this at your peril.
In addition to updating to the current version of macOS (currently Big Sur, macOS 11, but Monterey, MacOS 12 is coming soon), you need to make sure that all installed software is also updated. Running out-of-date software on your Mac is an open invitation to hackers, so don’t make it easy for them. You might as well also turn on auto-updates so that interim updates to your current macOS version are applied. Also watch your notifications for when a new version of macOS is released – my general recommendation is to wait a month or so before upgrading, but not too much longer. You should also open the App Store > Updates to make sure any apps you installed from there are updated.
3rd party apps (such as MS 365/Office or Adobe apps) have their own update methods. Same for alternative browsers. Whatever you’ve installed on your computer, keep it up-to-date. Sometimes that means looking through the app’s menu system to find something with the word “update” in it. And if you see any apps that aren’t standard Apple Mac apps or apps you installed on purpose – get rid of them.
- For an additional layer of security, use a security app. Macs are typically more resistant to hackers than Microsoft Windows PCs, but they are not immune. A 3rd party app can give you additional protection, but keep in mind that you must also be wary of installing anything or bypassing any of the warnings your Mac shows you, to keep your Mac safe.
You can choose among many apps that purport to give you additional security, but only two come to my mind when considering adding security to the Mac’s already powerful protection mechanisms. One is Malwarebytes Premium (at https://malwarebytes.com), and the other is CleanMyMac X (in the App Store or at https://macpaw.com/cleanmymac). Either will recognize and remove a wide range of threats including all the most common types of RAT apps.
I should say that if you use your Mac carefully, use a Standard account for day-to-day use and keep your system up-to-date, your risk of infection is going to be low. Adding a 3rd party app for protection may not be needed. And, these 3rd party apps cannot protect you against yourself. Meaning, if you ignore warnings, download and install apps without concern from the internet, and surf the web indiscriminately, you’re effectively negating any protection from hackers either built into your Mac or that you add on.
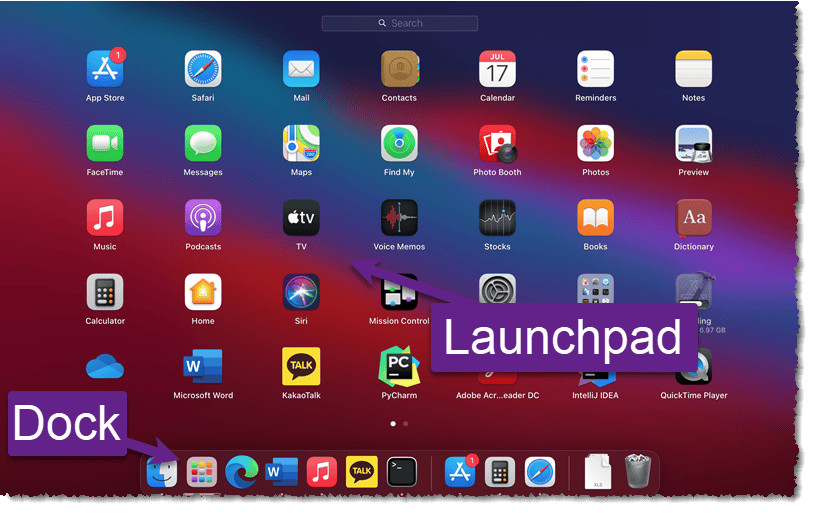
Now to a quick Dock tutorial: The dock on your Mac is that bar of icons, usually across the bottom. It’s intended to give you quick access to the apps you use most often and is very customizable – meaning you can easily add apps to the dock, or remove apps. Adding or removing an app from the dock doesn’t add or remove it from your Mac, it’s only the quick access to it – as opposed to either opening Finder > Applications or using the Launchpad and finding your app from the iPad-style screen of icons.
The Dock is split into three sections of icons, and the sections are separated by a light grey vertical line between the icons. The largest section starts from the left-side and has all the icons which are “pinned” to the dock. These icons are apps that run, such as Finder, Safari, & Photos. Often this section contains just the set of default apps that came with the Mac, but you can add and remove icons from this list to suit your preferences. If there are apps you run often, they should definitely be on this list, and if there are icons that you never use, feel free to remove them.
To add an icon, click on the Launchpad icon to show you all your installed apps, and click, hold and drag any icon down to the dock. You can also re-arrange the icons on the dock by clicking, holding and dragging an icon left or right. To remove an icon, use the 2-finger click on the icon to bring up a menu of things you can do with the icon, and hover over the “Options” menu item. This brings up a sub-menu with “Remove from Dock” – click that to eliminate the icon from your Dock. Again, this action doesn’t uninstall the app, it simply removes quick access to it through the Dock. To run that app, you need to either open the Launchpad again or open Finder to the Applications folder.
The second section is a short list of up to three of your recently-used apps that aren’t already pinned to the Dock. You can also remove icons from this list with the same 2-finger click as above. That same sub-menu also includes an option to add the icon to your left-side section of pinned icons if you find you use that app often.
The third section contains two standard icons – one is your Downloads folder and the other is your Trash Can. These can’t be removed. A 2-finger click on these gives you different options, including emptying your Trash. Hint: You likely never need to empty your Trash because your Mac automatically does this for you if your free internal storage space runs low.
The more icons you pin to your Dock, the smaller the icons will appear. In general, I recommend you limit the icons you pin to this to only the apps you use on a daily or weekly basis.
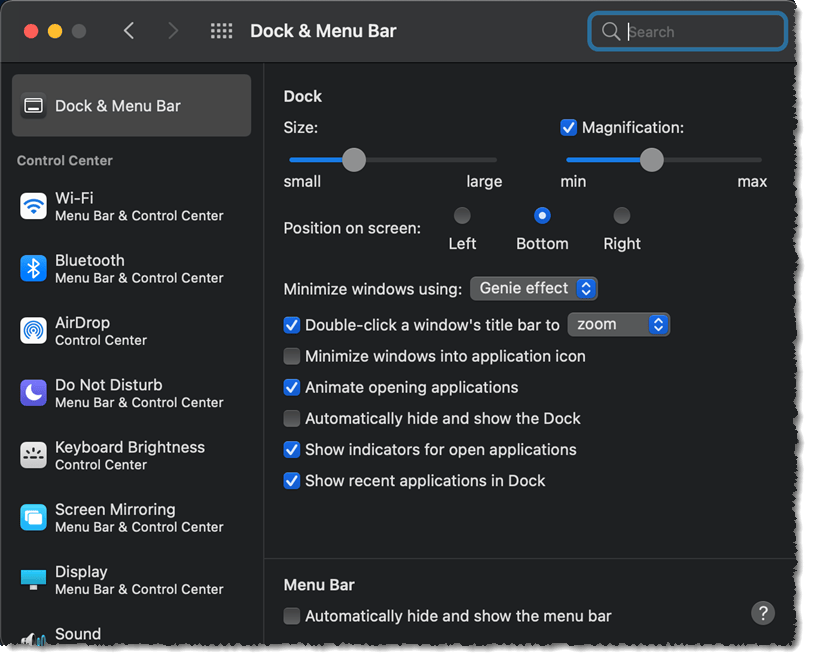
I should also mention that you can further customize the Dock by clicking System Preferences > Dock & Menu Bar. From there, you can make all sorts of changes, including hiding the Dock until you move your cursor to the bottom of the screen, moving it to the left or right side of the screen (instead of the bottom), and more.
The Dock is such a useful and powerful tool, that Microsoft has copied it for use in the forthcoming Windows 11. Imitation is a sincere form of flattery, but of course Microsoft software developers are going to change their version of the Dock to make it unique for Windows users – and avoid copyright infringement I’d wager…
This website runs on a patronage model. If you find my answers of value, please consider supporting me by sending any dollar amount via:
![]()
(@PosiTek)
![]()
(Support@PosiTek.net)
")
(using any credit card)
There are currently 1295 reader comments on published articles, care to join in? Use the Leave a Comment form below/at the bottom of any existing comments. This is a good place to ask follow-on questions on this subject.


