
Time Capsule Not Working
 Time Capsule Not Working: a reader asks…
I have several older Macbook Air computers at home in the family, and I also bought a Time Capsule so they’d all automatically back up with the Time Machine app. I just checked, and none of the Macs are backing up, they say they can’t. I have Time Machine turned on and the Time Capsule is powered on and connected to my home network. What can I do to get Time Machine working on these Macs?
Depending on the vintage of the Macbook Air, your best bet is to first upgrade the operating system to the current version (that’s Sierra, MacOS 10.12.x), and then try starting a Time Machine backup. You should also use Airport Utility to make sure the Time Capsule has the latest firmware (currently version 7.7.8) on it. Here’s how:
 To update to Sierra, your Macbook Air must be a late 2010 model or newer. You can check that by clicking the Apple icon at the top left of your screen and choosing the menu option “About this Mac”. The window that pops up will show the model information. Depending on your vintage and version of OS X, the screen might show it more or less prominently.
Once you’ve determined that your Macbook Air can be upgraded, then set aside a few hours where you won’t need to use your Mac. You don’t need to babysit the Mac through the process completely, just get the update started, and periodically go look at the screen to see if you have to click something to keep the update going. Start by visiting the App Store on your Mac. You can go to the Updates tab, or simply choose the Sierra option on the right-side of the App store (under All Categories). Follow the on-screen instructions to update your operating system.
 First, the update process will download the Sierra update file, which could take up to an hour or more, depending on your internet speed. Once the download is complete, you’ll have to click through a few screens to get the update started. Once it’s started, it can take up to an hour to complete.
Depending on the version from which you’re upgrading, you may have some choices to make at the end of the upgrade process. For example, you may have to choose to use iCloud Drive and Siri. Make your choices and finish the upgrade. Once completed, your Mac will show you your desktop, and you might see the new Sierra wallpaper – if you hadn’t already chosen a specific wallpaper image.
 With your Mac now running MacOS Sierra, you can open the Airport Utility and check your Time Capsule for a firmware update. Click the magnifying glass icon to open your search bar, and type in ‘Airport Utility’, and open the applet. It will show you an image of your Time Capsule. Click on it and if a firmware update is available, it will offer to update it for you. Follow the on-screen instructions to do so. This will restart your Time Capsule once or twice, so be patient.
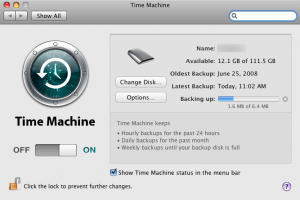
Once your Macbook Air (all three of them in your case) is running Sierra and your Time Capsule is updated and has finished restarting, you should be able to open Time Machine Preferences on your Mac, and make sure that the Time Capsule is selected and Time Machine is turned on. At that point, the automatic backup should start preparing and backing up your Mac. You might get a warning that you have to create a new backup – this is normal after an operating system update.
I should mention that this first backup is going to take awhile, so your Mac should be plugged into electric power so the battery doesn’t run down and shut down the Mac.
 If Time Machine will still not complete the backup, then you may have to erase (and reformat) the drive. Don’t worry about the old backup files, with MacOS Sierra you wouldn’t be able to use them anyway. Open Airport Utility and select your Time Capsule. Click the Disks Tab, then click the Erase Disk button. This will both erase the disk and reformat it for use as a Time Capsule. Finish that process and then Time Machine should start working correctly on your Mac(s).
As an aside, you may not know this but you can also use the Time Capsule as an external storage drive, separately from the backup. This can be handy to store files that may not fit on your Macbook’s hard drive. Large picture libraries and video files are good candidates for storing on the Time Capsule. To connect to and use the Time Capsule as an external network-attached storage drive:
 Open a Finder window. You should see the Time Capsule menu item on the left-side under Shared
- Click it and then click the Connect button near the top-right of the window
- Provide the username and password for the Time Capsule
 Open a Finder window. You should see the Time Capsule menu item on the left-side under Shared
Once connected, you can create folders on the Time Capsule drive and copy files into the folders. If you have a folder that you frequently access, drag it to the top-left Favorites section of your Finder window.
This website runs on a patronage model. If you find my answers of value, please consider supporting me by sending any dollar amount via:
![]()
(@PosiTek)
![]()
(Support@PosiTek.net)
")
(using any credit card)
There are currently 1295 reader comments on published articles, care to join in? Use the Leave a Comment form below/at the bottom of any existing comments. This is a good place to ask follow-on questions on this subject.


