Using External Drive on Mac & PC

Using External Drive Mac & PC: a reader asks…
I use a 2022 Macbook Air, and recently purchased two new external drives (WD Elements 2TB) to use with my Mac. I’m going to use one for Time Machine, and want to use the other to share files with others (including people using Windows PC’s). However, the drives came formatted for a PC, so my Mac doesn’t recognize them. I see that Amazon also sells drives for Mac – should I return these and get new ones that work with my Mac?
You don’t need to return those drives, it’s very easy to reformat them so they will work with your Mac. You have two different needs for those two drives, so you’ll need to format them two different ways. For the drive you’ll use with Time Machine, you’ll need to format it as Apple File System (APFS). For the drive you’ll use with other people, you’ll need to format it as ExFAT as that format is compatible with both Mac and Windows systems.
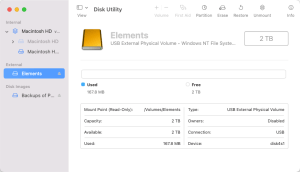
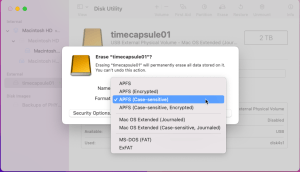
For the Time Machine drive, connect it to your Mac, and then run the Disk Utility app. Select the drive on the left-side. Click the Erase menu item at the top. This will open a small popup where you can rename the drive, and choose which format to apply to the erased drive.

To use that drive with Time Machine you must use the APFS format, and I recommend you choose Case-sensitive, so that the system knows the difference between capital and lower-case letters in the filesnames. You could choose an Encrypted option as well, which secures the data on the drive with a password you choose. I personally think that’s overkill for most people, unless you tend to lose your external hard drives.
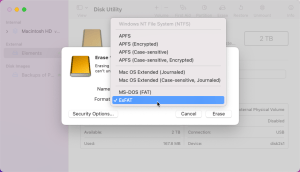
With those selections in place, click the Erase button which will rename and reformat the drive. Once the formatting is done, you can eject that drive and plug in the 2nd external drive. Using File Utility again, choose the drive on the left-side and click the Erase icon at the top, which brings up the popup window again. Rename the drive and choose which format to apply to the erased drive.

In this case, you want to choose ExFAT format, so that both Mac and PC computers can read and write to the drive. Once you’ve made that selection, click the Erase button and it will rename the drive and format it. When that’s done, you can eject the drive.
That’s all there is to formatting the drives for your use. You can run Disk Utility at any time to reformat any external drives you may want to use for whichever purpose you want.
This website runs on a patronage model. If you find my answers of value, please consider supporting me by sending any dollar amount via:
or by mailing a check/cash to PosiTek.net LLC 1934 Old Gallows Road, Suite 350, Tysons Corner VA 22182. I am not a non-profit, but your support helps me to continue delivering advice and consumer technology support to the public. Thanks!


