
Win10 AutoCorrect Frustration
Win10 AutoCorrect Frustration: a reader asks…

I have a computer with Windows 10 and I’m often typing non-standard words into various apps like Word, Outlook, etc. Windows auto-corrects that word and I have to backspace and re-correct it, since the auto-correct wasn’t, in fact, correct. For example, it auto-corrects HSA (e.g., health savings account) to HAS. I looked in the Windows 10 auto-correct settings and there’s no way to add words to the auto-correct dictionary. How do I do that?
This is a real annoyance for just about all computer types and devices. AutoCorrect is often more like “auto-destruct”. It’s become so prevalent a complaint that it’s become a meme online. Some operating systems are better than others at letting you customize the AutoCorrect actions, Windows 10 is not one of them.
Since you have Microsoft Office, you do have the ability to adjust the AutoCorrect options in all the Office programs (Word, Excel, Powerpoint, Outlook, etc.). You can add acronyms and other non-standard words into the dictionary, but the place to do that is a bit hidden. Here’s what you have to do:

Open MS Word (current version is 2016), and start a blank document. Then…
- Click File > Options > Proofing > and click the AutoCorrect Options button. That opens a small window called “AutoCorrect”
- On the AutoCorrect tab in this window, click the Exceptions button which opens another small window called “AutoCorrect Exceptions”
- Click the tab “Other Corrections” > type in the non-standard word or acronym you want to add, then click the Add button. Click OK to shut the window and continue clicking OK to shut the other window
Before this will take effect, you’ll have to shut down any open Office apps (including Word) and restart them. From that point forward, they will honor the non-standard words and acronyms you added to the Exceptions list, and not AutoCorrect them.
Of course, that doesn’t work for any other apps or programs you have installed on your PC, but it sounds like you are primarily looking for help with your Microsoft Office programs, so the above procedure will help you solve those pesky AutoCorrect issues.
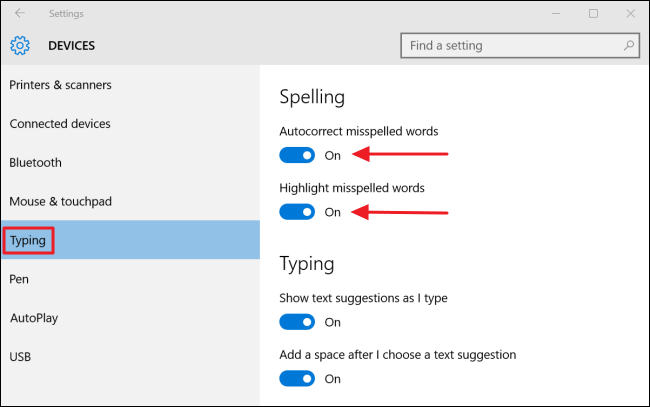
For folks who’ve decided that AutoCorrect is simply not for them, it’s easy to turn off in Windows 10. Click Start > Settings > Devices > Typing > and slide the slider to OFF for “Autocorrect misspelled words”. You can also slide the next slider to off (Highlight misspelled words) if you don’t want to see the squiggly red lines underneath the words that aren’t in the standard dictionary.
And because I’ve had this same question with iOS for the iPhone and iPad, you can turn off Auto-Correction by tapping Settings > General > Keyboards > and sliding the slider to OFF for the Auto-Correction entry under “All Keyboards. If you simply want to add in your non-standard words and acronymns, look above that setting for the Text Replacement link – tap that and start adding items you want.
Hint: you can type an acronym in lower-case and have the Text Replacement entry change it to upper-case automatically.
As computers get smarter and faster, I’m hoping that the AutoCorrect function will improve as well, but for now, we just have to suffer through the ways in which our computers, smartphones and tablets mangle our typing.
This website runs on a patronage model. If you find my answers of value, please consider supporting me by sending any dollar amount via:
![]()
(@PosiTek)
![]()
(Support@PosiTek.net)
")
(using any credit card)
There are currently 1295 reader comments on published articles, care to join in? Use the Leave a Comment form below/at the bottom of any existing comments. This is a good place to ask follow-on questions on this subject.


I cannot figure out how to force Microsoft Word to stop changing “wouldn’t” into wouldn’t’t. You can’t tell by how it looks right here, but the second apostrophe and t are in a different font, though my program insists they’re the same as the rest of the word.
I’ve gone into autocorrect to fix this multiple times. I’ve entered “wouldn’t” as an actual word in every dictionary that would let me, and in the Roaming dictionary, where I found wouldn’t’t , I highlighted and deleted it. But when I returned to any document (I have thousands), every time I spell it correctly, it auto-changes into wouldn’t’t.
Help!
Hi Lynn, thanks for your question! I’m assuming you found the misspelled word correction in your custom dictionary (e.g., RoamingCustom.dic (Default), under the Custom Dictionaries>Edit Word List. And that you removed it and then clicked the OK button. And that you revisited the custom dictionary word list and saw the entry still there (even after you removed it).
Have you tried clicking the checkbox just above the Custom Dictionaries button “Suggest from main dictionary only”? That would force Office apps to only use the default dictionary, instead of every dictionary you have, (default.dic CUSTOM.DIC, and RoamingCustom.dic). If that doesn’t solve the issue, uncheck that box and then read on…
It’s possible that somehow your user account lost the standard permission to modify the custom dictionary – it’s in a folder to which you may not have the permissions you should have. This is just an educated guess based on what you’ve told me…
To check, open File Explorer and navigate to c:\Users\[your account]\AppData\Roaming\Microsoft\Spelling. You may have to enable Hidden Folders in the View menu of File Explorer. Then, right-click each folder inside (in turn) and select Properties, which will open a small Properties dialogue box. Click on the Security tab and then click your user account – and note the permissions checks – you should have the Full Control line checked (actually all of them). If not, you’ll want to change the permissions (click the Edit button) and make sure that Full Control is checked.
If you had to make a change, be sure to click OK to close the Properties box, and close then re-open Word and see if you can edit the custom dictionary and that now removing the bad entry doesn’t have to be repeated.