
Win10 System Image
 Win10 System Image: a reader asks…
Hi Chris, I upgraded to Windows 10 recently. Previously on Windows 7 I took your advice and have been doing regular backups using the built-in Windows backup. I’ve also been periodically making System Images. Now that I’m on Windows 10, the new File History seems to be working fine, but I can’t make System Images any longer. Any tips?
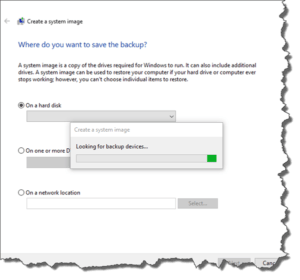
First off, in Windows 10, Microsoft has thoughtfully included the legacy system image creation feature, but thoughtlessly hidden it. You have to do some extensive clicking just to get to the point where you can choose to create a system image. Here’s three different ways to get to the same place:
Using Windows 10’s Settings:
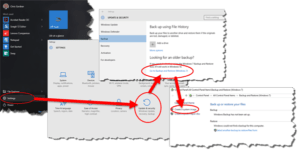
 Click Start and choose Settings, which opens a window
- Choose Update & Security in that window
- Choose Backup on the left-side menu
- Choose Go to Backup and Restore (Windows 7) on the right-side under Looking for an older backup? This opens a separate, Windows 7-style control panel window with a link on the left side to create a system image.
 Click Start and choose Settings, which opens a window
Or, using the Windows 10 search box (Ask me anything) type “Backup and Restore (Windows 7)” to open the Windows 7-style control panel window. Much faster but certainly less intuitive. You could also type “File History” to get to the same place in step 3 above. If you’re already using File History, then you might already be used to doing this.
It’s possible you’ve already found the right window to create a system image, but the process doesn’t complete for you. Some reasons why and solutions are listed below:
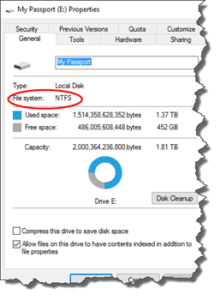 First, the external drive you are using to create the system image must be formatted as an NTFS volume. Some external drives come formatted in the older FAT32 format. To fix this you’ll have to reformat the drive. Plug it in and click Start > File Explorer to open a window. Then…
- Right-click on the external drive (in the left-side list).
- Select (left-click) the Format option and be sure you’ve selected NTFS as the format type, then click OK.
This will prepare the drive for use with the system image creation tool. You can check the format of an external drive by looking at the Properties window for the drive (right-click the external drive in File Explorer and left-click Properties).
Second, Windows 10’s Volume Shadow Copy service may not be working correctly. Our friends at Macrium.com have provided a VSS fix tool for both 32-bit and 64-bit computers here.
 Third, the VSS service may not be set to run automatically or may be disabled. Sometimes an upgrade from an older version of Windows may make changes like this. To reset this:
- In the Ask me anything search box, type “Services” and choose the entry labeled “Services – Desktop app”. That opens a Services window with a listing of services on your computer.
- Look down the list till you find “Volume Shadow Copy” and right-click that entry which brings up a menu. Select (left-click) “Properties” to open a new window.
- Change the startup type to ‘Automatic’ and click OK.
You might want to restart your computer after making this change. I should note that some 3rd party backup tools might change the setting from Automatic to Manual. If you use a 3rd party tool for backup, then you don’t need to change this, but then you’d also be using that tool instead of creating a system image with the built-in Windows tool.
 Fourth, the old Windows 7-style system image creation tool recognizes external hard drives, but not flash drives (e.g., thumbdrives). You can back up to any external hard drive (like the popular My Passport drives), but not to new high-capacity thumbdrives. This was also the case in Windows 7.
Don’t forget to create the System Repair Disc, since you’ll need that in the event that you need to restore Windows from the System Image. And you’ll want to create a new System Image at least yearly. I generally do this about once every 3 months to make sure that the image has any new programs I’ve installed.
This website runs on a patronage model. If you find my answers of value, please consider supporting me by sending any dollar amount via:
![]()
(@PosiTek)
![]()
(Support@PosiTek.net)
")
(using any credit card)
There are currently 1295 reader comments on published articles, care to join in? Use the Leave a Comment form below/at the bottom of any existing comments. This is a good place to ask follow-on questions on this subject.


