I have a new Dell Windows 10 PC (an Inspiron laptop with SSD hard drive) and have followed your instructions for setting it up. I’m using a Microsoft account (set as Standard user), have another Admin user account, and went through the Windows 10 setup, turning off everything I could in the Microsoft initial configuration crap. Now I’m at the point where Windows 10 is running normally, I’ve applied all the updates and have MS Office 2016, Adobe Acrobat Reader DC, Malwarebytes Premium (and Windows Defender), and Google Chrome. I use Gmail btw. What’s left to do is adjust my power options. I rarely use the computer on battery, it’s almost always plugged into electric power. Can you give me a rundown on the right power options for me please?
It sounds like you’ve done everything right to set up your new PC, and are ready to start using it! I’m assuming you have Windows Update turned on for automatic updates, and you’ve setup your Start Menu tiles for the programs you’ll use most. The power options I lay out below are intended to keep your computer safe (from overheating), and give you the maximum performance. One slight caveat, if you experience sustained high CPU, Memory, or Disk usage (pegging at or near 100% all the time), then make the adjustment I suggest at the end. Otherwise you should be good to go. Here’s a quick missive on that issue:
logos courtesy of WindowsCentral.com
The recent CPU vulnerabilities that have emerged (Spectre & Meltdown) are serious problems, and we’ve seen poor mitigation help from the chip-makers (most likely Intel in your case), your operating system (OS) developer (Microsoft), and your computer manufacturer (Dell). In fact, updates to your OS and BIOS or other firmware updates from Dell may have made the problem worse. The problem I’m referring to is that the attempts to mitigate these vulnerabilities can put a huge hit on your system’s performance and reliability. There are tons of reports on the internet from folks whose computers are slowing down to a crawl. Running Task Manager and looking at performance, they’ll see sustained 100% utilization of CPU, Memory or Disk. Take a look at my EWS for PC article and put small monitors for those critical measures on your desktop.
Onto the power options. I’m going to go over the process of setting the power plan first, then adjusting all the advanced power options that you need to change (and why). Let’s start with getting to the power plan first: Click Start > the gear icon > the System icon on the resulting window that opens. Click the Power and Sleep menu item. On the right side of that, set:
Screen: Set the “On battery power…” dropdown for 10 minutes or less. That shuts off power to the battery-killing screen if you haven’t touched the keyboard or touchpad for xx minutes. Waking it back up just means moving the mouse or hitting any key and almost instantly you’re back in business. For the “When plugged in…” dropdown, you can set that for whatever you want. I usually set it for 45 minutes or less.
Sleep: Set the “On battery power…” dropdown for Never, and also for “When plugged in…”. Even in Windows 10, I find that sleep mode is pretty useless, and can cause other problems. That’s because all the 3rd party software (and inexplicably some Microsoft software) that has background processes can throw errors if the computer’s sleeping. See below for using hibernation instead of sleep mode on battery power.
Once that’s done, you can click the link below those sections under Related settings for “Additional power settings”. That opens a new window, which is the old Windows 7-style Control Panel opened to the Power Options section. Here is where you can Choose or customize a power plan. I suggest you choose the High Performance plan, as all the optional settings below are going to be based on that plan. You may have to click the Show additional plans down-caret to expand the list of power plans so you can see and choose the High performance plan. Once you have that selected, click the “Change plan settings link on the right side, and then on the resulting screen click the link “Change advanced power settings” – this opens a new smaller window that has all the advanced settings you want to adjust. Here’s my recommendations on what to set on this window:
Advertisement
Hard disk: Turn off hard disk after: set both of the options (battery and plugged in) to zero minutes, which shows Never after you’ve done that. Why? Your SSD need not be powered down, it is very power efficient and even the small delay of powering it up will slow down your PC – totally not worth the minuscule energy savings.
Sleep: Sleep after: make sure both options are set to Never. See above for my reasoning on why sleep mode is anathema to smooth computer operation. I should note that if the computer is in sleep mode and you put it in a computer case for traveling, the computer can overheat and damage the CPU and/or other internal components. That’s because in sleep mode the computer is still running, albeit more slowly. Running generates heat, and that will quickly build up in a bag, case or other enclosed space.
Hibernate after: set the On battery option to something like 30-45 minutes, and set the plugged in option to Never. This substitutes the much-safer hibernate mode for sleep mode when on battery. When plugged in, you need neither. Most of your computer’s energy usage is in the screen, and the display settings below will work well for you.
USB selective suspend setting: You should turn both options to Disabled. If you have something plugged into a USB port, enabling this option will power down the attached device, and cause a performance delay when you want to use it. If nothing’s plugged in, there’s no energy usage. For most consumers, they only plug in a USB device that they’re going to use, and unplug it when they aren’t going to use it. So enabling this option saves nothing and causes a performance hit.
Power buttons and lid: Lid close action: Set the On battery option to Hibernate, set the Plugged in option to Do nothing. When you are plugged in and want to stop using the computer, just shut the lid. The screen goes off (saving lots of energy), but the computer is otherwise awake and running so you can return and quickly get back to work by opening the lid. When on battery power, shutting the lid will power down the computer completely. Great for shoving it in a case when you’re going somewhere, and just open the lid and press the power button to resume from hibernation quickly.
Power buttons and lid: Power button action: Set the On battery option to Hibernate, set the Plugged option to Do nothing. This makes sure that when you’re on battery power, you can more quickly get back up and running after you’ve powered down. When plugged in, you’re always going to want to shut down.
Power buttons and lid: Sleep button action: set both options to Do nothing. As outlined above, sleep mode on a Windows PC causes more problems than the minuscule power savings it provides.
Battery: Critical battery action: set the On battery option to Hibernate, with the Plugged in option set to Do nothing. This ensures your computer shuts down when the battery is low (and the computer is using it for power). When plugged in, you aren’t using the battery so you don’t want the computer shutting down. This will become important as your battery ages and can no longer hold a charge well.
The rest of the options you can leave at the default setting for the High performance power plan. Your particular computer might have other settings in the Advanced power settings window, such as Intel Dynamic Platform and Thermal Framework Settings, and some additional Battery settings (levels for each of the actions Critical, Low, & reserve). If your computer has such, feel free to ask me what to do in the comments below.
Ok, now to the caveat: If your computer’s performance is suffering, check the Task Manager or use the EWS for PC 3rd party software I suggest to see if your CPU, Memory or Disk activity levels are at or near sustained 100% levels. If you see this, you’ll want to restart your PC. You can also adjust these power options differently than the default High Performance plan & the changes I noted above:
Internet Explorer: JavaScript Timer Frequency: You can set one or both options (On Battery and Plugged in) to Maximum Power Savings to reduce the load on your system
Intel Graphics Settings: reset these from Maximum Performance to Balanced for both options to reduce the load on your system
PCI Express: Link State Power Management: you can change these from Off to Moderate power savings for both options to reduce the load on your system
I wouldn’t bother to change the Processor power options, leave them on maximum performance. Changing this will slow down your computer even if the CPU isn’t pegged at 100% utilization. So it just adds to your problem without subtracting anything. And depending on your particular computer, resetting the power plan to the default Dell option may solve the problem for you (but by all means turn off sleep mode). Other things you can do to possibly reduce the load on your system or at least temporarily solve the problem is to:
Restart your computer. Wait a good 5 minutes after the restart before you try to use the computer. If you have the EWS for PC monitors running, do this anytime your Memory meter exeeds 90%. Note this is my first go-to option to solve computer problems (my 80/80/2/20 rule). Also update all your installed software.
Shut down Malwarebytes temporarily: Right-click the Malwarebytes icon in your notification area, then left-click (on the resulting menu) Quit Malwarebytes. Malwarebytes will restart when you reboot your computer, or restart Malwarebytes from the Start menu.
Right-click the Start menu, left-click the Computer Management link, click the Services item (under Services and Applications) on the left-side. Scroll down the list on the right and click on the Internet Connection Sharing item. Make sure the service is not running and if it is, Stop it (link). Again, this is temporary and the service will restart when you restart your computer or if it’s needed (almost never is it needed).
Reset Windows Update: Follow Microsoft’s instructions, which are here.
Check your disk for errors and fix them: Open File Explorer, right-click on your boot drive (usually C:), left-click Properties. On the window that opens, select the Tools tab and click the Error Checking: Check button. Scan the drive and if it finds errors, click the option to fix them. Then restart your computer. Power users can also use Powershell to run DISM and SFC commands (see my article Windows 10 Using DISM article).
Lastly, recognize that performance problems in a personal computer can have a lot of different causes and fixes. There’s no substitute for professional help to resolve this, and even with that, there may be no good answer (see what I said above about Spectre and Meltdown). At this point in time, performance issues may only have short-term workarounds (like restarting your computer) until the various parties (Intel, Microsoft and Dell) can get reasonable fixes that don’t impact performance out to us.
This website runs on a patronage model. If you find my answers of value, please consider supporting me by sending any dollar amount via:
(@PosiTek)
(Support@PosiTek.net)
(using any credit card)
or by mailing a check/cash to PosiTek.net LLC 1934 Old Gallows Road, Suite 350, Tysons Corner VA 22182. I am not a non-profit, but your support helps me to continue delivering advice and consumer technology support to the public. Thanks!
Author: Chris Gardner
Your Tech Coach at PosiTek.net
There are currently 1295 reader comments on published articles, care to join in? Use the Leave a Comment form below/at the bottom of any existing comments. This is a good place to ask follow-on questions on this subject.
"I'm all about helping you deal with our 21st century high-tech digital world so you can enjoy a healthy and secure digital life!"
About Me
Hi! I'm Chris Gardner, Your Tech Coach giving you Practical Help for Your Digital Life® since 1996. My job is to translate geek-speak into clear and concise advice and give you easy-to-understand how-to's and instructions about your consumer technology products and services.
Browse my library with over 1,000 of the types of questions and answers we all have about our consumer technology. Better yet, use the search bar above or pick a subject or keyword below to see a list of related posts you can read. And please sign up for my freeweekly digest and occasional email alerts!
If you don't find the answer to your question in my library, ask me a question - anything about consumer technology. I answer questions large and small, from how to use Siri on an iPhone to how to protect your computer, tablet or smartphone. I take arcane language from manuals and translate that into easy-to-follow instructions. This gives you better ways to use your consumer technology - helping you get more out of the gadgets and services you already own and use.
I provide all the above, supported by my readers who find my answers valuable (patronage model). Please consider supporting me by sending any amount via (send to @PosiTek), or via (send to Support@PosiTek.net), or via using any credit card (no Paypal account required), or by mailing a check or cash to PosiTek.net LLC 1934 Old Gallows Road, Suite 350, Tysons Corner VA 22182.
I am not a non-profit, but your support helps me to continue delivering advice and consumer technology support to the public.
If you need more immediate or direct support, please see my 1-on-1 Tech Support page. I don't profess to know everything about everything, but I'm great at finding and giving you exactly the right answer in the way you need to hear it. Give me a try and let Your Tech Coach help you get your technology working for you, not the other way around!
The information presented on this website and referred to in various social networking channels are the considered opinions of the authors. We accept no advertising, kickbacks or any sort of remuneration for any commercial products or services that we recommend or suggest. Furthermore, posts or links to external websites or other content do not imply endorsement, unless explicitly stated.
Any elements on this website that may be linked to or displayed, including trademarks and product/service images, are for educational purposes only under fair use copyright law. PosiTek.net LLC purchases licensing for commercial imagery used on this website via Shutterstock.com and any other imagery is licensed for our use via:

 Windows 10 Power Options: a reader asks…
 Screen: Set the “On battery power…” dropdown for 10 minutes or less. That shuts off power to the battery-killing screen if you haven’t touched the keyboard or touchpad for xx minutes. Waking it back up just means moving the mouse or hitting any key and almost instantly you’re back in business. For the “When plugged in…” dropdown, you can set that for whatever you want. I usually set it for 45 minutes or less.
 Screen: Set the “On battery power…” dropdown for 10 minutes or less. That shuts off power to the battery-killing screen if you haven’t touched the keyboard or touchpad for xx minutes. Waking it back up just means moving the mouse or hitting any key and almost instantly you’re back in business. For the “When plugged in…” dropdown, you can set that for whatever you want. I usually set it for 45 minutes or less.
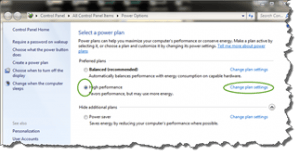
 Power buttons and lid: Power button action: Set the On battery option to Hibernate, set the Plugged option to Do nothing. This makes sure that when you’re on battery power, you can more quickly get back up and running after you’ve powered down. When plugged in, you’re always going to want to shut down.
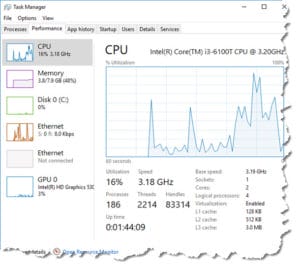 Ok, now to the caveat: If your computer’s performance is suffering, check the Task Manager or use the EWS for PC 3rd party software I suggest to see if your CPU, Memory or Disk activity levels are at or near sustained 100% levels. If you see this, you’ll want to restart your PC. You can also adjust these power options differently than the default High Performance plan & the changes I noted above:
 Restart your computer. Wait a good 5 minutes after the restart before you try to use the computer. If you have the
 ")


Pingback: New PC Configuration - Practical Help for Your Digital Life®