
Windows 11 Screenshotting
Windows 11 Screenshotting: a reader asks…
I read your article Screenshots of my PC, and that’s good info, but I have a fairly new Windows 11 PC. Has your recommendation changed? What should I use to capture a screenshot of my PC, either a window or the whole screen. And, can I also capture a video of that screen?
Yes, with Windows 11, a third-party screen capture utility is not needed; Microsoft has built that capability right into Windows, called the Snipping Tool. While that utility was also in Windows 10, it was so primitive that it wasn’t worth using. Hence, third-party tools that provide this capability proliferated.
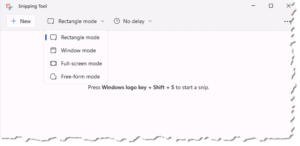
To start a screen capture, use a key combination: The Windows key, the Shift Key, and the S key. Press them simultaneously to open the utility. This pops up a small toolbar at the top-center of your screen. That has the option to capture either a screenshot (still image) or a recording by clicking either of the first two icons. The 3rd icon from the left is the one where you specify whether you want to capture a window, the whole screen, or just whatever square or rectangular shape you create with your mouse.
If you want to capture video, use this key combination instead: Windows key, Shift Key and the R key.
The 3rd icon has a drop-down list of what you want to capture (this icon is only for still image screen captures; if you’re capturing video, the only option is full-screen). The options are:
- Rectangle (draw a rectangle by placing your cursor at the top-left of the area you want to capture. Click-and-hold the left mouse button and drag the cursor to the bottom-right of the area you want to capture and release the mouse button.
- Window (the contents of the currently-active window)
- Full Screen (your entire computer screen)
- Freeform (an option where you can draw around whatever you want to capture by clicking and holding the left mouse button while you drag the cursor around the object you wish to capture).

Once you’ve selected and captured the object you want, a notification will appear at the bottom right of your screen. That notification lets you know what you captured, which is temporarily saved to your invisible clipboard, ready to paste wherever you need it.
A note about your invisible clipboard. Anything you copy, using either this utility or a simple Ctrl+C key combination (for anything highlighted or selected), is copied to your Windows clipboard. Normally, that clipboard only holds one item – the last item you copied. You can turn on “clipboard history,” which keeps the last 20 items you’ve captured, but most people don’t use this feature. To enable clipboard history, press the Windows key and the V key simultaneously.

Back to the screen-capturing utility. That notification screen also has a Markup and share button – click that and you open the image in a simplified editing window where you can crop, resize, add lines, etc. I should note this isn’t as full-featured as the editing tools in my favorite third-party screen-capturing utility, but it’s adequate for most people’s needs. There is also a button to open the screen capture in Paint, Microsoft’s simple graphics editing tool.
If you want more features, such as the ability to add elements like torn edges and drop shadows, consider Snagit from TechSmith, as I recommended back in 2022. It’s $39/year, and I still think it’s well worth the cost for the added features over Microsoft’s screen-capturing utility.
This website runs on a patronage model. If you find my answers of value, please consider supporting me by sending any dollar amount via:
![]()
(@PosiTek)
![]()
(Support@PosiTek.net)
")
(using any credit card)
There are currently 1298 reader comments on published articles, care to join in? Use the Leave a Comment form below/at the bottom of any existing comments. This is a good place to ask follow-on questions on this subject.


