
Word 2016 Mail Merge – Categories
 Word 2016 Mail Merge – Categories: a reader asks…
I use Office 365 and have Outlook and Word 2016 installed. I have all my contacts organized by category. What I’d like to do is a mail merge in Word using just one category of contacts (I’m making a holiday letter). Using the Mail Merge function in Word doesn’t show me a way to filter contacts by category. So how do I do this?
Unfortunately, filtering by categories wasn’t included in the Word Mail Merge wizard for your Outlook Contacts. And the correct procedure entails a number of steps to go through and multiple windows that open. , What you’ll have to do is your mail merge operation in three parts: First, sort your contacts folder in Outlook and apply a filter so you only see the category of contacts that you want to use. Second, kick off the Mail Merge from within Outlook. That will open Word with the correct contacts loaded and ready for you to complete the third part and follow Word’s Mail Merge procedure. Here’s what you need to do:
Part 1: You’re going to create a filtered view of your contacts so you only see contacts in the category that you want. In Outlook:
- Go to your Contacts folder and switch to a list view (using the ribbon toolbar control).
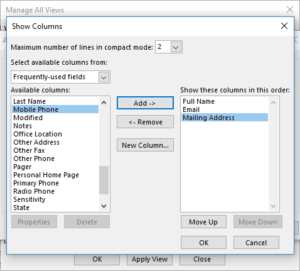
- Click open the Current View drop-down in the ribbon and select Manage Views.
- On the window that opens, create a new View, name it and choose the Table view type.
- On the next screen, choose Conditional Formatting, then click the Add button, name the condition (such as “Holiday”) and click the Condition button.
- On the filter window that opens, click the More Choices tab and click the Categories button. Choose your category and click OK. Click OK 4 more times to close all the windows that opened in the above steps, which puts you back at the main Outlook window showing you your contacts.
- Now switch to the new view you just created. You may have to click the Current View drop-down in the ribbon bar to see it.
 At this point you should be looking at a list of your contacts – only the ones that match the category you selected. At this point you should adjust the view if you want to see more or fewer fields of information on those contacts. You are best off starting with the fewest fields needed in your view, since having a lot of information will slow down the mail merge process as Word will have to read all that data into memory.
- With the view selected in Outlook, repeat step 2 above, then choose to modify the view
- Click the Columns option and deselect and select the fields you want to display
Once you can see in Outlook the data set of contacts you’re going to use, You’re now ready for part 2.
 Part 2: In Outlook, start the mail merge procedure:
- click the Mail Merge button in the ribbon toolbar which opens a new window Mail Merge Contacts
- Click OK to initialize and start MS Word
This part is pretty simple, but notice the window that opens has a bunch of choices you can make including whether to show all the contacts being viewed, or just the contacts you selected in the Outlook view window. Also, you can use all the contact fields or just the fields that are in the current view. The latter is better so you aren’t dealing with extraneous information you don’t need, and will also speed up the mail merge process in Part 3 below.
 Part 3: In Word, click Start Mail Merge (in the ribbon toolbar), then click the link to Step by Step Mail Merge Wizard. You can then follow the guided steps to complete the project. Your data set will already be selected and be the category of contacts that you created in Part 1 above.
If you’re already familiar with how to do mail merges in Word, you can bypass the step-by-step wizard and just use the mail merge toolbar to craft your holiday letter. If you’re not familiar, then you might want to either use the wizard or brush up on the procedure. I should say that anytime you’re doing Mail Merge functions, it’s always best to start by configuring the data source, whether Outlook contacts or an Excel spreadsheet.
There are plenty of tutorials, and also a handy video from our friends at GCFLearnFree.org:
This website runs on a patronage model. If you find my answers of value, please consider supporting me by sending any dollar amount via:
![]()
(@PosiTek)
![]()
(Support@PosiTek.net)
")
(using any credit card)
There are currently 1295 reader comments on published articles, care to join in? Use the Leave a Comment form below/at the bottom of any existing comments. This is a good place to ask follow-on questions on this subject.


