
Word Tip: Horizontal Line

MS Word Tip: Horizontal Line: a reader asks…
I use Microsoft Word and Outlook. I’m confounded by this little problem: In an Outlook message draft, I can add a horizontal line easily, the Insert ribbon menu has a button for Horizontal Line. But there’s nothing like that in Word. Is there a hidden menu item somewhere to do this?
Actually, in Microsoft Word, there is a Horizontal Line button, in the Home ribbon set of icons. Look in the Paragraph section, which has a border icon at the bottom right. Click the down-caret to the right of that and you’ll see the Horizontal Line icon. Click that an a horizontal line will be placed wherever you had your cursor. That line will be an object, which you can select and shorten or lengthen, and change the justification (left, center or right). Right-click on it and choose Borders & Shading, and you can change the color, restyle it a number of ways. This line is its own paragraph, and you can place text in separate paragraphs above and/or below it. Pretty simple, right?
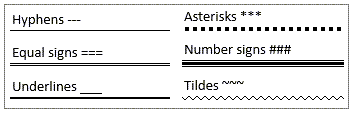
However, there’s another, perhaps better way to do this: To insert a horizontal line on the page, place your cursor where you want the line, and then type three (or more) specific characters and press your keyboard’s Enter key, and viola, a horizontal line will appear. Which characters? That depends on what type of line you want, there are six options using either the hyphen key (-), equal sign key (=), underline key (_), asterisk key (*), number sign key (#) or tilde key (~). Here’s a table that shows what type of line you get for each key option:
If you decide you didn’t want that line where you placed it, just tap your backspace key to remove it (only immediately after you added the line). You’ll also see a tooltip graphic on the left that you can click to reveal a menu where you can delete the line.
Some additional notes on this slick method:

- What Word is creating is an empty paragraph that has a line at the bottom, e.g., the bottom border. So with your cursor on that line any text you type will go directly above the line (in the same paragraph), unlike the method above. This is good if you want to save vertical space and keep things tightly together.
- This also works in both the header and footer areas, in case you want to separate your page text from either or both.
- You can reformat the line after you’ve created it by using the Borders options menu. Place your cursor on the line and click the caret to the right of the Borders icon to reveal a list of border options. This can be useful if you want to put a box around some text.
- Click the down-right arrow in the ribbon (on the bottom-right right of the Paragraph area to change spacing, indentation, etc.
Both methods work just fine to create a horizontal line. The first way is fast and easy, the second way gives you options for formatting the line in some creative ways. This information is also in a Microsoft Support article.
This website runs on a patronage model. If you find my answers of value, please consider supporting me by sending any dollar amount via:
![]()
(@PosiTek)
![]()
(Support@PosiTek.net)
")
(using any credit card)
There are currently 1298 reader comments on published articles, care to join in? Use the Leave a Comment form below/at the bottom of any existing comments. This is a good place to ask follow-on questions on this subject.


