
Zoom & Print
 Zoom & Print: a reader asks…
Hi Coach, do you have an easy way for me to be able to print part of a page blown up in size? I often print Adobe PDFs that have architectural drawings, and the pages are actually very large, but when I print them they must shrink down the whole page to fit on standard size paper. Is there a way I can take just a part of the page and print that bit out full size? I have an HP printer that prints on 8.5″ x 11″ paper and a Windows 10 computer.
Generally, when you print a pdf, it doesn’t matter what size the original document is, it will be automatically shrunk or zoomed to fill the page. Same as if you wanted to print photos, they are usually sized to fit the paper you’re printing on. But I get that you have high-detail drawings and want to zoom in and only print a part of them so that part prints out big enough to see.
You can do something like this just using Windows’ built-in capabilities, but it can get complicated and hard to do. Basically, you’d open the PDF, zoom in so the screen shows just the part you want, take a screenshot, and then open that screenshot in a image editing program like Paint, and finally print it. That’s just so hard! You could also print the document with custom zoom set so that everything is big, but you have no control over which part prints on a single page – your drawing might be split between several pieces of paper.
For your situation, I’d like to suggest a handy program that I use daily. It’s called SnagIt from Techsmith.com. What makes this program so handy is that it lets you take a screenshot very easily, and opens that screenshot in a simple editor. From this editor, you can instantly print that screenshot and have it auto-size to fit the paper size. Here’s what you should do:
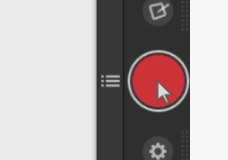 Purchase (it’s $50) and install the program on your computer. You can watch TechSmith’s tutorial here, or just jump in and start using it: You’ll see a blue edge at the top or side of your screen, and you can hover over that for the menu to automatically pop out. It has a big red button to start a capture, and a smaller grey button to open your SnagIt editor, which includes a print menu item. You’ll also see a gear icon button for settings, and you can set a ‘hotkey’ (key combination) to capture images if your keyboard doesn’t have a PrtScrn button. You can use the PrtScrn button or your hotkey combination to start a capture instead of using the onscreen red button.
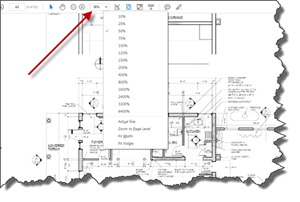 Open your document, maximize the Adobe Reader window, and use Adobe Reader’s view option to zoom in so that the drawing you want is showing as large as possible on the screen. You can choose one of the default zoom options on the list, or highlight the number showing and type in your own. You might have to experiment to get the right zoom level so just the part you want to print is visible on the screen. If you can see the drawing on your screen, you can capture it, so your goal is to get everything that you want to print on one page to show on your screen. The larger that part is on the screen, the more detailed of an image you’ll be able to capture.
 Now hover over the SnagIt blue edge and click the red button (or press your PrtScrn button or hotkey combination). You’ll see cross-hairs appear with your onscreen cursor in the middle. Position your cursor at one corner of a rectangle that would include the drawing you want to capture, then click-and-hold down the left mouse button. Drag your mouse to the opposite corner of the drawing you want to capture and let go of the mouse button. Make sure your entire drawing is inside the rectangle you just created.
A blue button will appear letting you choose either a snapshot or a video – click the ‘capture image’ button (with the camera icon). That will open up your SnagIt editor, with the image you just captured. At this point, you can add text, arrows or other objects, resize the image, crop it, save it as an image file, and print it.
 After you’ve done this once or twice, it’ll be very easy for you to zoom in on just the drawings you want to print, and print them quickly and easily. With the SnagIt editor, it’s also easy to add arrows, text boxes or bubbles, shapes and outlines and more. You can even add ‘torn edges’ (like some of my screenshot images above) for effect. And of course, anything that shows on the screen you can capture, such as parts of web pages, emails, etc. The captures you make you can save in a variety of file formats, although be aware that you’re capturing an image, not editable text.
If you don’t want to spend the $50 for a professional-quality program like SnagIt, there are other free or lower-cost alternatives. There hundreds of screen capture utility programs available, here are just a few:
- PicPick by NGWIN, free, but not near as polished either in controls or in the things you can add to your screen capture.
- Fastone Capture, $20 is a lower-cost alternative that may offer some features you want that PicPick doesn’t have.
- Windows built-in Snipping tool, as part of Microsoft Windows
For Apple Mac users, I like Skitch (free on the Apple Mac Store) if you don’t want to use the excellent screen capturing utility built into OS X, or if you want more annotation abilities (like adding graphics, text, lines, etc.).
This website runs on a patronage model. If you find my answers of value, please consider supporting me by sending any dollar amount via:
![]()
(@PosiTek)
![]()
(Support@PosiTek.net)
")
(using any credit card)
There are currently 1295 reader comments on published articles, care to join in? Use the Leave a Comment form below/at the bottom of any existing comments. This is a good place to ask follow-on questions on this subject.


