
Zoom Tip, Permissions
Zoom Tip, Permissions: a reader asks…
Like many people during the pandemic, I use Zoom a lot. Recently I upgraded to a Pro account and now have a lot more choices about things I can do. I can’t seem to find all the controls and permissions options, esp. for my participants. Do you have any tips?
Zoom has a ton of features and capabilities, and most people barely scratch the surface of what they can do with Zoom. So kudos to you for wanting to expand your Zoom skills! The first thing you should know about is where you can set your basic options for your Zoom account. That’s not done in the Zoom app, but by logging into your Zoom account in a web browser (Chrome, Edge, Safari, Firefox, etc.).
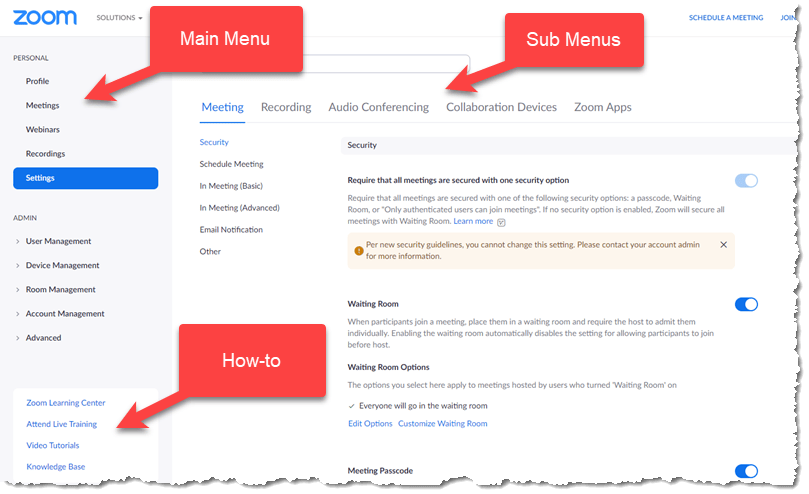
Go to https://zoom.us/profile and log into your account. Here you can set your time zone, change your profile picture and other profile options. The menu on the left-side also takes you to other settings pages, such as settings for Meetings, Webinars, Recordings, and general Settings. I encourage you to go through all of these options pages and read each item to make an informed choice about what you want. For example:
- in the Schedule Meeting section, you can set Zoom so that your video is automatically started when you host a meeting. If turned off, you will start the meeting with just your profile picture showing.
- also in the Schedule Meetings section, you can set Zoom so that when anyone joins your meeting they are automatically muted. This ensures that folks joining a meeting in progress don’t disrupt what’s happening.
- in the In Meeting (Basic) section, you can turn on Auto saving chats so you don’t have to remember to save the text of the chat during meetings. You can also turn off the ability of participants to have private chats between each other (although even if you have this turned on, you as the host will be able to see the private chats after the meeting has ended).
There are many more options you can set in this menu system, it’s a pretty extensive list so you should go through this at least once to make sure you have things setup the way you want.
Next, you can start a meeting and take a look at other controls you have to manage permissions for your participants: First of all, click open the Participants sidebar (click the menu option at the bottom).

Look at the bottom where you’ll see an Invite button and a Mute All button. To the right of that is a small button with three dots. 3 Dots is a universal control icon that gives you menu options, usually for settings or permissions. Click that icon and you can ask all your participants to unmute themselves, as well as give or take away permission for all your participants to:
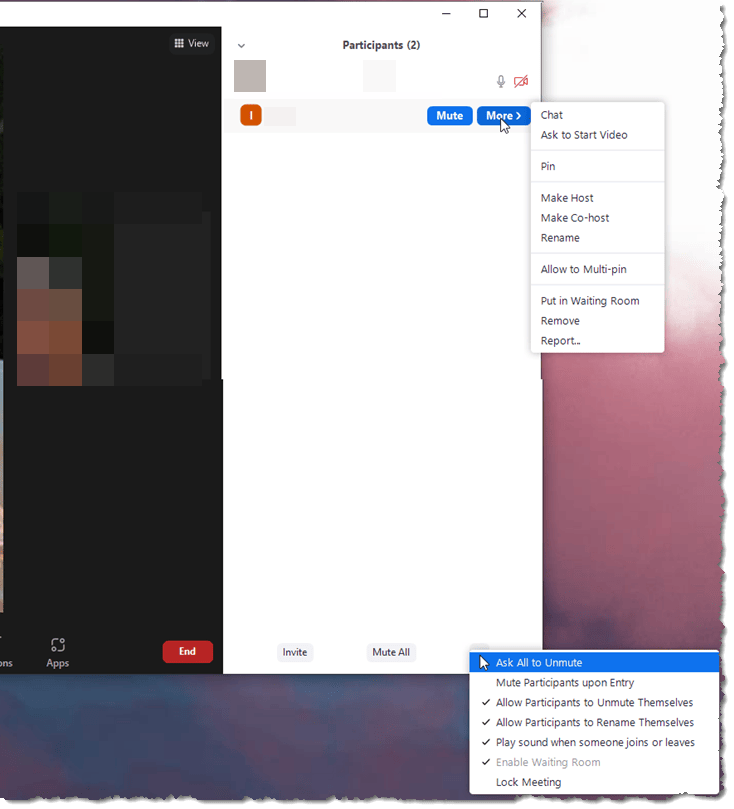
- Turn on or off the setting to mute participants when they join your meeting
- Turn on or off the setting to allow participants to unmute themselves
- Turn on or off the setting to allow participants to rename themselves
- Turn on or off the setting to play a sound when someone joins or leaves your meeting
- Lock the meeting so nobody else can join
Note that for these items, a checkmark showing on the menu means all participants have that permission. You can’t do this individually. Also, there is an entry on that list for enabling the waiting room, which may be greyed out (but should be checked). The waiting room control is on the Security menu which you get by clicking the Security icon on the main Zoom menu at the bottom of the Zoom window.
You also have some permissions controls for individual participants in that same Participants sidebar. Hover your cursor over a participant in the sidebar and click the blue More button that appears. Among the things you can do is make the participant the host (replacing you) or a co-host (which gives them the ability to help you control the meeting). This same menu of individual permissions is also available to you in the Zoom window itself by hovering over a participant’s window and clicking the 3-dot icon that appears in the top-right.
You probably know that in Speaker view, whoever’s talking is showing in the large video window. You may also know that you can pin one person’s video window so it shows to everyone even if someone else is speaking. Zoom also lets you multi-pin, where you can select up to 9 participants to pin (useful for when you have more than one screenful of participants but you want everyone to focus only on the ones you decide will do all the presenting). The participant permissions option also lets you give permission for any participant to multi-pin. If they are not a co-host, multi-pinning only affects what they see, not everyone else.

That same individual permissions options menu in the Participants sidebar is also available by hovering over a participant’s video – a 3-dot icon appears in the top-right of their video. Click that and you get the same menu as clicking the More icon on a participant in the Participants Sidebar.
You also have participant controls on the control bar when you’re screen sharing. Click the usual 3-dot More icon on the right of that control bar to bring up a menu of things you can do while screen-sharing. The participant permission shown there is to enable or disable participant “annotation” – letting participants draw on your shared screen. Say you’re sharing the whiteboard. You may want to allow other participants to draw on the whiteboard, which is great for brainstorming.
Zoom is continuing to evolve as more and more people use it regularly, and I’ve noticed that controls seem to shift around to different areas. Plus, more granular controls get added along with new features as Zoom.us responds to user suggestions. All in all, I’ve found Zoom to be the easiest of the video conferencing and collaboration tools out there in the market right now. Alternatives like Microsoft Teams, Cisco WebEx, Google Meet, Join.me and others are also constantly evolving, it seems like mostly to catch up to Zoom.

You may want to sign up for the various upcoming Zoom how-to webinars, by visiting https://explore.zoom.us/docs/en-us/events.html. There you can also view previously aired webinars. Each of these webinars focuses on a feature or capability of Zoom.
You can also get to this and more help by visiting one of the links in the bottom-left of the Zoom.us settings window. I highly recommend watching a video (most are fairly short and you can fast-forward to the info you want) or two anytime you want to learn about any specific feature. You can also search Youtube.com using keywords: “Zoom” and the feature you want to know more about. For Youtube videos, pay attention to the date the video was made, it may not be about the latest version of Zoom.
This website runs on a patronage model. If you find my answers of value, please consider supporting me by sending any dollar amount via:
![]()
(@PosiTek)
![]()
(Support@PosiTek.net)
")
(using any credit card)
There are currently 1287 reader comments on published articles, care to join in? Use the Leave a Comment form below/at the bottom of any existing comments. This is a good place to ask follow-on questions on this subject.


