
Use iCloud Safely – (semi) Quick Tips Part II
 In Part 1 we covered the basics of securing your iCloud account against hackers. But if you’ve got sensitive and private photos or information on your computer or iOS devices, the next thing to consider is protecting against government snooping. Apple is just as subject to court orders as you are, so you have to expect that your information might be snooped by someone. You’ll be considering whether keeping anything ‘in the cloud’ is for you.
Not just iCloud, but any other cloud-based storage or apps including cloud-based storage like Dropbox, Google Drive or OneDrive; webmail-based services like Gmail, Outlook.com or Yahoo mail; and online backup services like iCloud, Carbonite and Mozy. Using anything online is a trade-off between your personal digital security and the benefits of those features and services – syncing email and files between devices, access to your files from anywhere, and easy recovery in case you lose or crash your computer, tablet or smartphone.
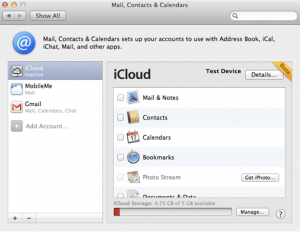
So focusing on iCloud, you need to consider if you want to use all the features it offers, limit what it does, or do without. That trade-off I mentioned. So assuming you have something on your Mac, PC, iPhone or iPad that you don’t want anybody to be able to see, you’ll have to figure out what that is, and eliminate it from iCloud. iCloud stores:
 mail, contacts, calendar events from any Apple or iCloud account
- bookmarks, reminders and notes
- photos via Photostream
- documents from Pages, spreadsheets from Numbers (the app) and presentations from Keynote (the apps)
- apps and app data from your App store purchases
- music and video from your iTunes purchases (and iTunes Match if you use it)
- any other files you save to iCloud Drive
- for Macs, any unsaved document in any app (from Apple) is likely to be saved to iCloud
 mail, contacts, calendar events from any Apple or iCloud account
So look over the above list and decide what you want to clear out of iCloud. The most likely first item you’ll tackle is photos. To remove photos from being part of your iCloud backup, first remove them from your Photostream, then turn off backup for your photos (on all your devices and computers). You’ll also want to purge photos from any other online place you use (like Dropbox, Google Drive, etc.). Here’s how to clear them from iCloud and keep them out of iCloud backups:
First, remove Photos from iCloud:
- on your iPhone or iPad: tap Photos > Albums > My Photo Stream
- click Select in the top right-hand corner and choose all the photos that are to be deleted by tapping each one to show a blue circle with a white arrow. You can only select one at a time, so if you have a lot of photos this may take some time! Shortcut this by only selecting photos you think are sensitive and private.
- click the garbage can icon in the bottom right-hand corner to permanently remove them. This wipes them from iCloud, as well as any other synced devices
Second, disable Photo Stream and Photo Sharing features from iCloud:
- tap Settings > iCloud > Photos and slide all the green sliders to grey
Now unless you want any existing photos in your Camera Roll to be backed up to iCloud, also clear out your Camera Roll:
- open Photos again, tap Camera Roll and select some or all of your photos and videos
- if you want to save these somewhere, click the Share button in the bottom left-hand corner and choose where to store them, then delete them
- or just delete them.
You can also copy the photos to your Mac or PC by connecting a USB cable, opening Finder (or Windows Explorer), navigating to the photo storage and copying some or all of your photos and videos to your computer before you delete them from the device.
Third, you want to change settings on your device to prevent future photos and videos from being backed up:
- first, perform a new backup to overwrite the existing backup (the one that has your photos). Tap Settings > iCloud > (Storage &) Backup, then tap Back Up Now. Once that’s done,
- tap Settings > iCloud > Storage (& Backup), Manage Storage and disable the Camera Roll option for future backups.
Next, you may want to keep your personal information (email, contacts, calendar items, bookmarks, reminders, notes, etc.). For your Mac or PC, open iCloud and turn off saving for any information you don’t want backed up. Do likewise for your iPhone/iPad by tapping Settings > iCloud and slide all the green sliders to grey on the list. Then perform a new backup to overwrite the old backup that had all that information. Just like above, tap Settings > iCloud > (Storage &) Backup, then tap Back Up Now.
If all that’s not difficult enough, you have at least one more thing to do. This involves a sneaky way that iCloud backup works on your Mac – unsaved documents are saved in iCloud until they’re saved, ostensibly so you can recover your work if you lose power or something. Here’s an example and solution:
If you use an Apple app like TextEdit, you may be used to using it to take notes. And you probably don’t bother to name and save the document till you’re done note-taking. You’ll have to change how you do this. First, you need to create a new, blank document and save it to your Mac, then you can start filling in your notes. Once you’ve saved your document (to your Mac), unsaved changes will be only on your Mac, not in iCloud. This works similarly for other Apple apps.
If you want to completely do without iCloud and make sure it’s empty, in addition to doing all the above, you’ll want to do all these tasks as well. For iOS (iPhones & iPads) this means visiting the Settings area and completing this baker’s dozen tasks:
- delete your iCloud backups: tap settings > iCloud > Storage > Manage Storage and tap on a backup, then tap Delete Backup (repeat this for each backup that’s showing). You can also do this from your Mac or PC by logging into iCloud (using the app or https://www.icloud.com) tapping Backups and then select and delete each backup
- log out of iCloud: tap Settings > iCloud, scroll to the bottom and sign out
- log out of the App Store: tap Settings > iTunes & App Store > your Apple ID (email address) and sign out
- turn off Siri: tap General > Siri and slide the green slider to turn it grey
- turn off Location Services: tap Privacy > Location Services and slide the green slider to turn it grey
- remove any iCloud entries in your Mail, Contact, Calendars settings: Tap Mail, Contacts Calendar then tap each iCloud account shown, scroll to the bottom and sign out
- log out of FaceTime: tap Facetime and slide the FaceTime green slider to turn it grey
- turn off iMessage: tap Messages and slide the iMessage green slider to turn it grey
- turn off Home Sharing in Music: tap Music, scroll to the bottom and tap your Apple ID, then sign out. Also slide the iTunes Match green slider to turn it grey, then do the same for Videos
- turn off everything in Photos & Camera settings: tap Photos & Camera > slide the top 3 green sliders to turn them grey
- turn of syncing for iBooks, Podcasts and iTunes U: tap each icon and slide green sliders to turn them grey for each item
- turn off Game Center: tap Game Center, tap your Apple ID and sign out
- Clear Safari’s cache: tap Safari > Clear History and Website Data
For your Mac or PC, do these steps:

- open your iCloud account: for Mac, look in System Preferences > iCloud and click the Manage button at the bottom-right of the window. For PC, open the iCloud app from your Start menu
- click on Backups, then click on a backup and delete it
- Repeat for each backup showing
- Now go through all the other apps that show, click on each one and click the button to delete documents and data
- Lastly, you’ll want to delete or disconnect your iCloud account. For Mac, look in System Preferences > iCloud and sign out. For PC, open the iCloud app and sign out, then uninstall the iCloud app.
Of course, doing this stops you from most of the benefits of having a smartphone, but if privacy trumps usability, the above arduous steps will clear iCloud for you and stop it from backing up any of your personal information.
Feel free to use the comments area below if you need more detail or have a special situation I can help you with.
This website runs on a patronage model. If you find my answers of value, please consider supporting me by sending any dollar amount via:
![]()
(@PosiTek)
![]()
(Support@PosiTek.net)
")
(using any credit card)
There are currently 1298 reader comments on published articles, care to join in? Use the Leave a Comment form below/at the bottom of any existing comments. This is a good place to ask follow-on questions on this subject.


