
Win10-2 things for recovery
 Win10-2 things for recovery: a reader asks…
I have a Windows 10 computer, and I want to make sure I can recover from a disaster. I have File History turned on, backing up to an external hard drive. Is that enough?
Not quite. You need two more things in order to be ready to recover from a disaster. Such as a hard drive crashing. Thing One is a System Recovery USB thumbdrive. That’s what you can insert into your computer (and boot to) to start the recovery process. Thing Two is a System Image. While File History saves all your personal files, a System Image has the entire operating system and all installed programs – in short a clone of your hard drive that you can use to quickly rebuild your computer to what it was before the crash.
To create a USB thumbdrive as a system repair USB, you need a thumbdrive that you won’t use for anything else and that has at least 8gb of storage space (so your average 16gb thumbdrive will do). Insert that into a USB port on your computer. Then:
 Search (type into the Ask me anything search box at the bottom of your screen) “create a recovery drive” and open the top search result. That runs a program called ‘Recovery Media Creator’ and opens a window titled ‘Recovery Drive’.
- Make sure the checkbox is checked for ‘Back up system files to the recovery drive’ and click the Next button.
- Once the tool finds your thumbdrive, select it and click Next. When the USB thumbdrive is found and selected, you’ll read a warning that everything on the drive will be deleted. Click Next to create the recovery thumbdrive. When completed, you can close the window.
 Search (type into the Ask me anything search box at the bottom of your screen) “create a recovery drive” and open the top search result. That runs a program called ‘Recovery Media Creator’ and opens a window titled ‘Recovery Drive’.
You should label this drive and put it someplace safe so you can get to it if needed.
You’ll want to create a System Image at least once a year. Do this on some other removable hard drive, such as a My Passport. It can be the same external hard drive that you use with File History. Plug in the external hard drive. Then:
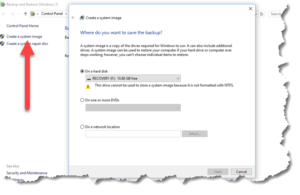
- Search (type into the Ask me anything search box at the bottom of your screen) “Backup and Restore (Windows 7)” and open the top search result. That opens a Control Panel window. Click on the left-side menu item “Create a System Image”.
- This opens a new window where it locates your external hard drive. Click Next to start the process of creating the System Image. When completed, you can close the window.
 Search (type into the Ask me anything search box at the bottom of your screen) “Backup and Restore (Windows 7)” and open the top search result. That opens a Control Panel window. Click on the left-side menu item “Create a System Image”.
If you choose to store the system image on the same drive as your File History, then you might want to take one extra step to help protect yourself from ransomware. Leave the drive unplugged most of the time. Plug it in only when you aren’t planning on using the computer, such as at night before bed. Once a week or every night depending on your level of concern for ransomware attacks. The reason for this is that if your computer’s hard drive was encrypted due to a successful ransomware attack, the attack could also lock up all your attached hard drives and thumbdrives.
 At least once a year, or anytime you make a significant change to your computer, be sure to create a fresh System Image. Examples of these sorts of changes are: Installing a new program, removing a program, and major updates to Windows 10. The more often you update your System Image, the easier it will be to recover from a disaster.
Now you have all the tools you need to recover from a disaster. Let’s say your hard drive crashed. You purchased a replacement hard drive, and now want to restore your system. Here’s what you do:
- Insert the thumbdrive and boot up the computer – booting to the thumbdrive. Use it to restore your basic system functionality.
- Run the Backup and Recover program and restore your system image from the one you created.
- Run the File History program and restore all the files to their latest versions.
You should run through this process at least once so you know how it works. Remember, when you are recovering from a disaster you may not be at your best, so make it as easy for yourself as possible. You can print out these instructions and put them in a ziplock bag along with your recovery thumbdrive, and keep it near your computer.
This website runs on a patronage model. If you find my answers of value, please consider supporting me by sending any dollar amount via:
![]()
(@PosiTek)
![]()
(Support@PosiTek.net)
")
(using any credit card)
There are currently 1295 reader comments on published articles, care to join in? Use the Leave a Comment form below/at the bottom of any existing comments. This is a good place to ask follow-on questions on this subject.


Pingback: Get my Files! - Practical Help for Your Digital Life®
Pingback: Windows 10 April Update - Practical Help for Your Digital Life®