Backup Win10
 Backup Win10: a reader asks…
Hi, I have a 2 year old Dell laptop PC with Windows 10 on it (I upgraded when it was free last year). I notice that my computer just updated itself to version 1607 and it seems to have completed ok now after a lot of rebooting over 2 days. But I’m worried that I might lose my files and know I should be doing backup. Can you tell me how to backup my computer easily and without spending a lot of money (I’m a student)?
While you don’t need to spend money on fancy backup software, you do need an external hard drive, or cloud-based file storage space sufficient to fit all your backups. In general the size of your backup space (drive or cloud) should be at least double the size of your hard drive. These days many laptops come with 1tb of hard drive space, so getting a 2tb external drive or cloud service should be enough. For external hard drives, I really like the Western Digital My Passport line, and you can get a 2tb drive for under $100 (try this one at Amazon.com, and the 1tb size is only $59). For cloud-based file storage, you can get 1tb of online storage space for $100/year from Dropbox or unlimited space for $60/year for Amazon Cloud Drive, for example. You could also use an online backup service like Carbonite or CrashPlan (both are $60/year). See this article for more info.
 Like I said, you don’t need to spend a penny on backup software if you don’t want to. Windows 10 comes with all the backup capabilities you need. First off, there’s File History which, once turned on will backup your files every hour as long as your external hard drive is plugged in. While online services and 3rd party software have the file recovery process built in, File History will allow you to restore files from the backup, but only if Windows is working. To fix your computer when Windows isn’t working, you’ll need to create two items: System Repair Disk (on a writeable DVD or a USB thumbdrive) and System Image Disk (you can create this on your external hard drive).
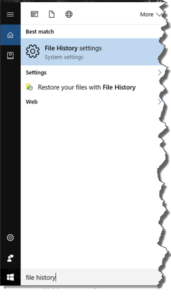
Turning on File History is easy, just plug in your external hard drive, then click the Windows 10 Start button, type “file history” and either press the Enter key on your keyboard or click on the File History Settings (System settings) entry on the search results that pop up as you type. On the resulting window, the left-side menu should be on Backup, and on the right side you can just turn File History on (either click the Turn on link or slide the slider to on). Unless you change settings your system will automatically backup all your personal files on an hourly basis.
While Microsoft was really good about putting this simple utility in the new-style Settings app, creating a System Repair Disk and a System Image are still in the old-style Control Panel app. You need these two items if your system has crashed and you want to restore Windows. While you have the options of using Advanced Startup to refresh or reset your PC, these two have a good chance of making the whole restoral process much more work, since you’ll have to re-install programs you’d previously installed. With a System Image on your external hard drive, you can use the System Repair Disk to boot the PC, restore the System Image, and then run Windows and restore the most recent File History backup. That puts your PC right back where it was before the crash.
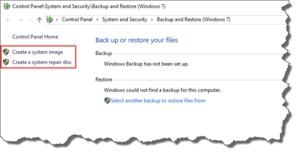
 You can create those two items fairly easily. From the Settings > Backup window, click the link Go to Backup and Restore (Windows 7) and that opens a Control Panel window to the old-style Backup. On the left-side are the two links you’d use to create a System Image (on your external hard drive), and to create a System Repair Disk (on a writeable DVD). It’s just a teeny bit more complicated to create a System Repair Disk on a USB thumbdrive:
- Click this link: MediaCreation Tool to download the app. Also insert your thumbdrive (which can’t be used for anything else)
- Double-click the file you downloaded to run the program.
- Accept the EULA and then choose the option to create installation media for another PC. The next screen should be pre-selected for your system, so just click the Next button and it will create your thumbdrive.
 If all the above sounds too complicated for you, then you might want to give Carbonite a look. This $60/year service doesn’t need an external hard drive, just an internet connection. While CrashPlan is good for backing up the same type of files as File History (and using CrashPlan with an external hard drive is free), Carbonite includes a complete image/system backup so you can recover from a crash. You have to balance your student budget against how much work you are capable of and willing to do. Using Windows’ built-in tools is cheapest, but more work than using an automated backup program or service.
 Lastly, it’s possible to use the built-in Windows backup tools with an online storage solution, but that would cost you as much as just using Carbonite ($60/year for Amazon Cloud Drive). And unless you want to pay even more money for a 3rd party app (like ExpanDrive), it would be more complicated to use. Basically, you’d create your file history and system image on your laptop’s hard drive and then upload them to Amazon Cloud Drive. Restoring files after a crash is also more complicated. So I’d recommend you either stick with the lowest cost solution: either a little more work on your part and a $60 or so external hard drive (one-time cost), or a little less work on your part with a service like Carbonite at $60/year.
This website runs on a patronage model. If you find my answers of value, please consider supporting me by sending any dollar amount via:
or by mailing a check/cash to PosiTek.net LLC 1934 Old Gallows Road, Suite 350, Tysons Corner VA 22182. I am not a non-profit, but your support helps me to continue delivering advice and consumer technology support to the public. Thanks!


Pingback: Dying Hard Drive - Practical Help for Your Digital Life®
Pingback: Thumbdrive Usage - Practical Help for Your Digital Life®
Pingback: My Old Windows XP - Practical Help for Your Digital Life®
Pingback: Windows 10 Tablet Mode - Practical Help for Your Digital Life®
Pingback: Windows 10 April Update - Practical Help for Your Digital Life®